Automatically add credits when an eligible Eazybe wallet reaches a low-balance threshold.
Auto payment charges a saved card and adds credits when the workspace wallet reaches your chosen threshold. Use it to reduce interruptions to eligible paid WhatsApp activity.
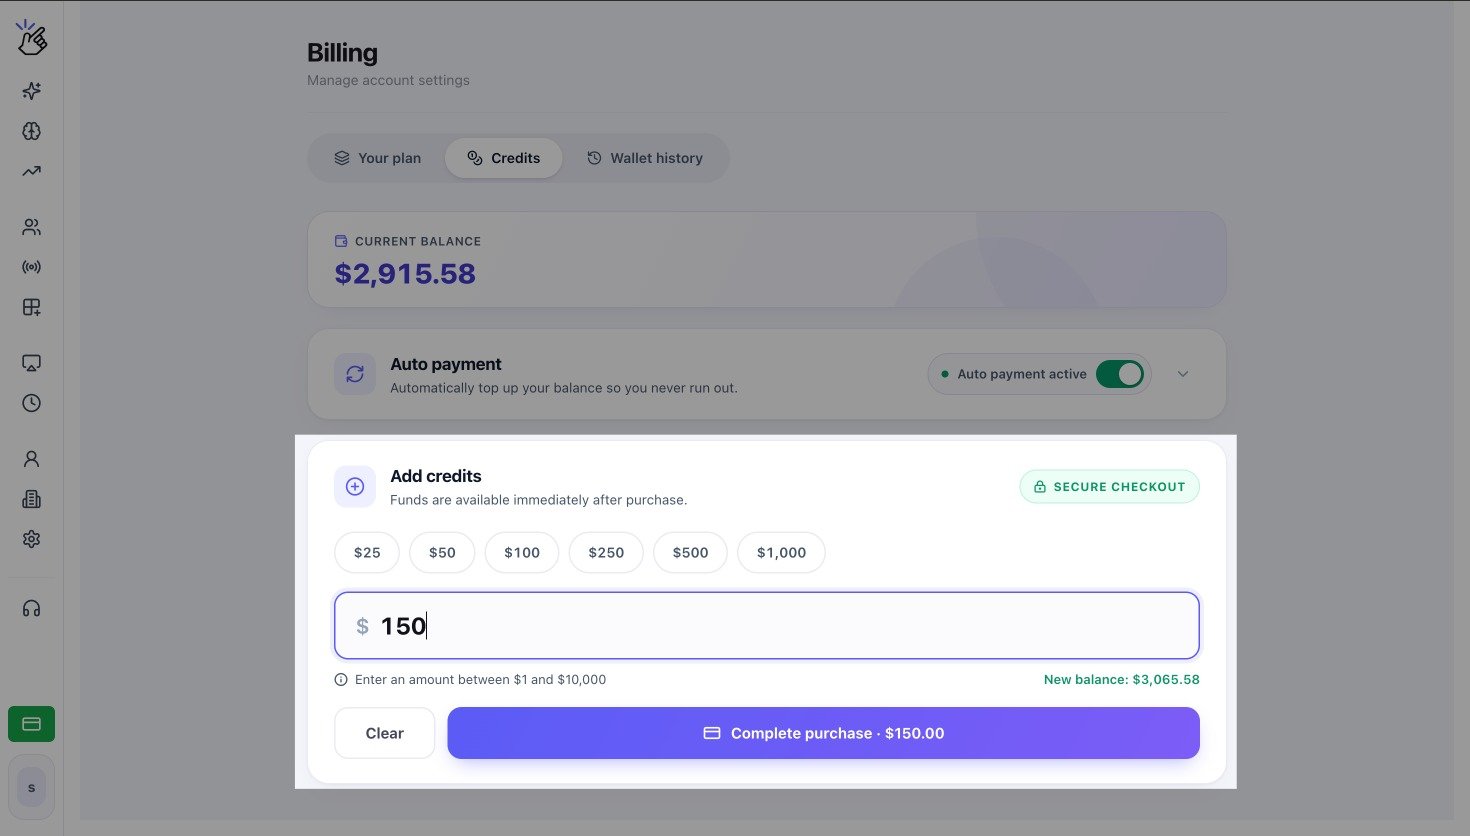
Credits tab with Auto payment status and Add credits
The balance, status, and purchase amounts in the screenshot are examples. Auto payment is currently available for USD wallets, and your workspace can show different values.
Confirm that the status changes to Auto payment active.
If this is the first setup, Eazybe uses the eligible card already saved for the workspace subscription.
Turning on auto payment authorizes future charges to the saved card. If Eazybe cannot find a usable subscription card, auto payment is not enabled. Update the subscription payment method or contact Eazybe Support, then try again.
Top up when below is the wallet balance that triggers auto payment.
Amount to add is charged to the saved card and added to the wallet after a successful payment.
The threshold must be lower than the amount to add.
For a USD wallet, the threshold must be at least USD 1, the amount to add must be at least USD 5, and each value can be up to USD 10,000.Example: if Top up when below is USD 5 and Amount to add is USD 50, Eazybe starts an automatic payment when the balance reaches USD 5 or less. A successful payment adds USD 50.
The example explains the trigger; it is not a recommended setting. Choose amounts that match your expected messaging usage and budget.
To stop future automatic top-ups, turn off the toggle and confirm Disable auto payment.
Disabling keeps the saved configuration so you can turn it on again later.
Check the status text to confirm whether auto payment is active.
Turning auto payment off does not add credits or cancel a payment that has already started. Check Wallet history when a payment was triggered near the time you disabled it.
Auto-payment activity is sent to the workspace account email and can also create an in-app notification.
Event
What you receive
Payment started
Amount and transaction ID
Payment successful
Amount, transaction ID, and updated balance when available
Payment failed
Failure reason, retry timing, and instructions for updating the payment method
Repeated failures
Auto payment is disabled after three failed attempts and a final email is sent
Was this page helpful?
{"docsConfig":{"theme":"mint","$schema":"https://mintlify.com/docs.json","name":"Eazybe","colors":{"primary":"#25D366","light":"#25D366","dark":"#128C7E"},"logo":{"light":"https://mintcdn.com/eazybe/TtjqbPeh2FMWJGex/logo/light.svg?fit=max\u0026auto=format\u0026n=TtjqbPeh2FMWJGex\u0026q=85\u0026s=a91766fca92028f00082929d6e241356","dark":"https://mintcdn.com/eazybe/TtjqbPeh2FMWJGex/logo/dark.svg?fit=max\u0026auto=format\u0026n=TtjqbPeh2FMWJGex\u0026q=85\u0026s=da7117b4a04f56dc6eb7f00e1d608b3f"},"favicon":"https://mintcdn.com/eazybe/TyMNKRVg-iXkJM5t/favicon3.png?fit=max\u0026auto=format\u0026n=TyMNKRVg-iXkJM5t\u0026q=85\u0026s=9b239a885e1067e5a90ddb398e9b242a","api":{"playground":{"display":"simple"},"examples":{"languages":["curl"]}},"search":{"prompt":"Search documentation..."},"seo":{},"styling":{"latex":true},"navigation":{"languages":[{"language":"en","href":"introduction"},{"language":"es","href":"es/introduction"},{"language":"pt","href":"pt/introduction"},{"language":"tr","href":"tr/introduction"}]}},"deployment":{"deploymentMetadataValue":{"subdomain":"eazybe","hasAudioNarration":false,"actualSubdomain":"eazybe","customDomains":["help.eazybe.com"],"gitSource":{"type":"github","owner":"eazybecode","repo":"docs","deployBranch":"main","contentDirectory":"","isPrivate":false,"mountPath":"","label":""},"chroma":{"liveDeploymentHistoryId":"6ada01e68b3d16364f982ee7","collectionId":"c90258c5-91f2-42c8-9e3c-660823f13000","schemaVersion":"v3","latestBuiltDeploymentHistoryId":"6ada01e68b3d16364f982ee7"},"feedback":{"thumbs":true,"edits":false},"entitlements":{},"buildId":"6ada01e68b3d16364f982ee7","clientVersion":"0.0.3939","searchFilterCounts":[{"language":"pt","tag":"Integrações CRM","count":220},{"language":"tr","tag":"CRM Entegrasyonları","count":218},{"language":"es","tag":"Integraciones CRM","count":217},{"language":"en","tag":"CRM Integrations","count":213},{"language":"en","tag":"Guides","count":114},{"language":"pt","tag":"Guias","count":101},{"language":"tr","tag":"Kılavuzlar","count":95},{"language":"es","tag":"Guías","count":90},{"language":"en","tag":"FAQ","count":59},{"language":"es","tag":"HubSpot","count":52},{"language":"pt","tag":"HubSpot","count":52},{"language":"tr","tag":"HubSpot","count":52},{"language":"en","tag":"HubSpot","count":49},{"language":"es","tag":"API Reference","count":46},{"language":"pt","tag":"API Reference","count":46},{"language":"tr","tag":"API Reference","count":46},{"language":"es","tag":"FAQ","count":45},{"language":"pt","tag":"FAQ","count":45},{"language":"tr","tag":"FAQ","count":45},{"language":"en","tag":"Zoho CRM","count":44},{"language":"es","tag":"Zoho CRM","count":44},{"language":"pt","tag":"Zoho CRM","count":44},{"language":"tr","tag":"Zoho CRM","count":44},{"language":"es","tag":"Documentación de la API de WABA","count":43},{"language":"pt","tag":"Documentação da API WABA","count":43},{"language":"tr","tag":"WABA API Dokümantasyonu","count":43},{"language":"es","tag":"Vista Mini-CRM","count":40},{"language":"pt","tag":"Vista Mini-CRM","count":40},{"language":"tr","tag":"Mini-CRM Görünümü","count":40},{"language":"en","tag":"Salesforce","count":37},{"language":"en","tag":"Mini-CRM View","count":35},{"language":"es","tag":"LeadSquared","count":33},{"language":"pt","tag":"LeadSquared","count":33},{"language":"tr","tag":"LeadSquared","count":33},{"language":"es","tag":"Salesforce","count":32},{"language":"pt","tag":"Salesforce","count":32},{"language":"tr","tag":"Salesforce","count":32},{"language":"en","tag":"LeadSquared","count":28},{"language":"en","tag":"API Reference","count":25},{"language":"en","tag":"Bitrix24","count":25}]},"assistantConfig":{"enableAskAiButton":false,"enableStarterQuestions":false,"enableAskAiSearchBar":true},"hasChatPermissions":false,"hasWebMcpPermissions":false,"toggles":[{"name":"kill-isr","enabled":true,"variant":{"name":"disabled","enabled":false,"feature_enabled":true},"impressionData":false},{"name":"agent-mintlify-slack","enabled":true,"variant":{"name":"disabled","enabled":false,"feature_enabled":true},"impressionData":false},{"name":"editor-v7-file-tree","enabled":true,"variant":{"name":"disabled","enabled":false,"feature_enabled":true},"impressionData":false},{"name":"agent-integrations-settings","enabled":true,"variant":{"name":"disabled","enabled":false,"feature_enabled":true},"impressionData":false},{"name":"automations-pr-grouping","enabled":true,"variant":{"name":"disabled","enabled":false,"feature_enabled":true},"impressionData":false},{"name":"custom-prefix","enabled":true,"variant":{"name":"disabled","enabled":false,"feature_enabled":true},"impressionData":false},{"name":"analytics-v7","enabled":true,"variant":{"name":"disabled","enabled":false,"feature_enabled":true},"impressionData":false},{"name":"user-flows-analytics","enabled":true,"variant":{"name":"disabled","enabled":false,"feature_enabled":true},"impressionData":false},{"name":"no-publish-flow","enabled":true,"variant":{"name":"disabled","enabled":false,"feature_enabled":true},"impressionData":false},{"name":"workos-onboarding","enabled":true,"variant":{"name":"disabled","enabled":false,"feature_enabled":true},"impressionData":false},{"name":"llms-txt-v2","enabled":true,"variant":{"name":"disabled","enabled":false,"feature_enabled":true},"impressionData":false},{"name":"pause-universal-search-reconcile","enabled":true,"variant":{"name":"disabled","enabled":false,"feature_enabled":true},"impressionData":false},{"name":"snapshot-serving-live","enabled":true,"variant":{"name":"disabled","enabled":false,"feature_enabled":true},"impressionData":false},{"name":"stripTemperatureMiddleware","enabled":true,"variant":{"name":"disabled","enabled":false,"feature_enabled":true},"impressionData":false},{"name":"per-site-search-delta","enabled":true,"variant":{"name":"disabled","enabled":false,"feature_enabled":true},"impressionData":false},{"name":"support-platform-pylon-zendesk","enabled":true,"variant":{"name":"disabled","enabled":false,"feature_enabled":true},"impressionData":false},{"name":"snapshot-serving","enabled":true,"variant":{"name":"disabled","enabled":false,"feature_enabled":true},"impressionData":false},{"name":"instant-rollback","enabled":true,"variant":{"name":"disabled","enabled":false,"feature_enabled":true},"impressionData":false},{"name":"granular-notifications-server","enabled":true,"variant":{"name":"disabled","enabled":false,"feature_enabled":true},"impressionData":false},{"name":"granular-notifications","enabled":true,"variant":{"name":"disabled","enabled":false,"feature_enabled":true},"impressionData":false},{"name":"editor-private-page-search","enabled":true,"variant":{"name":"disabled","enabled":false,"feature_enabled":true},"impressionData":false},{"name":"automations-fable","enabled":true,"variant":{"name":"disabled","enabled":false,"feature_enabled":true},"impressionData":false},{"name":"fixed-ai-action-pricing","enabled":true,"variant":{"name":"disabled","enabled":false,"feature_enabled":true},"impressionData":false},{"name":"automation-resolve-merge-conflict","enabled":true,"variant":{"name":"disabled","enabled":false,"feature_enabled":true},"impressionData":false},{"name":"scoped-publishing","enabled":true,"variant":{"name":"disabled","enabled":false,"feature_enabled":true},"impressionData":false},{"name":"mintql","enabled":true,"variant":{"name":"disabled","enabled":false,"feature_enabled":true},"impressionData":false},{"name":"page-level-analytics","enabled":true,"variant":{"name":"disabled","enabled":false,"feature_enabled":true},"impressionData":false},{"name":"editor-version-history-v2","enabled":true,"variant":{"name":"disabled","enabled":false,"feature_enabled":true},"impressionData":false},{"name":"editor-nav-generations","enabled":true,"variant":{"name":"disabled","enabled":false,"feature_enabled":true},"impressionData":false},{"name":"billing-page-v2","enabled":true,"variant":{"name":"disabled","enabled":false,"feature_enabled":true},"impressionData":false},{"name":"workspace-projects","enabled":true,"variant":{"name":"disabled","enabled":false,"feature_enabled":true},"impressionData":false},{"name":"assistant-v5","enabled":true,"variant":{"name":"disabled","enabled":false,"feature_enabled":true},"impressionData":false},{"name":"byok-sep-25","enabled":true,"variant":{"name":"disabled","enabled":false,"feature_enabled":true},"impressionData":false},{"name":"fork-pr-previews","enabled":true,"variant":{"name":"disabled","enabled":false,"feature_enabled":true},"impressionData":false},{"name":"revalidation-jwt","enabled":true,"variant":{"name":"disabled","enabled":false,"feature_enabled":true},"impressionData":false},{"name":"vite-origin","enabled":true,"variant":{"name":"disabled","enabled":false,"feature_enabled":true},"impressionData":false},{"name":"editor-agent-model-picker","enabled":true,"variant":{"name":"disabled","enabled":false,"feature_enabled":true},"impressionData":false},{"name":"billing-updated-9-15","enabled":true,"variant":{"name":"disabled","enabled":false,"feature_enabled":true},"impressionData":false},{"name":"hobby-abuse-scan","enabled":true,"variant":{"name":"disabled","enabled":false,"feature_enabled":true},"impressionData":false},{"name":"dashboard-inbox","enabled":true,"variant":{"name":"disabled","enabled":false,"feature_enabled":true},"impressionData":false}],"isAtlas":false,"googleFontsInlined":false},"customCss":[{"filePath":"style.css","content":"html[data-current-path*=\"/api-reference/meta/operations/\"] .api-section-heading-title+.flex.items-center{display:none}html[data-current-path*=\"/api-reference/meta/operations/\"] .api-section>.object-param-field>div>div:has(>div pre)>div:not(:has(pre)){display:none}"}],"page":{"pagePath":"en/billing/auto-payment","slug":"/en/billing/auto-payment","pageMetadata":{"title":"Set Up Auto Payment","description":"Automatically add credits when an eligible Eazybe wallet reaches a low-balance threshold.","href":"/en/billing/auto-payment"},"description":{"compiledSource":"\"use strict\";\nconst {jsx: _jsx} = arguments[0];\nconst {useMDXComponents: _provideComponents} = arguments[0];\nfunction _createMdxContent(props) {\n const _components = {\n p: \"p\",\n ..._provideComponents(),\n ...props.components\n };\n return _jsx(_components.p, {\n children: \"Automatically add credits when an eligible Eazybe wallet reaches a low-balance threshold.\"\n });\n}\nfunction MDXContent(props = {}) {\n const {wrapper: MDXLayout} = {\n ..._provideComponents(),\n ...props.components\n };\n return MDXLayout ? _jsx(MDXLayout, {\n ...props,\n children: _jsx(_createMdxContent, {\n ...props\n })\n }) : _createMdxContent(props);\n}\nreturn {\n default: MDXContent\n};\n","frontmatter":{},"scope":{}},"pageType":"default","mdx":{"mdxSource":{"compiledSource":"\"use strict\";const{Fragment:_Fragment,jsx:_jsx,jsxs:_jsxs}=arguments[0];const{useMDXComponents:_provideComponents}=arguments[0];function _createMdxContent(props){const _components={li:`li`,ol:`ol`,p:`p`,strong:`strong`,tbody:`tbody`,td:`td`,th:`th`,thead:`thead`,tr:`tr`,ul:`ul`,..._provideComponents(),...props.components},{Frame,Heading,OptimizedImage,Table,Warning}=_components;if(!Frame)_missingMdxReference(`Frame`,true);if(!Heading)_missingMdxReference(`Heading`,true);if(!OptimizedImage)_missingMdxReference(`OptimizedImage`,true);if(!Table)_missingMdxReference(`Table`,true);if(!Warning)_missingMdxReference(`Warning`,true);return _jsxs(_Fragment,{children:[_jsx(_components.p,{children:`Auto payment charges a saved card and adds credits when the workspace wallet reaches your chosen threshold. Use it to reduce interruptions to eligible paid WhatsApp activity.`}),`\n`,_jsx(Frame,{caption:`Credits tab with Auto payment status and Add credits`,children:_jsx(OptimizedImage,{src:`https://mintcdn.com/eazybe/4wWkvFsdEgURCh_5/images/billing/add-credits.jpeg?fit=max\u0026auto=format\u0026n=4wWkvFsdEgURCh_5\u0026q=85\u0026s=d846b4ca72a39df2c53fd7d77d3dff56`,alt:`Eazybe Credits tab showing Current balance, Auto payment active status and toggle, and Add credits`,\"data-og-width\":`1470`,width:`1470`,\"data-og-height\":`836`,height:`836`,\"data-path\":`images/billing/add-credits.jpeg`,\"data-optimize\":`true`,\"data-opv\":`3`,srcset:`https://mintcdn.com/eazybe/4wWkvFsdEgURCh_5/images/billing/add-credits.jpeg?w=280\u0026fit=max\u0026auto=format\u0026n=4wWkvFsdEgURCh_5\u0026q=85\u0026s=1eded72711227f3b6048205790c7e4e7 280w, https://mintcdn.com/eazybe/4wWkvFsdEgURCh_5/images/billing/add-credits.jpeg?w=560\u0026fit=max\u0026auto=format\u0026n=4wWkvFsdEgURCh_5\u0026q=85\u0026s=34291dd1c0f0d8d2020bfa28194e6421 560w, https://mintcdn.com/eazybe/4wWkvFsdEgURCh_5/images/billing/add-credits.jpeg?w=840\u0026fit=max\u0026auto=format\u0026n=4wWkvFsdEgURCh_5\u0026q=85\u0026s=de232723e46bbb2bcc8897fe3dd7ad04 840w, https://mintcdn.com/eazybe/4wWkvFsdEgURCh_5/images/billing/add-credits.jpeg?w=1100\u0026fit=max\u0026auto=format\u0026n=4wWkvFsdEgURCh_5\u0026q=85\u0026s=73707072231c3291930a01a64eba7fcd 1100w, https://mintcdn.com/eazybe/4wWkvFsdEgURCh_5/images/billing/add-credits.jpeg?w=1650\u0026fit=max\u0026auto=format\u0026n=4wWkvFsdEgURCh_5\u0026q=85\u0026s=c1e7b2040e25133b379fc00eed0b3ee4 1650w, https://mintcdn.com/eazybe/4wWkvFsdEgURCh_5/images/billing/add-credits.jpeg?w=2500\u0026fit=max\u0026auto=format\u0026n=4wWkvFsdEgURCh_5\u0026q=85\u0026s=08bbdcff03b2d0a421f6e213c746c39b 2500w`})}),`\n`,_jsx(Warning,{children:_jsx(_components.p,{children:`The balance, status, and purchase amounts in the screenshot are examples. Auto payment is currently available for USD wallets, and your workspace can show different values.`})}),`\n`,_jsx(Heading,{level:`2`,id:`turn-on-auto-payment`,children:`Turn On Auto Payment`}),`\n`,_jsxs(_components.ol,{children:[`\n`,_jsxs(_components.li,{children:[`Open `,_jsx(_components.strong,{children:`Settings → Billing → Credits`}),`.`]}),`\n`,_jsxs(_components.li,{children:[`Expand `,_jsx(_components.strong,{children:`Auto payment`}),` if the panel is collapsed.`]}),`\n`,_jsxs(_components.li,{children:[`Turn on the `,_jsx(_components.strong,{children:`Auto payment`}),` toggle.`]}),`\n`,_jsxs(_components.li,{children:[`Confirm `,_jsx(_components.strong,{children:`Top up when below`}),` and `,_jsx(_components.strong,{children:`Amount to add`}),`.`]}),`\n`,_jsxs(_components.li,{children:[`Confirm that the status changes to `,_jsx(_components.strong,{children:`Auto payment active`}),`.`]}),`\n`]}),`\n`,_jsx(_components.p,{children:`If this is the first setup, Eazybe uses the eligible card already saved for the workspace subscription.`}),`\n`,_jsx(Warning,{children:_jsx(_components.p,{children:`Turning on auto payment authorizes future charges to the saved card. If Eazybe cannot find a usable subscription card, auto payment is not enabled. Update the subscription payment method or contact Eazybe Support, then try again.`})}),`\n`,_jsx(Heading,{level:`2`,id:`choose-the-amounts`,children:`Choose the Amounts`}),`\n`,_jsxs(_components.ul,{children:[`\n`,_jsxs(_components.li,{children:[_jsx(_components.strong,{children:`Top up when below`}),` is the wallet balance that triggers auto payment.`]}),`\n`,_jsxs(_components.li,{children:[_jsx(_components.strong,{children:`Amount to add`}),` is charged to the saved card and added to the wallet after a successful payment.`]}),`\n`,_jsx(_components.li,{children:`The threshold must be lower than the amount to add.`}),`\n`]}),`\n`,_jsx(_components.p,{children:`For a USD wallet, the threshold must be at least USD 1, the amount to add must be at least USD 5, and each value can be up to USD 10,000.`}),`\n`,_jsxs(_components.p,{children:[`Example: if `,_jsx(_components.strong,{children:`Top up when below`}),` is USD 5 and `,_jsx(_components.strong,{children:`Amount to add`}),` is USD 50, Eazybe starts an automatic payment when the balance reaches USD 5 or less. A successful payment adds USD 50.`]}),`\n`,_jsx(Warning,{children:_jsx(_components.p,{children:`The example explains the trigger; it is not a recommended setting. Choose amounts that match your expected messaging usage and budget.`})}),`\n`,_jsx(Heading,{level:`2`,id:`change-the-amounts`,children:`Change the Amounts`}),`\n`,_jsxs(_components.ol,{children:[`\n`,_jsx(_components.li,{children:`Select an amount field or its pencil icon.`}),`\n`,_jsxs(_components.li,{children:[`Update `,_jsx(_components.strong,{children:`Top up when below`}),` and `,_jsx(_components.strong,{children:`Amount to add`}),`.`]}),`\n`,_jsxs(_components.li,{children:[`Select `,_jsx(_components.strong,{children:`Save changes`}),`.`]}),`\n`,_jsx(_components.li,{children:`Recheck the summary shown in the panel.`}),`\n`]}),`\n`,_jsx(Heading,{level:`2`,id:`change-the-payment-card`,children:`Change the Payment Card`}),`\n`,_jsxs(_components.ol,{children:[`\n`,_jsxs(_components.li,{children:[`Select `,_jsx(_components.strong,{children:`Change card`}),` beside the saved card.`]}),`\n`,_jsx(_components.li,{children:`Enter the new card details on the secure Stripe page and complete the setup.`}),`\n`,_jsxs(_components.li,{children:[`Return to `,_jsx(_components.strong,{children:`Credits`}),` and confirm that the card brand and last four digits have updated.`]}),`\n`]}),`\n`,_jsx(_components.p,{children:`Eazybe displays only the saved card brand and last four digits in the workspace.`}),`\n`,_jsx(Heading,{level:`2`,id:`turn-auto-payment-off-or-on-again`,children:`Turn Auto Payment Off or On Again`}),`\n`,_jsxs(_components.ul,{children:[`\n`,_jsxs(_components.li,{children:[`To stop future automatic top-ups, turn off the toggle and confirm `,_jsx(_components.strong,{children:`Disable auto payment`}),`.`]}),`\n`,_jsx(_components.li,{children:`Disabling keeps the saved configuration so you can turn it on again later.`}),`\n`,_jsx(_components.li,{children:`Check the status text to confirm whether auto payment is active.`}),`\n`]}),`\n`,_jsx(Warning,{children:_jsxs(_components.p,{children:[`Turning auto payment off does not add credits or cancel a payment that has already started. Check `,_jsx(_components.strong,{children:`Wallet history`}),` when a payment was triggered near the time you disabled it.`]})}),`\n`,_jsx(Heading,{level:`2`,id:`emails-and-notifications`,children:`Emails and Notifications`}),`\n`,_jsx(_components.p,{children:`Auto-payment activity is sent to the workspace account email and can also create an in-app notification.`}),`\n`,_jsxs(Table,{children:[_jsx(_components.thead,{children:_jsxs(_components.tr,{children:[_jsx(_components.th,{children:`Event`}),_jsx(_components.th,{children:`What you receive`})]})}),_jsxs(_components.tbody,{children:[_jsxs(_components.tr,{children:[_jsx(_components.td,{children:`Payment started`}),_jsx(_components.td,{children:`Amount and transaction ID`})]}),_jsxs(_components.tr,{children:[_jsx(_components.td,{children:`Payment successful`}),_jsx(_components.td,{children:`Amount, transaction ID, and updated balance when available`})]}),_jsxs(_components.tr,{children:[_jsx(_components.td,{children:`Payment failed`}),_jsx(_components.td,{children:`Failure reason, retry timing, and instructions for updating the payment method`})]}),_jsxs(_components.tr,{children:[_jsx(_components.td,{children:`Repeated failures`}),_jsx(_components.td,{children:`Auto payment is disabled after three failed attempts and a final email is sent`})]})]})]})]})}function MDXContent(props={}){const{wrapper:MDXLayout}={..._provideComponents(),...props.components};return MDXLayout?_jsx(MDXLayout,{...props,children:_jsx(_createMdxContent,{...props})}):_createMdxContent(props)}return{default:MDXContent};function _missingMdxReference(id,component){throw new Error(`Expected `+(component?`component`:`object`)+\" `\"+id+\"` to be defined: you likely forgot to import, pass, or provide it.\")}","frontmatter":{},"scope":{"config":{},"pageMetadata":{"title":"Set Up Auto Payment","description":"Automatically add credits when an eligible Eazybe wallet reaches a low-balance threshold.","href":"/en/billing/auto-payment"}}},"mdxSourceWithNoJs":null},"mdxExtracts":{"tableOfContents":[{"title":"Turn On Auto Payment","slug":"turn-on-auto-payment","depth":2,"children":[]},{"title":"Choose the Amounts","slug":"choose-the-amounts","depth":2,"children":[]},{"title":"Change the Amounts","slug":"change-the-amounts","depth":2,"children":[]},{"title":"Change the Payment Card","slug":"change-the-payment-card","depth":2,"children":[]},{"title":"Turn Auto Payment Off or On Again","slug":"turn-auto-payment-off-or-on-again","depth":2,"children":[]},{"title":"Emails and Notifications","slug":"emails-and-notifications","depth":2,"children":[]}],"codeExamples":{}},"jsLinks":[],"subdomain":"eazybe","siteName":"Eazybe","title":"Set Up Auto Payment - Eazybe","navMaps":{"firstHrefInVersion":{},"firstHrefInLanguage":{"en":{"href":"/en/billing/auto-payment","matchLevel":0},"es":{"href":"/es/billing/auto-payment","matchLevel":1},"pt":{"href":"/pt/billing/auto-payment","matchLevel":1},"tr":{"href":"/tr/billing/auto-payment","matchLevel":1}}},"lastModified":"2026-08-21T01:28:45.355Z","originalFileLocation":"en/billing/auto-payment.mdx","locale":"en"},"headHtml":"\u003cscript data-mint-head>(function(){var d=document.documentElement,p=null;if(!p){try{p=localStorage.getItem(\"isDarkMode\")}catch(e){}if(p==='true')p='dark';else if(p==='false')p='light';if(p!=='light'\u0026\u0026p!=='dark'\u0026\u0026p!=='system')p=\"system\"}var r=p==='system'?(matchMedia(\"(prefers-color-scheme: dark)\").matches?'dark':'light'):p;d.classList.remove(r==='dark'?'light':'dark');d.classList.add(r);d.setAttribute(\"data-theme-preference\",p)})();\u003c/script>\u003cmeta data-mint-head name=\"description\" content=\"Automatically add credits when an eligible Eazybe wallet reaches a low-balance threshold.\">\u003cmeta data-mint-head name=\"application-name\" content=\"Eazybe\">\u003cmeta data-mint-head name=\"generator\" content=\"Mintlify\">\u003clink data-mint-head rel=\"icon\" type=\"image/png\" sizes=\"192x192\" href=\"/mintlify-assets/_mintlify/favicons/eazybe/8d_rplKX7vJFV0iB/_generated/favicon/android-chrome-192x192.png\" media=\"(prefers-color-scheme: light)\">\u003clink data-mint-head rel=\"apple-touch-icon\" type=\"image/png\" sizes=\"180x180\" href=\"/mintlify-assets/_mintlify/favicons/eazybe/8d_rplKX7vJFV0iB/_generated/favicon/apple-touch-icon.png\">\u003clink data-mint-head rel=\"icon\" type=\"image/png\" sizes=\"16x16\" href=\"/mintlify-assets/_mintlify/favicons/eazybe/8d_rplKX7vJFV0iB/_generated/favicon/favicon-16x16.png\" media=\"(prefers-color-scheme: light)\">\u003clink data-mint-head rel=\"icon\" type=\"image/png\" sizes=\"32x32\" href=\"/mintlify-assets/_mintlify/favicons/eazybe/8d_rplKX7vJFV0iB/_generated/favicon/favicon-32x32.png\" media=\"(prefers-color-scheme: light)\">\u003clink data-mint-head rel=\"shortcut icon\" type=\"image/x-icon\" href=\"/mintlify-assets/_mintlify/favicons/eazybe/8d_rplKX7vJFV0iB/_generated/favicon/favicon.ico\" media=\"(prefers-color-scheme: light)\">\u003clink data-mint-head rel=\"icon\" type=\"image/png\" sizes=\"192x192\" href=\"/mintlify-assets/_mintlify/favicons/eazybe/8d_rplKX7vJFV0iB/_generated/favicon-dark/android-chrome-192x192.png\" media=\"(prefers-color-scheme: dark)\">\u003clink data-mint-head rel=\"icon\" type=\"image/png\" sizes=\"16x16\" href=\"/mintlify-assets/_mintlify/favicons/eazybe/8d_rplKX7vJFV0iB/_generated/favicon-dark/favicon-16x16.png\" media=\"(prefers-color-scheme: dark)\">\u003clink data-mint-head rel=\"icon\" type=\"image/png\" sizes=\"32x32\" href=\"/mintlify-assets/_mintlify/favicons/eazybe/8d_rplKX7vJFV0iB/_generated/favicon-dark/favicon-32x32.png\" media=\"(prefers-color-scheme: dark)\">\u003clink data-mint-head rel=\"shortcut icon\" type=\"image/x-icon\" href=\"/mintlify-assets/_mintlify/favicons/eazybe/8d_rplKX7vJFV0iB/_generated/favicon-dark/favicon.ico\" media=\"(prefers-color-scheme: dark)\">\u003cmeta data-mint-head property=\"og:title\" content=\"Set Up Auto Payment - Eazybe\">\u003cmeta data-mint-head property=\"og:description\" content=\"Automatically add credits when an eligible Eazybe wallet reaches a low-balance threshold.\">\u003cmeta data-mint-head property=\"og:site_name\" content=\"Eazybe\">\u003cmeta data-mint-head property=\"og:url\" content=\"https://help.eazybe.com/en/billing/auto-payment\">\u003cmeta data-mint-head property=\"og:type\" content=\"website\">\u003cmeta data-mint-head property=\"og:image\" content=\"https://eazybe.mintlify.app/_mintlify/api/og/v2?division=Credits\u0026amp;title=Set+Up+Auto+Payment\u0026amp;description=Automatically+add+credits+when+an+eligible+Eazybe+wallet+reaches+a+low-balance+threshold.\u0026amp;theme=5608b398addef50962897bbb\u0026amp;signature=aef065593325fd6ec7b15cc1859bb0f1541138be68f0848702ee76c41a5f2c74\">\u003cmeta data-mint-head property=\"og:image:width\" content=\"1200\">\u003cmeta data-mint-head property=\"og:image:height\" content=\"630\">\u003cmeta data-mint-head name=\"twitter:card\" content=\"summary_large_image\">\u003cmeta data-mint-head name=\"twitter:title\" content=\"Set Up Auto Payment - Eazybe\">\u003cmeta data-mint-head name=\"twitter:description\" content=\"Automatically add credits when an eligible Eazybe wallet reaches a low-balance threshold.\">\u003cmeta data-mint-head name=\"twitter:image\" content=\"https://eazybe.mintlify.app/_mintlify/api/og/v2?division=Credits\u0026amp;title=Set+Up+Auto+Payment\u0026amp;description=Automatically+add+credits+when+an+eligible+Eazybe+wallet+reaches+a+low-balance+threshold.\u0026amp;theme=5608b398addef50962897bbb\u0026amp;signature=aef065593325fd6ec7b15cc1859bb0f1541138be68f0848702ee76c41a5f2c74\">\u003cmeta data-mint-head name=\"twitter:image:width\" content=\"1200\">\u003cmeta data-mint-head name=\"twitter:image:height\" content=\"630\">\u003cmeta data-mint-head name=\"msapplication-config\" content=\"/mintlify-assets/_mintlify/favicons/eazybe/8d_rplKX7vJFV0iB/_generated/favicon/browserconfig.xml\">\u003cmeta data-mint-head name=\"apple-mobile-web-app-title\" content=\"Eazybe\">\u003cmeta data-mint-head name=\"msapplication-TileColor\" content=\"#25D366\">\u003clink data-mint-head rel=\"canonical\" href=\"https://help.eazybe.com/en/billing/auto-payment\">\u003clink data-mint-head rel=\"alternate\" type=\"application/xml\" href=\"/sitemap.xml\">\u003clink data-mint-head rel=\"alternate\" type=\"text/markdown\" href=\"/en/billing/auto-payment.md\">\u003clink data-mint-head rel=\"alternate\" hreflang=\"en\" href=\"https://help.eazybe.com/en/billing/auto-payment\">\u003clink data-mint-head rel=\"alternate\" hreflang=\"es\" href=\"https://help.eazybe.com/es/billing/auto-payment\">\u003clink data-mint-head rel=\"alternate\" hreflang=\"pt\" href=\"https://help.eazybe.com/pt/billing/auto-payment\">\u003clink data-mint-head rel=\"alternate\" hreflang=\"tr\" href=\"https://help.eazybe.com/tr/billing/auto-payment\">\u003clink data-mint-head rel=\"alternate\" hreflang=\"x-default\" href=\"https://help.eazybe.com/en/billing/auto-payment\">\u003cscript data-mint-head type=\"application/ld+json\">{\"@context\":\"https://schema.org\",\"@graph\":[{\"@type\":\"Organization\",\"@id\":\"https://help.eazybe.com/#organization\",\"name\":\"Eazybe\",\"url\":\"https://help.eazybe.com\",\"logo\":{\"@type\":\"ImageObject\",\"url\":\"https://mintcdn.com/eazybe/TtjqbPeh2FMWJGex/logo/light.svg?fit=max\u0026auto=format\u0026n=TtjqbPeh2FMWJGex\u0026q=85\u0026s=a91766fca92028f00082929d6e241356\"}},{\"@type\":\"WebSite\",\"@id\":\"https://help.eazybe.com#website\",\"name\":\"Eazybe\",\"url\":\"https://help.eazybe.com\",\"publisher\":{\"@id\":\"https://help.eazybe.com/#organization\"}},{\"@type\":\"WebPage\",\"@id\":\"https://help.eazybe.com/en/billing/auto-payment#webpage\",\"url\":\"https://help.eazybe.com/en/billing/auto-payment\",\"name\":\"Set Up Auto Payment\",\"description\":\"Automatically add credits when an eligible Eazybe wallet reaches a low-balance threshold.\",\"dateModified\":\"2026-08-21T01:28:45.355Z\",\"isPartOf\":{\"@id\":\"https://help.eazybe.com#website\"},\"breadcrumb\":{\"@id\":\"https://help.eazybe.com/en/billing/auto-payment#breadcrumb\"}},{\"@type\":\"BreadcrumbList\",\"@id\":\"https://help.eazybe.com/en/billing/auto-payment#breadcrumb\",\"itemListElement\":[{\"@type\":\"ListItem\",\"position\":1,\"name\":\"Billing \u0026 Payment\",\"item\":\"https://help.eazybe.com/en/billing/overview\"},{\"@type\":\"ListItem\",\"position\":2,\"name\":\"Credits\",\"item\":\"https://help.eazybe.com/en/billing/credits-overview\"},{\"@type\":\"ListItem\",\"position\":3,\"name\":\"Set Up Auto Payment\",\"item\":\"https://help.eazybe.com/en/billing/auto-payment\"}]},{\"@type\":[\"Article\",\"TechArticle\"],\"@id\":\"https://help.eazybe.com/en/billing/auto-payment#article\",\"headline\":\"Set Up Auto Payment\",\"name\":\"Set Up Auto Payment\",\"description\":\"Automatically add credits when an eligible Eazybe wallet reaches a low-balance threshold.\",\"url\":\"https://help.eazybe.com/en/billing/auto-payment\",\"mainEntityOfPage\":{\"@id\":\"https://help.eazybe.com/en/billing/auto-payment#webpage\"},\"dateModified\":\"2026-08-21T01:28:45.355Z\",\"publisher\":{\"@id\":\"https://help.eazybe.com/#organization\"},\"isPartOf\":{\"@id\":\"https://help.eazybe.com#website\"}}]}\u003c/script>\u003cscript data-mint-head type=\"application/ld+json\">{\"@context\":\"https://schema.org\",\"@type\":\"WebSite\",\"name\":\"Eazybe\",\"creator\":{\"@type\":\"Organization\",\"name\":\"Mintlify\",\"url\":\"https://mintlify.com\"}}\u003c/script>","siteName":"Eazybe","nav":{"global":null,"languages":[{"language":"en","tabs":[{"tab":"Guides","groups":[{"group":"Getting Started","icon":"rocket","pages":[{"title":"Introduction","href":"/introduction"},{"title":"Quick Start","href":"/quickstart"},{"group":"Setup","pages":[{"title":"Eazybe Onboarding: Your First Steps to AI-Powered WhatsApp","href":"/en/getting-started/eazybe-onboarding-en"},{"title":"Onboarding to Coexistence via Eazybe","href":"/en/getting-started/onboarding-to-coexistence"}]},{"group":"Cloud WhatsApp","pages":[{"title":"About Cloud WhatsApp","href":"/en/getting-started/cloud-whatsapp/about"},{"title":"How to Connect","href":"/en/getting-started/cloud-whatsapp/how-to-connect"},{"title":"Disconnect Cloud","href":"/en/getting-started/cloud-whatsapp/disconnect"},{"title":"Compliance and Privacy","href":"/en/getting-started/cloud-whatsapp/compliance-and-privacy"},{"group":"FAQ","pages":[{"title":"Connection Check","href":"/en/getting-started/cloud-whatsapp/connection-check"},{"title":"Disconnection Check","href":"/en/getting-started/cloud-whatsapp/disconnection-check"},{"title":"Backup and Scheduling","href":"/en/getting-started/cloud-whatsapp/backup-and-scheduling"},{"title":"CRM Integration","href":"/en/getting-started/cloud-whatsapp/crm-integration"},{"title":"Prerequisites","href":"/en/getting-started/cloud-whatsapp/prerequisites"},{"title":"Connection Issues","href":"/en/getting-started/cloud-whatsapp/connection-issue"},{"title":"Free Trial","href":"/en/getting-started/cloud-whatsapp/free-trial"}]}]}]},{"group":"Team Inbox","icon":"users","pages":[{"title":"Overview","href":"/en/team-inbox-hd/team-inbox-hd-en"},{"title":"Setup \u0026 Access","href":"/en/team-inbox-hd/setup-and-access-en"},{"title":"Find Conversations by Filters","href":"/en/team-inbox-hd/filters-in-team-inbox-en"},{"title":"Manage Conversations","href":"/en/team-inbox-hd/manage-conversations-en"},{"title":"Messages, Templates \u0026 Quick Replies","href":"/en/team-inbox-hd/messages-templates-quick-replies-en"},{"title":"New Chats \u0026 Acquisition","href":"/en/team-inbox-hd/new-chats-and-acquisition-en"},{"title":"AI Features","href":"/en/team-inbox-hd/ai-features-en"},{"title":"Customer Details \u0026 HubSpot","href":"/en/team-inbox-hd/customer-details-and-hubspot-en"},{"title":"Troubleshooting","href":"/en/team-inbox-hd/troubleshooting-en"}]},{"group":"Voice Number","icon":"phone","pages":[{"title":"Overview","href":"/en/voice-number/overview"},{"title":"Dialer","href":"/en/voice-number/dialer"},{"title":"Auto Dialer","href":"/en/voice-number/auto-dialer"},{"title":"Buy and Manage Phone Numbers","href":"/en/voice-number/phone-numbers"},{"title":"Call History","href":"/en/voice-number/call-history"},{"title":"Call Analytics","href":"/en/voice-number/call-analytics"},{"title":"SMS","href":"/en/voice-number/sms"},{"title":"Voice Number Billing","href":"/en/voice-number/billing-subscription"}]},{"group":"Message Templates","icon":"message","pages":[{"title":"Create Template","href":"/en/waba/templates/create-template"},{"title":"Create Template with Extension","href":"/en/waba/templates/create-template-with-extension"},{"title":"How to Create a Template with HubSpot Variables","href":"/en/waba/templates/how-to-create-template-with-hubspot-variables"},{"title":"Utility Templates","href":"/en/waba/templates/utility-templates"},{"title":"Guideline","href":"/en/waba/templates/guideline"}]},{"group":"Broadcasts","icon":"bullhorn","pages":[{"title":"Broadcasts Overview","href":"/en/broadcasts/overview"},{"title":"How Broadcasts Work","href":"/en/broadcasts/how-broadcasts-work"},{"group":"Analytics","pages":[{"title":"Analytics Overview","href":"/en/broadcasts/broadcast-home"},{"title":"Filter Broadcasts and Templates","href":"/en/broadcasts/filter-broadcasts-and-templates"},{"title":"Compare Numbers by Date","href":"/en/broadcasts/compare-numbers-by-date"},{"title":"Customize and Export Reports","href":"/en/broadcasts/customize-and-export-reports"},{"title":"View Broadcast Analytics","href":"/en/broadcasts/view-analytics"}]},{"group":"Create a broadcast","pages":[{"group":"Create Broadcast from Workspace","pages":[{"title":"Create a New Broadcast","href":"/en/broadcasts/create-broadcast"},{"title":"Upload Contacts for a Broadcast","href":"/en/broadcasts/upload-contacts"},{"title":"Broadcast to a HubSpot Contact or Deal Segment","href":"/en/broadcasts/hubspot-contact-list"},{"title":"Template Variables and Personalization","href":"/en/broadcasts/template-variables"},{"title":"Review Estimated Cost and Send","href":"/en/broadcasts/estimated-cost-and-sending"}]},{"title":"Create Broadcast with Extension","href":"/en/waba/broadcasting/create-broadcast-with-extension"},{"title":"Send Ready-to-Use Template through HubSpot Workflow","href":"/en/waba/broadcasting/hubspot-workflow/send-ready-to-use-template"},{"title":"Send Wait and Reply Template through HubSpot Workflow","href":"/en/waba/broadcasting/hubspot-workflow/send-wait-and-reply-template"},{"title":"Send WhatsApp Messages through a Zoho Workflow","href":"/en/waba/broadcasting/zoho-workflow/send-whatsapp-message"}]},{"title":"Troubleshoot Broadcasts","href":"/en/broadcasts/troubleshooting"}]},{"group":"Revenue Inbox","icon":"inbox","pages":[{"title":"Overview","href":"/revenue-inbox/overview"},{"title":"Dashboard","href":"/revenue-inbox/dashboard"},{"group":"Conversation Management","pages":[{"title":"Viewing Conversations","href":"/revenue-inbox/viewing-conversations"},{"title":"Conversation States","href":"/revenue-inbox/conversation-states"},{"title":"Assigning Conversations","href":"/revenue-inbox/assigning-conversations"},{"title":"Internal Notes","href":"/revenue-inbox/internal-notes"},{"title":"Saved Replies","href":"/revenue-inbox/saved-replies"},{"title":"Managing WABA Conversations in Your Team Inbox","href":"/en/revenue-inbox/team-inbox"}]},{"group":"Labels \u0026 Funnels","pages":[{"title":"Labels","href":"/revenue-inbox/labels"},{"title":"Dynamic Labels","href":"/revenue-inbox/dynamic-labels"},{"title":"Funnels","href":"/revenue-inbox/funnels"}]},{"group":"Team Productivity","pages":[{"title":"Response Times","href":"/revenue-inbox/response-times"},{"title":"Unreplied Chats","href":"/revenue-inbox/unreplied-chats"},{"title":"Performance Metrics","href":"/revenue-inbox/performance-metrics"}]}]},{"group":"WhatsApp Business API","icon":"whatsapp","pages":[{"title":"Getting Started","href":"/en/waba/getting-started"},{"title":"Connect with WABA","href":"/en/waba/connect-waba"},{"title":"Back Up 6 Months of WhatsApp Chats","sidebarTitle":"6-Month Chat Backup","href":"/en/waba/6-month-chat-backup"},{"title":"Set Up WABA Disconnect Alerts","href":"/en/waba/waba-disconnect-alerts"},{"title":"Facebook Business Verification","href":"/en/waba/facebook-business-verification"},{"group":"Meta Pricing","pages":[{"title":"Broadcast Rate List (1 October 2026)","href":"/en/waba/broadcast-rate-list-1st-jan-2026"},{"title":"Service Message Charges","href":"/en/waba/service-message-charges"}]},{"group":"Broadcasting","hidden":true,"pages":[{"title":"Template-Based Chatbot","href":"/en/waba/broadcasting/template-based-chatbot"}]},{"group":"Embedded Signup Troubleshooting","pages":[{"title":"Signup Troubleshooting","href":"/en/waba/signup-troubleshooting"},{"title":"Business Partner Already Connected","href":"/en/waba/business-partner-already-connected"}]},{"title":"Connect with Existing WhatsApp","href":"/en/waba/connect-with-existing-whatsapp"},{"title":"Onboarding to Coex/API","href":"/en/waba/onboarding-to-coex-api"},{"title":"FAQ","href":"/en/waba/faq"}]},{"group":"Productivity Tools","icon":"bolt","pages":[{"title":"Message Templates","href":"/productivity/message-templates"},{"title":"Privacy Blur","href":"/productivity/privacy-blur"},{"title":"Start Chat","href":"/en/productivity/start-chat"},{"title":"Quick Reply","href":"/en/productivity/quick-reply"},{"title":"Setting Button","href":"/en/productivity/setting-button"},{"title":"Broadcast Messages","href":"/en/productivity/broadcast-messages"},{"title":"Scheduler Message","href":"/en/productivity/scheduler-message"},{"title":"Managing Unreplied Chats","href":"/en/productivity/managing-unreplied-chats"}]},{"group":"Analytics \u0026 Reports","icon":"chart-line","pages":[{"title":"Analytics Dashboard","href":"/analytics/dashboard"},{"title":"Team Performance","href":"/analytics/team-performance"},{"title":"Conversation Analytics","href":"/analytics/conversation-analytics"},{"title":"Broadcast Reports","href":"/analytics/broadcast-reports"},{"title":"Export Data","href":"/analytics/export-data"}]},{"group":"Billing \u0026 Payment","icon":"credit-card","pages":[{"title":"Billing Overview","href":"/en/billing/overview"},{"title":"Purchase or Manage a Plan","href":"/en/billing/plan-purchase"},{"group":"Credits","pages":[{"title":"Overview","href":"/en/billing/credits-overview"},{"title":"Add Credits to Your Wallet","description":"Add Eazybe wallet credits with a secure one-time payment.","href":"/en/billing/wallet-recharge"},{"title":"Set Up Auto Payment","href":"/en/billing/auto-payment"}]},{"title":"Add Billing and Tax Details","description":"Verify GST information for eligible INR payments and future tax invoices.","href":"/en/billing/billing-taxation"},{"title":"Review Wallet History","href":"/en/billing/wallet-history"}]},{"group":"Account \u0026 Settings","icon":"gear","pages":[{"title":"Team Management","href":"/settings/team-management"},{"title":"Roles \u0026 Permissions","href":"/settings/roles-permissions"},{"title":"SLAs (Response-Time Alerts)","href":"/settings/sla"}]},{"group":"Troubleshooting","icon":"screwdriver-wrench","pages":[{"title":"Common Issues","href":"/troubleshooting/common-issues"},{"title":"Sync Issues","href":"/troubleshooting/sync-issues"},{"title":"Connection Issues","href":"/troubleshooting/connection-issues"},{"title":"Extension Issues","href":"/troubleshooting/extension-issues"},{"title":"FAQ","href":"/troubleshooting/faq"}]},{"group":"FAQ","icon":"circle-question","pages":[{"title":"Account Setup","href":"/en/faq/account-setup"},{"title":"Join Organization","href":"/en/faq/join-organization"},{"title":"Manage Subscription","href":"/en/faq/manage-subscription"},{"title":"Manage Accounts","href":"/en/faq/manage-accounts"},{"title":"Privacy and Compliance","href":"/en/faq/privacy-and-compliance"},{"title":"IT Security Compliance","href":"/en/faq/it-security-compliance"}]}]},{"tab":"CRM Integrations","pages":[{"title":"CRM Integrations","href":"/en/integrations/hubspot/prerequisites"}]},{"tab":"AI Agents","pages":[{"title":"AI Agents","href":"/en/ai-agents/knowledge-base-agent/agent-info"}]},{"tab":"API Reference","pages":[{"title":"API Reference","href":"/api-reference/introduction"}]},{"tab":"Changelog","pages":[{"title":"Changelog","href":"/changelog/overview"}]}]},{"language":"es","pages":[{"title":"es","href":"/es/billing/auto-payment"}]},{"language":"pt","pages":[{"title":"pt","href":"/pt/billing/auto-payment"}]},{"language":"tr","pages":[{"title":"tr","href":"/tr/billing/auto-payment"}]}]},"title":"Set Up Auto Payment - Eazybe","buildId":"dpl_5UDDZ9hnigTkoV7QtvQ39eUp84nu","deploymentId":"dpl_5UDDZ9hnigTkoV7QtvQ39eUp84nu","dynamics":["07c022d89b","a74be98ba7"],"chunks":["Frame-CUTvSGqu.js","DynamicMarkdown-BGu84FgU.js","zoom-image-lightbox-ChyC7Hte.js","PlusIcon-DXkY3IBj.js","lightbox-handle-r17bVUz3.js"]}