> ## Documentation Index
> Fetch the complete documentation index at: https://help.eazybe.com/llms.txt
> Use this file to discover all available pages before exploring further.

# Enviar una Plantilla y Esperar una Respuesta

> Aprende a enviar una plantilla de WhatsApp, esperar una respuesta y crear ramas condicionales desde un flujo de trabajo de HubSpot mediante Eazybe.

Usa esta guía para configurar un flujo de trabajo de HubSpot que envíe una plantilla de WhatsApp y continúe según la respuesta del usuario.

## Requisitos previos

Antes de configurar el flujo de trabajo, asegúrate de tener:

<CardGroup cols={2}>
  <Card title="Cuenta de HubSpot" icon="hubspot">
    Una cuenta activa de HubSpot con acceso a flujos de trabajo
  </Card>

  <Card title="Integración de Eazybe" icon="plug">
    WhatsApp Integration by Eazybe instalada en HubSpot
  </Card>
</CardGroup>

## Crea tu flujo de trabajo de HubSpot

<Steps>
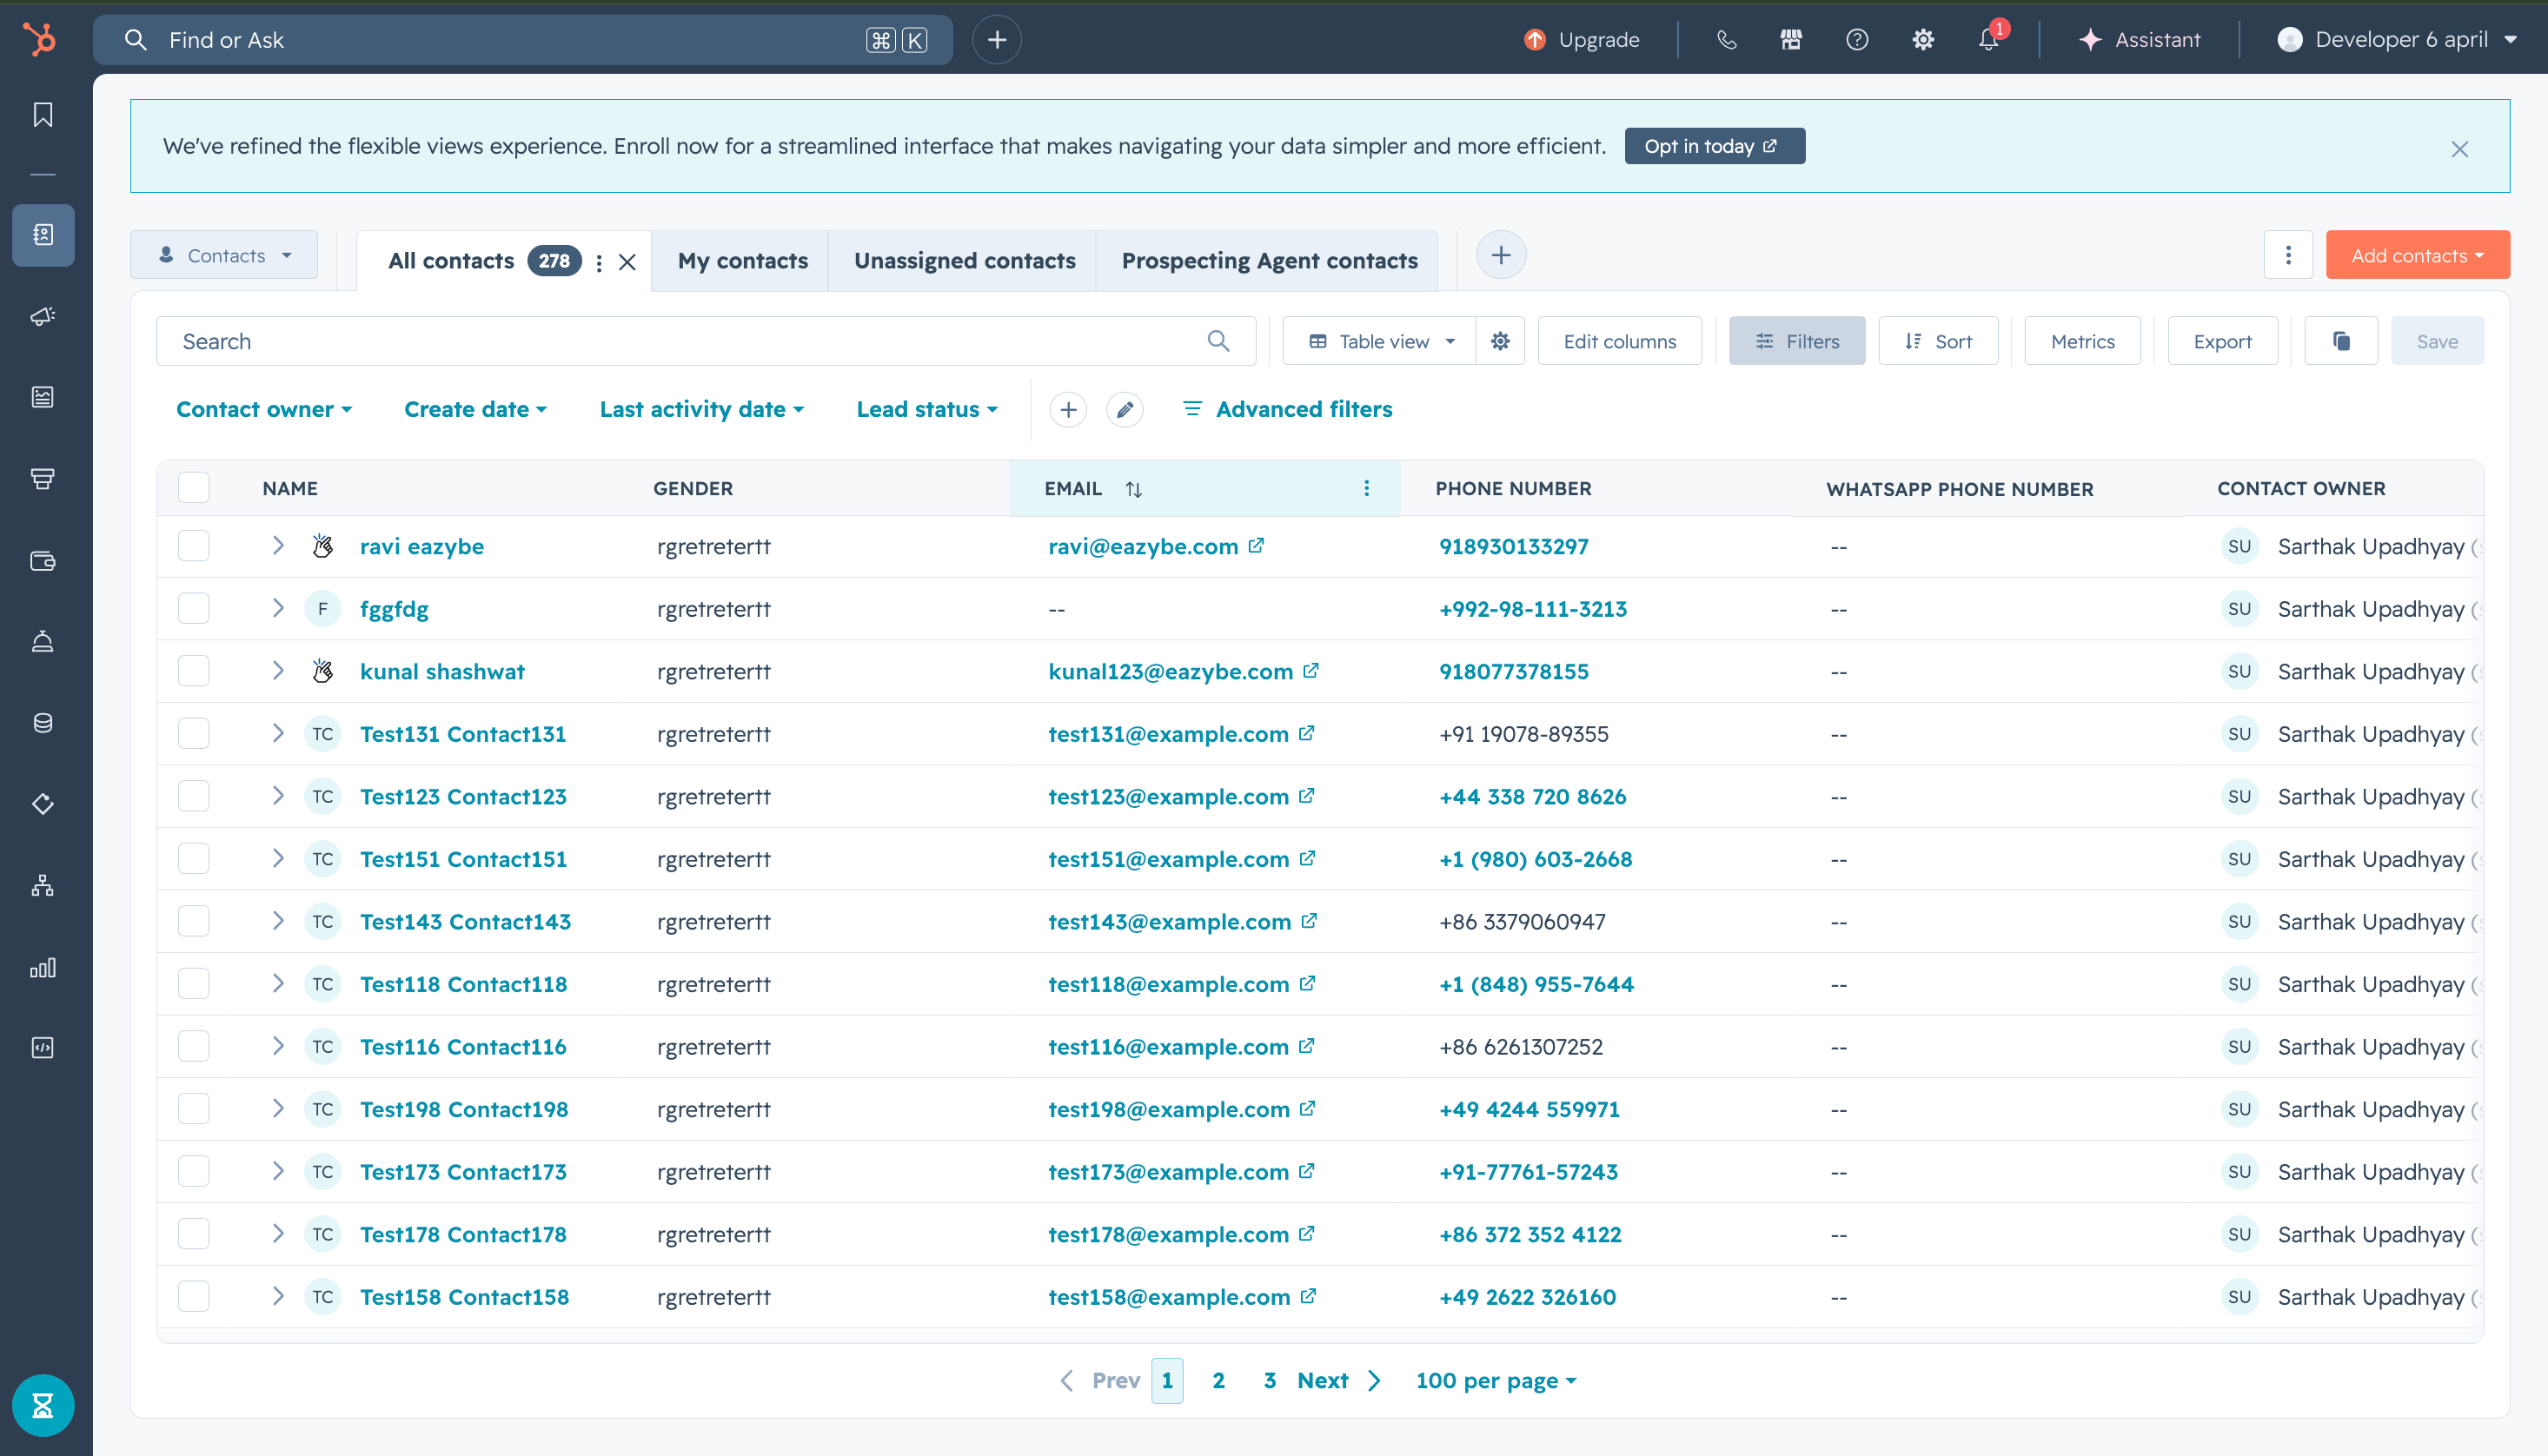
  <Step title="Accede a tu cuenta de HubSpot">
    Inicia sesión en HubSpot para comenzar a configurar el flujo de trabajo.
    <img src="https://mintcdn.com/eazybe/NZtXvr5CRt0MZpuu/images/hubspot-wait-reply-access-account.png?fit=max&auto=format&n=NZtXvr5CRt0MZpuu&q=85&s=5c2febc664d4cdc1c91db8c19b451c13" alt="Acceder a HubSpot" width="2932" height="1676" data-path="images/hubspot-wait-reply-access-account.png" />
  </Step>

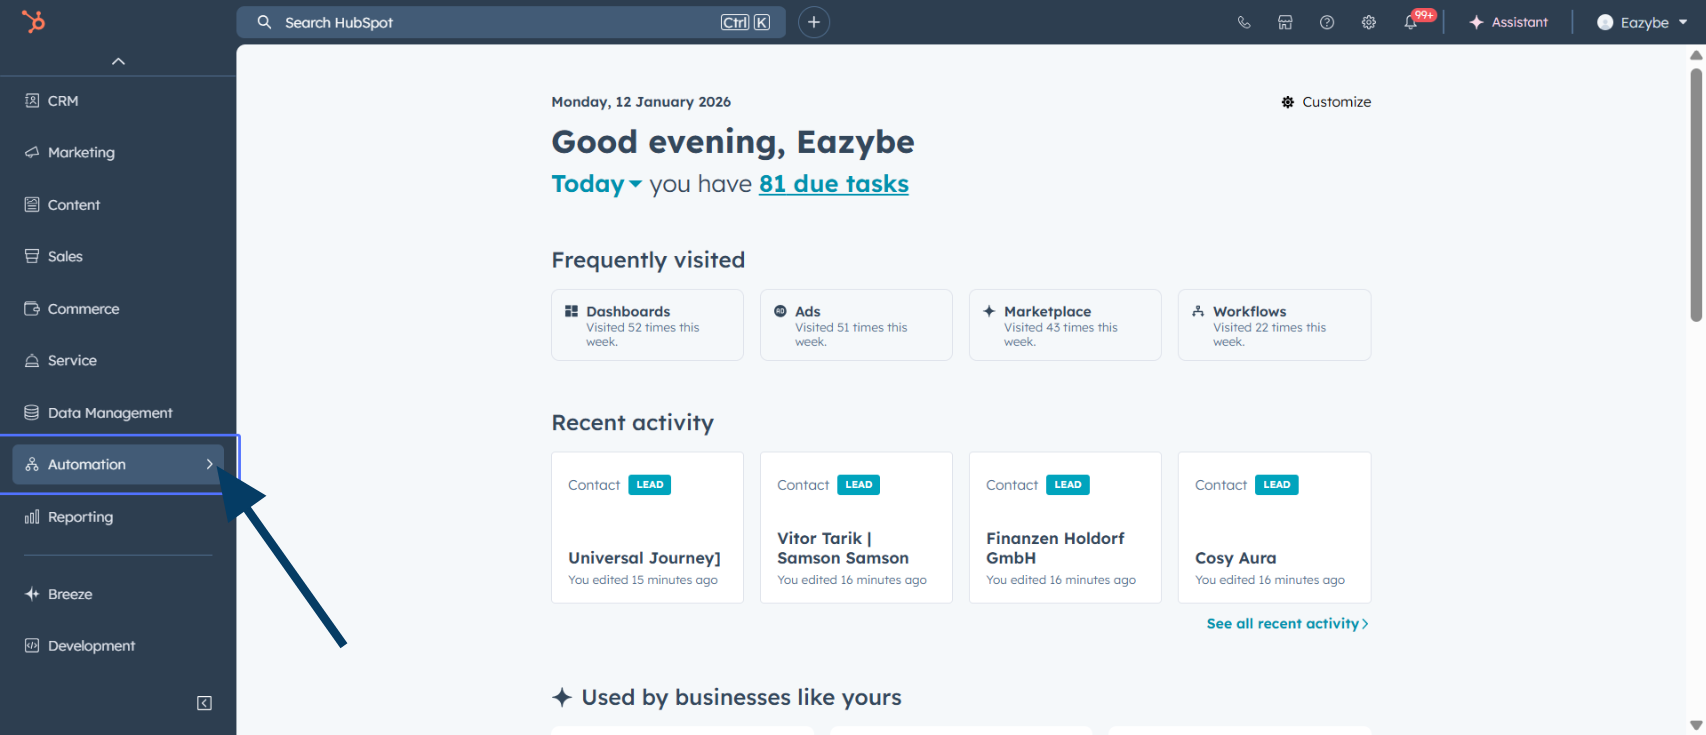
  <Step title="Ve a Automatización">
    Haz clic en **Automation** en el menú principal.
    <img src="https://mintcdn.com/eazybe/sttSA_SpGc2Das_j/images/1933597310.png?fit=max&auto=format&n=sttSA_SpGc2Das_j&q=85&s=2fb9df95c64a04b97962e163ec9df096" alt="Ir a Automatización" width="1706" height="735" data-path="images/1933597310.png" />
  </Step>

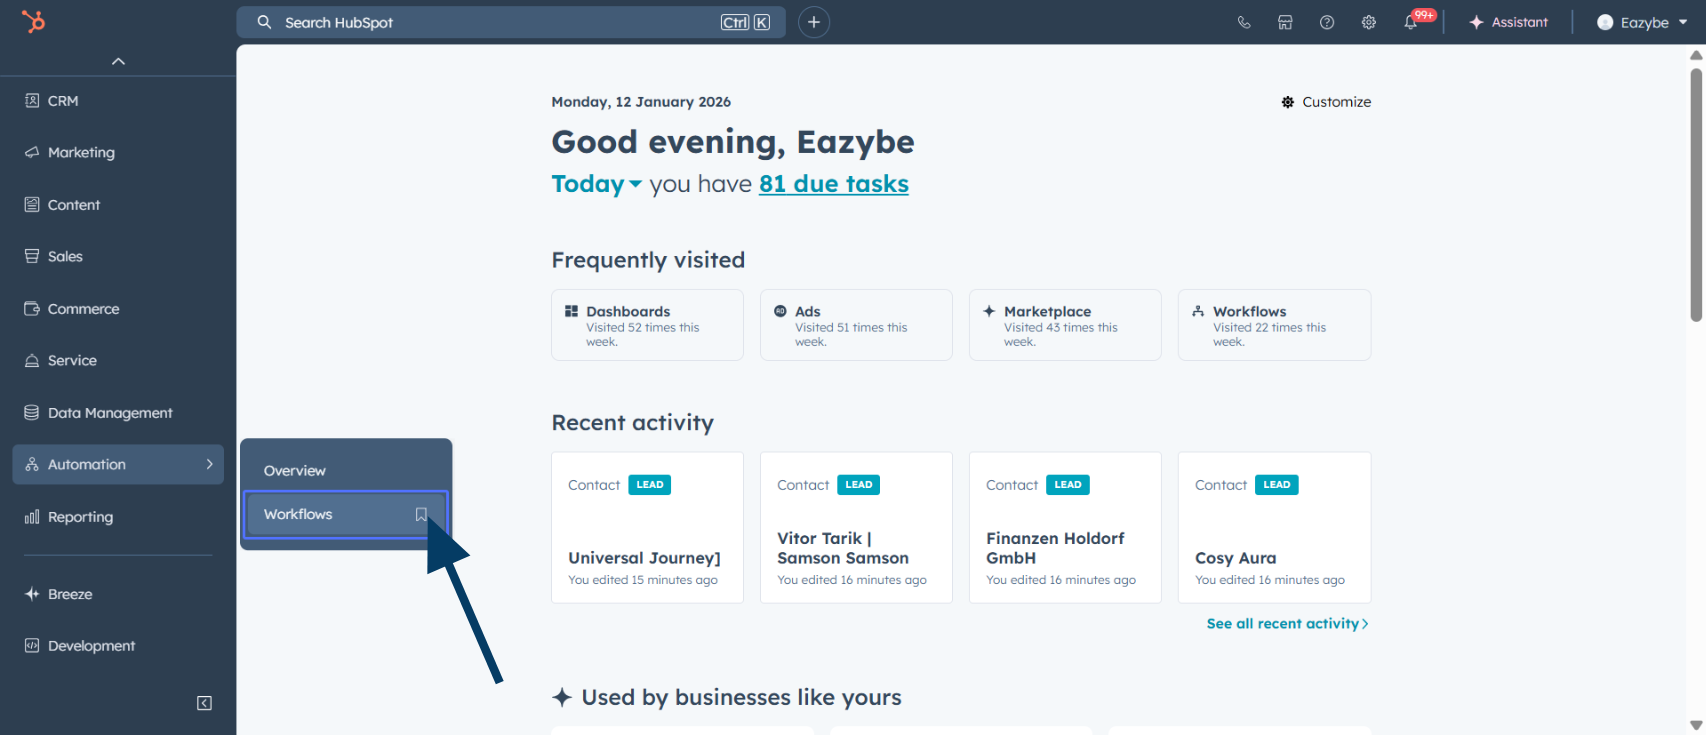
  <Step title="Selecciona Flujos de trabajo">
    Selecciona **Workflows** para abrir el generador.
    <img src="https://mintcdn.com/eazybe/qywAPyIJqEacfaRw/images/1933597303.png?fit=max&auto=format&n=qywAPyIJqEacfaRw&q=85&s=78faddc955df3be1c9492aba3ac715e5" alt="Seleccionar Flujos de trabajo" width="1706" height="735" data-path="images/1933597303.png" />
  </Step>

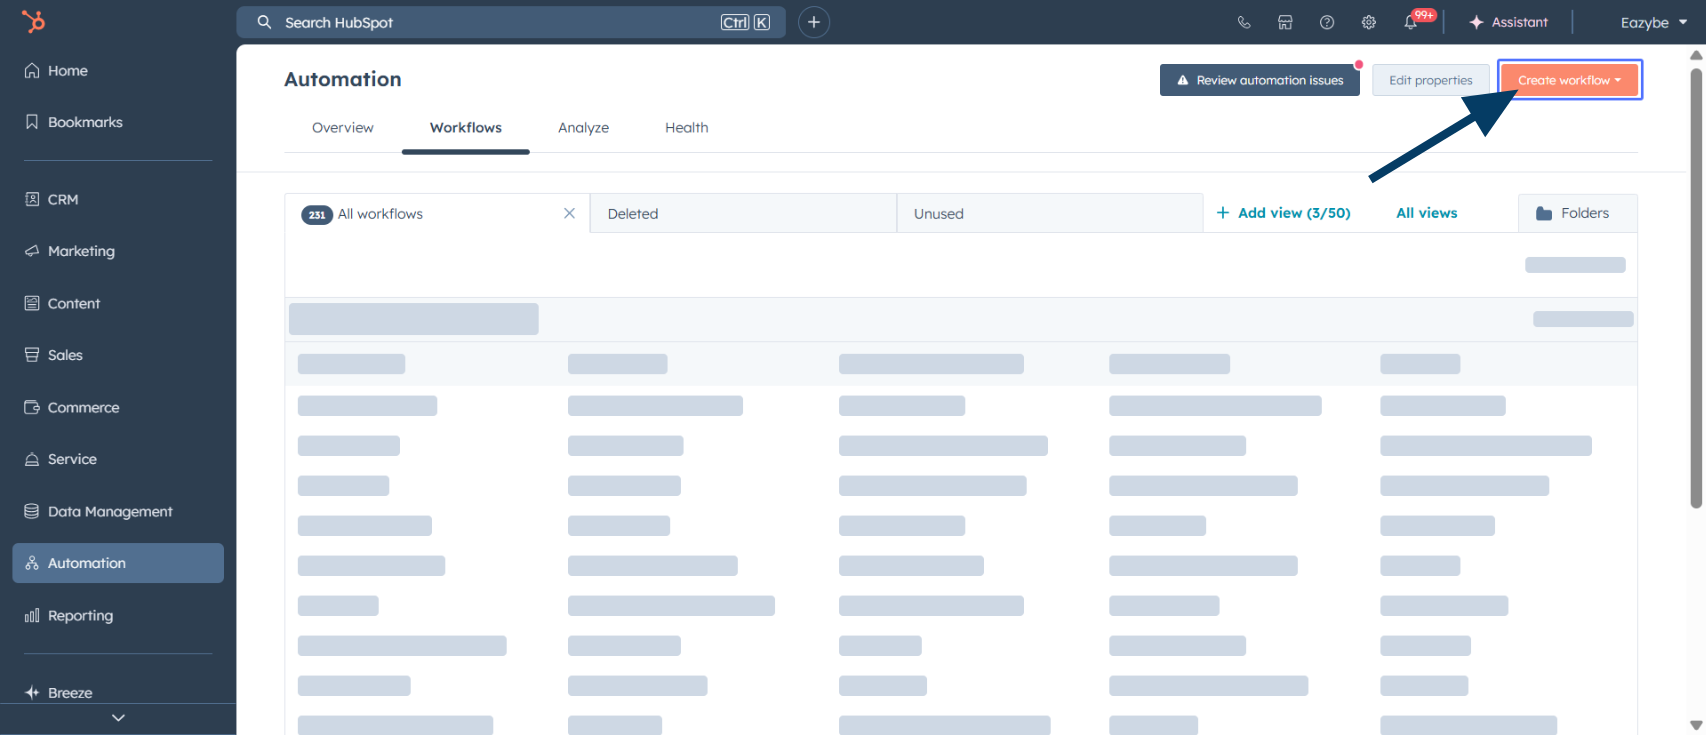
  <Step title="Crea un nuevo flujo de trabajo">
    Haz clic en **Create workflow** para comenzar una nueva automatización.
    <img src="https://mintcdn.com/eazybe/sttSA_SpGc2Das_j/images/1933597307.png?fit=max&auto=format&n=sttSA_SpGc2Das_j&q=85&s=08a51d5aab5f3da4ca428aa74e7b9cd5" alt="Crear flujo de trabajo" width="1706" height="735" data-path="images/1933597307.png" />
  </Step>

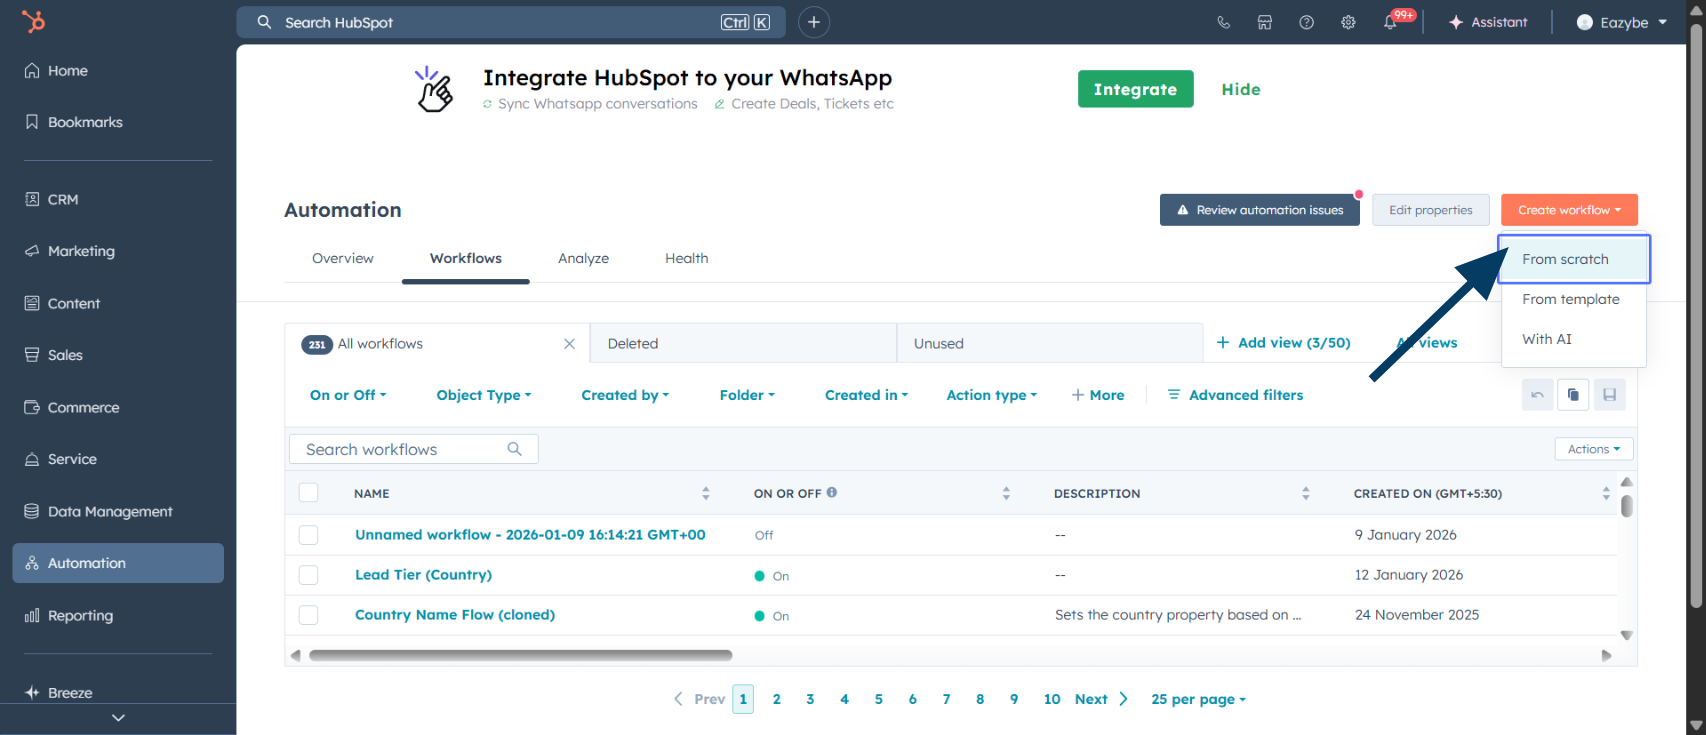
  <Step title="Elige Desde cero">
    Selecciona **From scratch** para crear un flujo de trabajo personalizado.
    <img src="https://mintcdn.com/eazybe/sttSA_SpGc2Das_j/images/1933597320.png?fit=max&auto=format&n=sttSA_SpGc2Das_j&q=85&s=9e2929a4f0d1e05e18759bbd5084beb7" alt="Elegir Desde cero" width="1706" height="735" data-path="images/1933597320.png" />
  </Step>

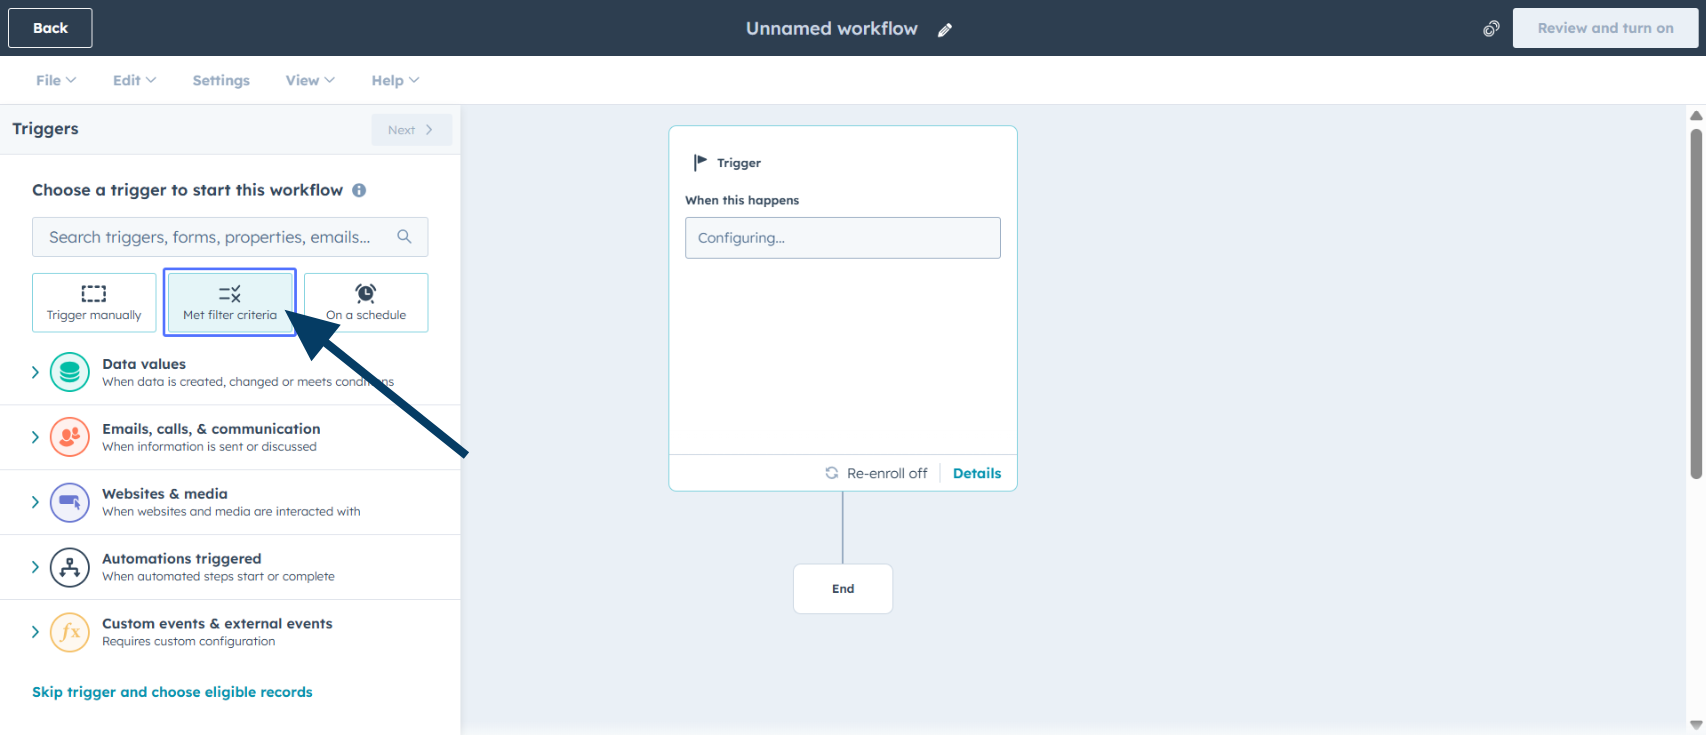
  <Step title="Configura los criterios de filtro">
    Haz clic en **Met filter criteria** para definir las condiciones de inscripción.
    <img src="https://mintcdn.com/eazybe/sttSA_SpGc2Das_j/images/1933597313.png?fit=max&auto=format&n=sttSA_SpGc2Das_j&q=85&s=95b06f069c4d926f90e9cdc7c88511b1" alt="Configurar criterios de filtro" width="1706" height="735" data-path="images/1933597313.png" />
  </Step>

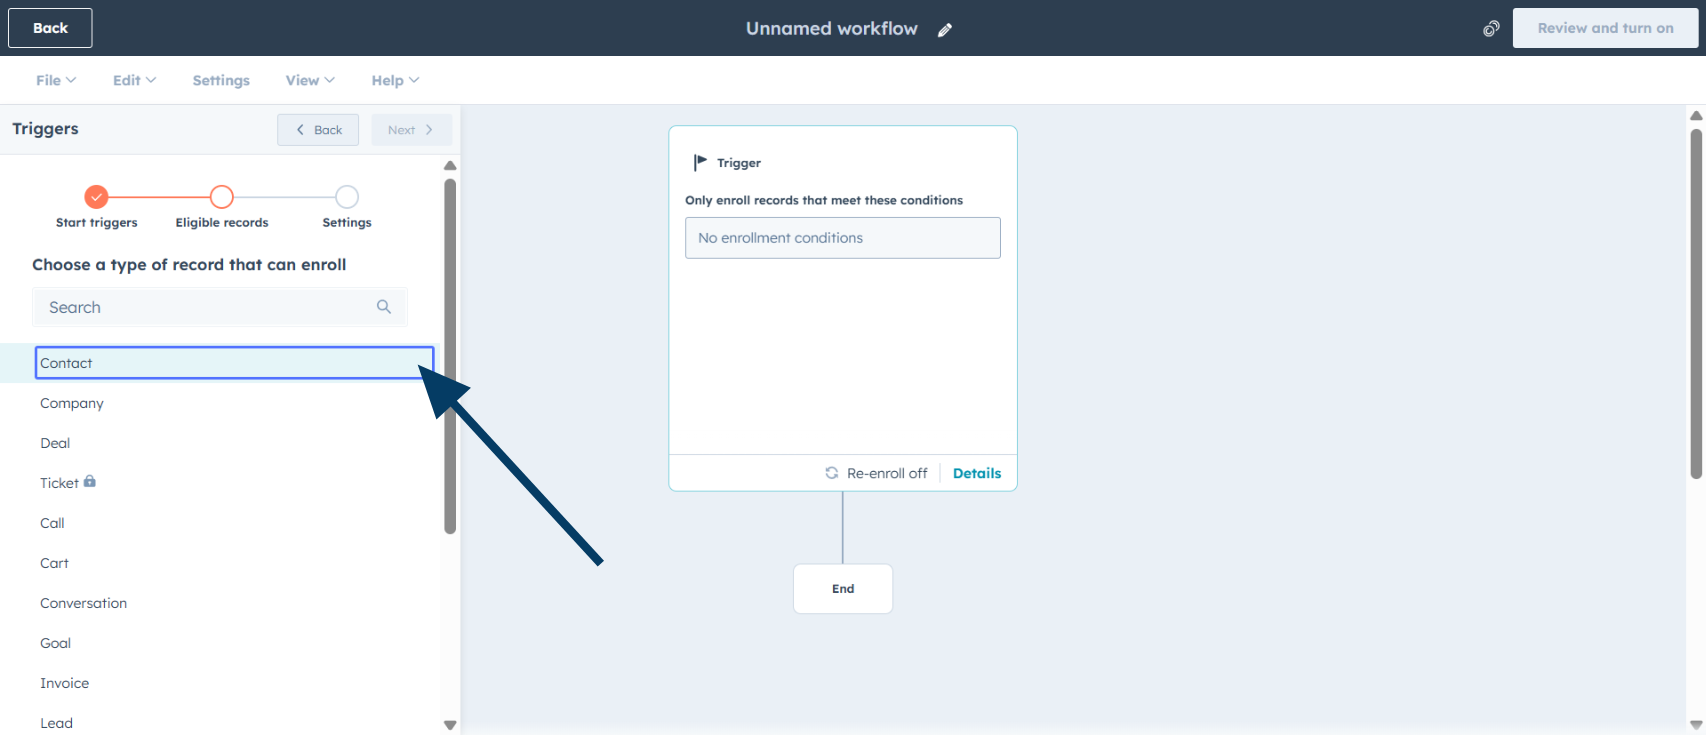
  <Step title="Selecciona un objeto del flujo de trabajo">
    Elige **Contacts**, **Deals** o **Leads** como tipo de objeto.
    <img src="https://mintcdn.com/eazybe/sttSA_SpGc2Das_j/images/1933597309.png?fit=max&auto=format&n=sttSA_SpGc2Das_j&q=85&s=4dae3b13770c470961fcf5bea577966a" alt="Seleccionar un objeto" width="1706" height="735" data-path="images/1933597309.png" />
  </Step>

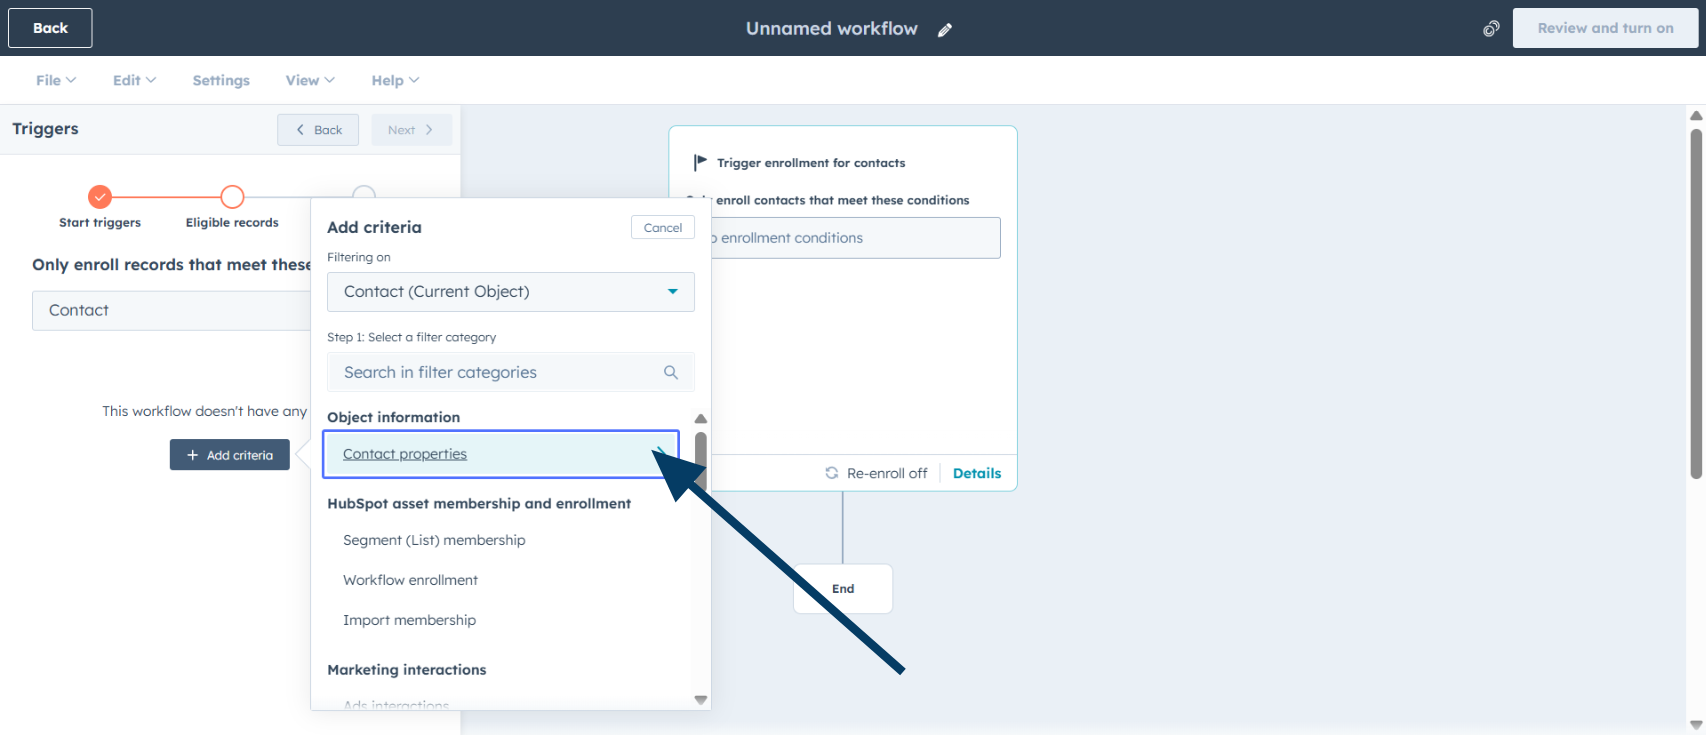
  <Step title="Accede a las propiedades del contacto">
    Haz clic en **Contact properties** para configurar los criterios de inscripción.
    <img src="https://mintcdn.com/eazybe/qywAPyIJqEacfaRw/images/1933597302.png?fit=max&auto=format&n=qywAPyIJqEacfaRw&q=85&s=b8108240e81de03bf57a479a92b00820" alt="Propiedades del contacto" width="1706" height="735" data-path="images/1933597302.png" />
  </Step>

  <Step title="Busca una propiedad">
    Busca la propiedad que deseas usar como activador.
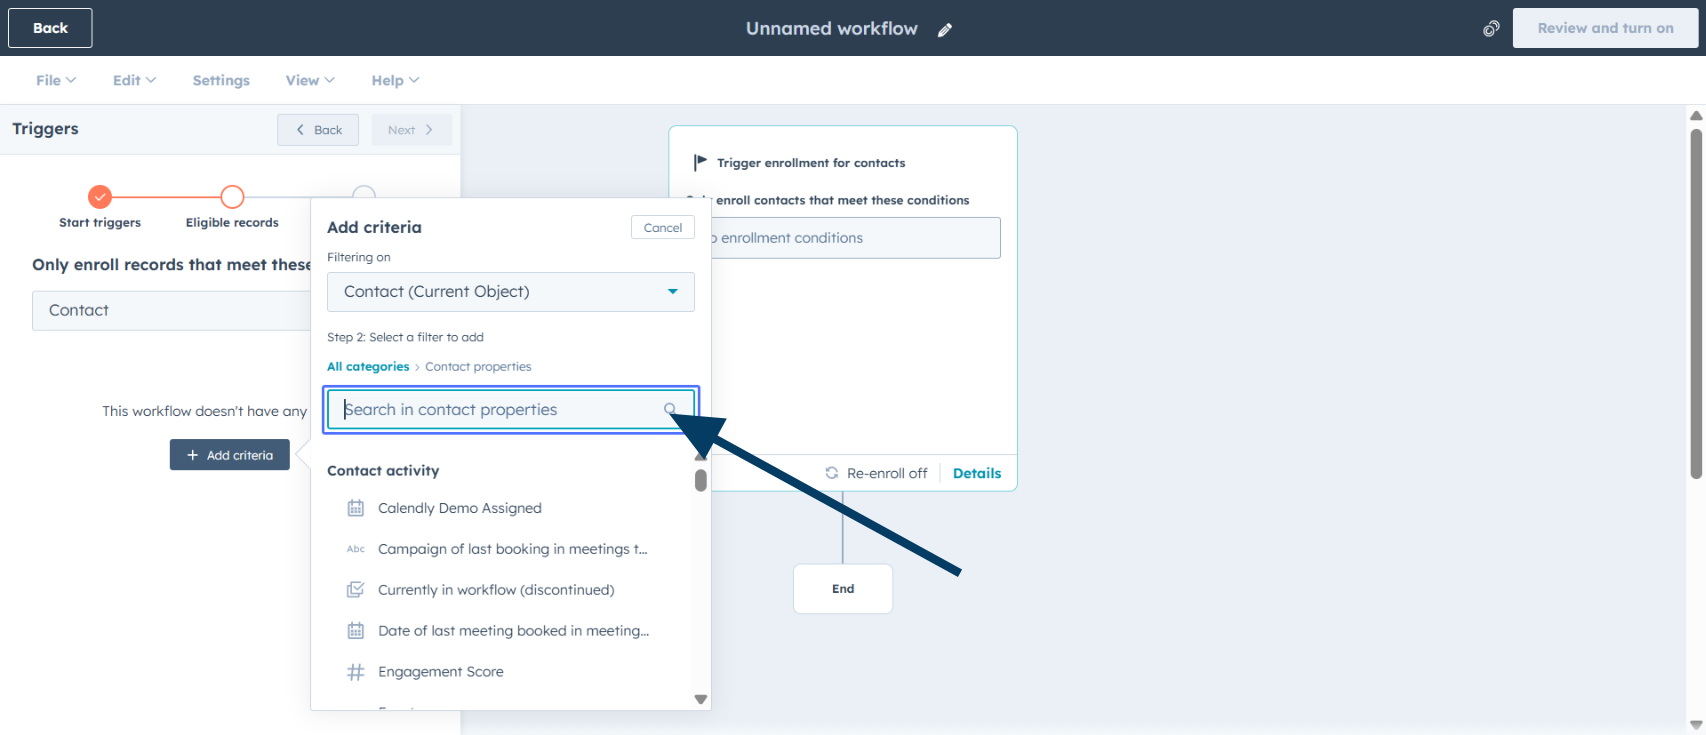
    <img src="https://mintcdn.com/eazybe/sttSA_SpGc2Das_j/images/1933597316.png?fit=max&auto=format&n=sttSA_SpGc2Das_j&q=85&s=f287aab0eadce3c67fca8ca03a76062f" alt="Buscar una propiedad" width="1706" height="735" data-path="images/1933597316.png" />
  </Step>

  <Step title="Elige el nombre de la propiedad">
    Selecciona la propiedad que quieras usar; por ejemplo, **Company name**.
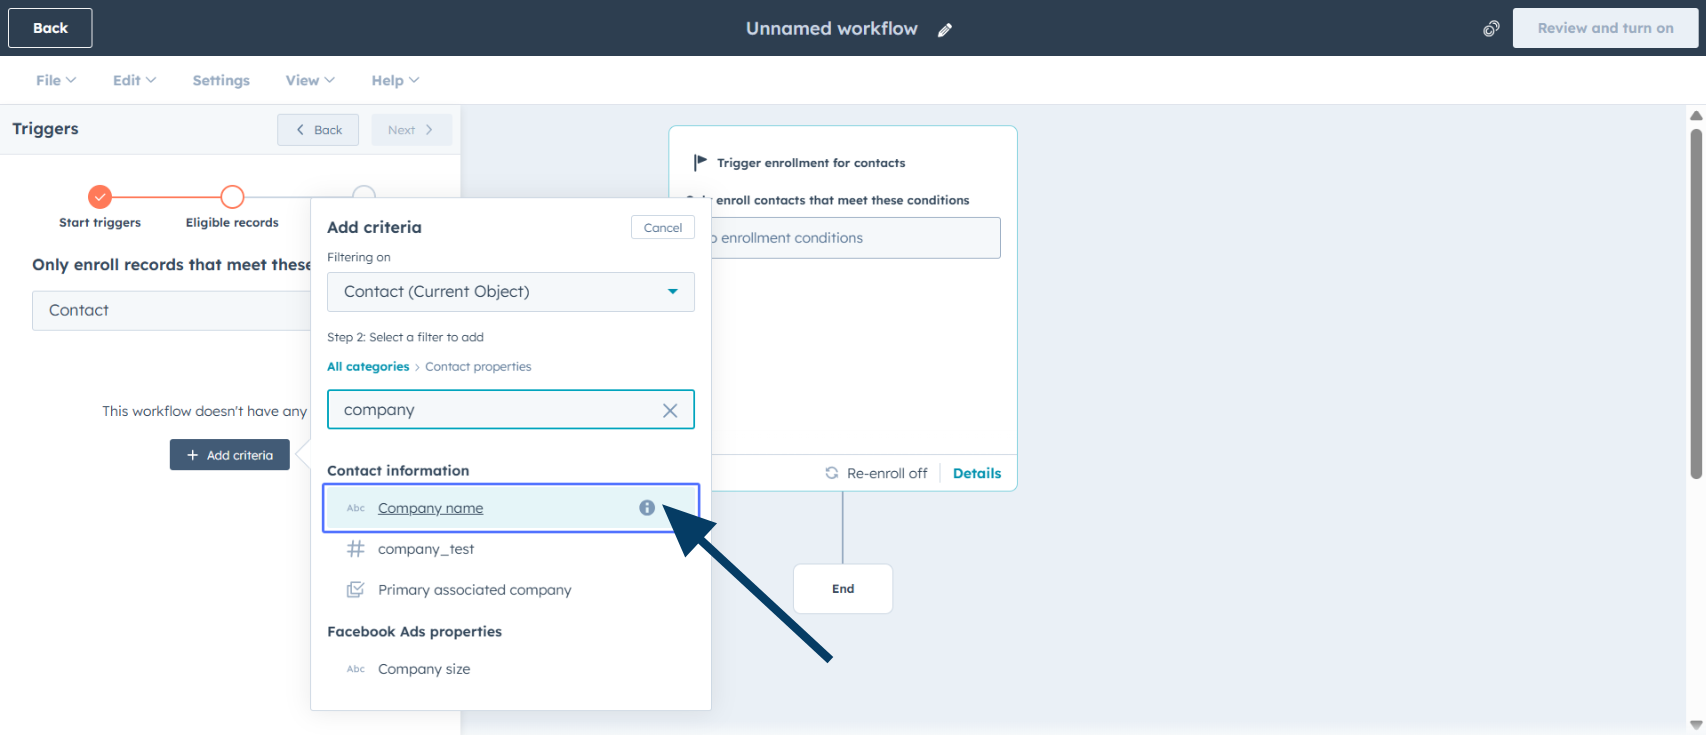
    <img src="https://mintcdn.com/eazybe/qywAPyIJqEacfaRw/images/1933597306.png?fit=max&auto=format&n=qywAPyIJqEacfaRw&q=85&s=e9514c8d30fc876bfd64ac5520c40d0b" alt="Elegir una propiedad" width="1706" height="735" data-path="images/1933597306.png" />

    <Info>
      Puedes usar cualquier propiedad del contacto, como etapa del ciclo de vida, estado del lead o una propiedad personalizada.
    </Info>
  </Step>

  <Step title="Configura las condiciones">
    Define la condición, por ejemplo **is equal to any of**, y añade los valores en **Add values**.
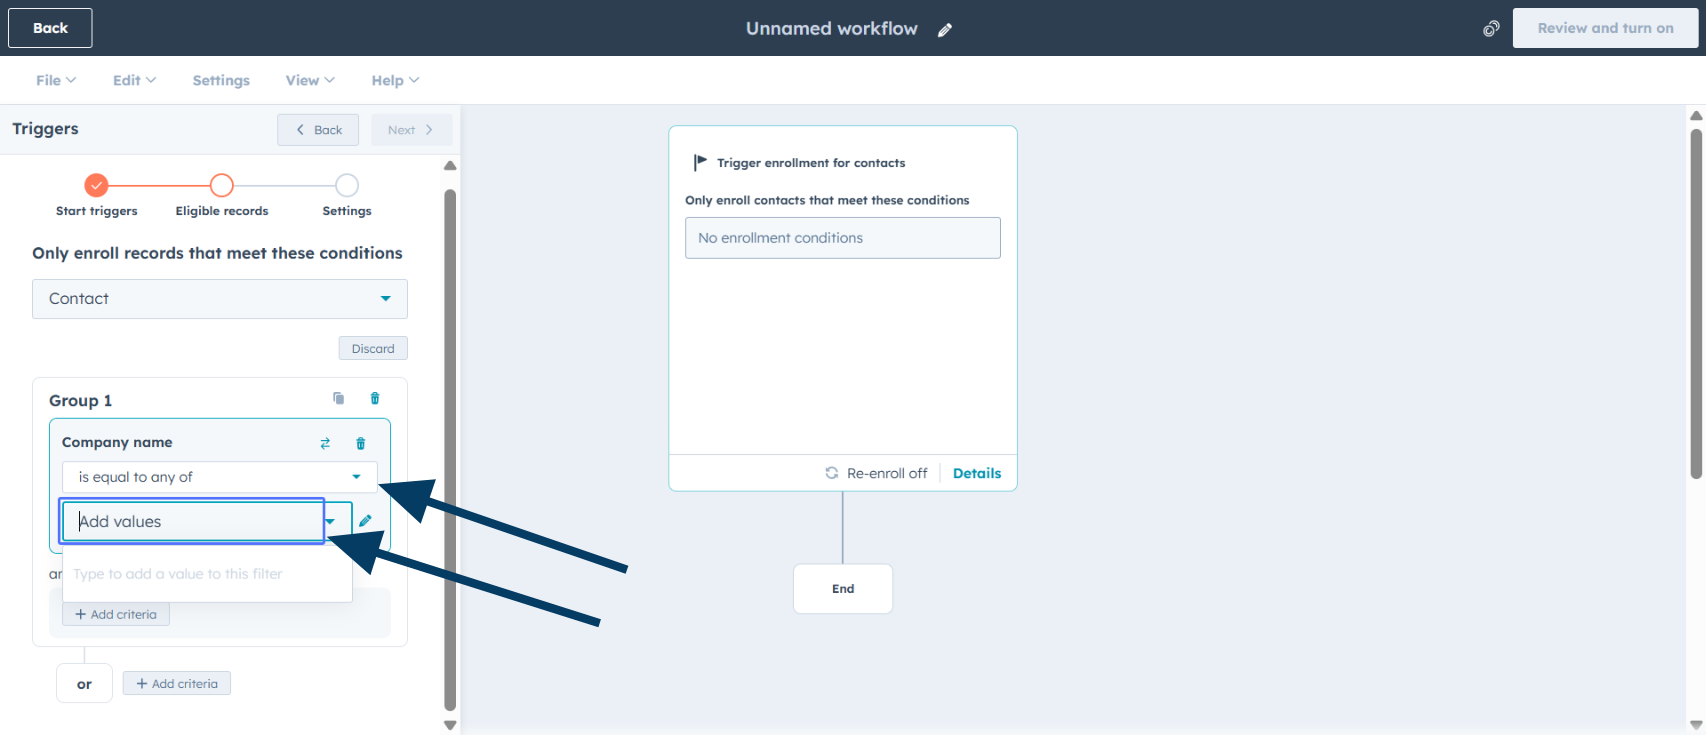
    <img src="https://mintcdn.com/eazybe/qywAPyIJqEacfaRw/images/1933597299.png?fit=max&auto=format&n=qywAPyIJqEacfaRw&q=85&s=1f117a647a19f5cbb7db7c41aaf0d98e" alt="Configurar condiciones" width="1706" height="735" data-path="images/1933597299.png" />
  </Step>

  <Step title="Continúa al siguiente paso">
    Haz clic en **Next** para continuar con la configuración de reinscripción.
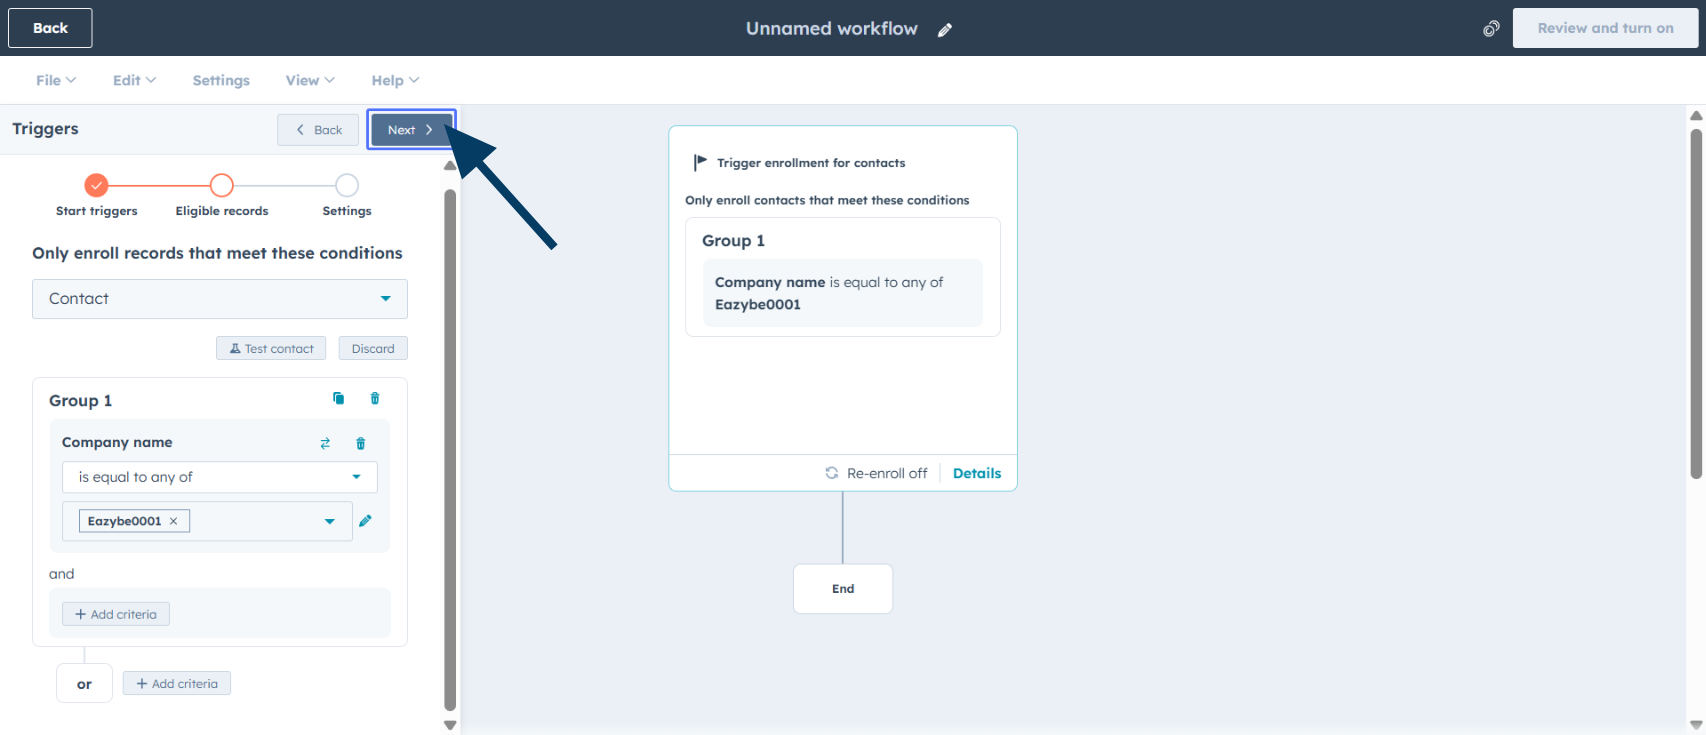
    <img src="https://mintcdn.com/eazybe/qywAPyIJqEacfaRw/images/1933597301.png?fit=max&auto=format&n=qywAPyIJqEacfaRw&q=85&s=075d97a58d47d1c2cd14250d5d12d3f4" alt="Hacer clic en Siguiente" width="1706" height="735" data-path="images/1933597301.png" />
  </Step>

  <Step title="Activa la reinscripción">
    Activa **Re-enroll** si quieres que los contactos vuelvan a entrar en el flujo.
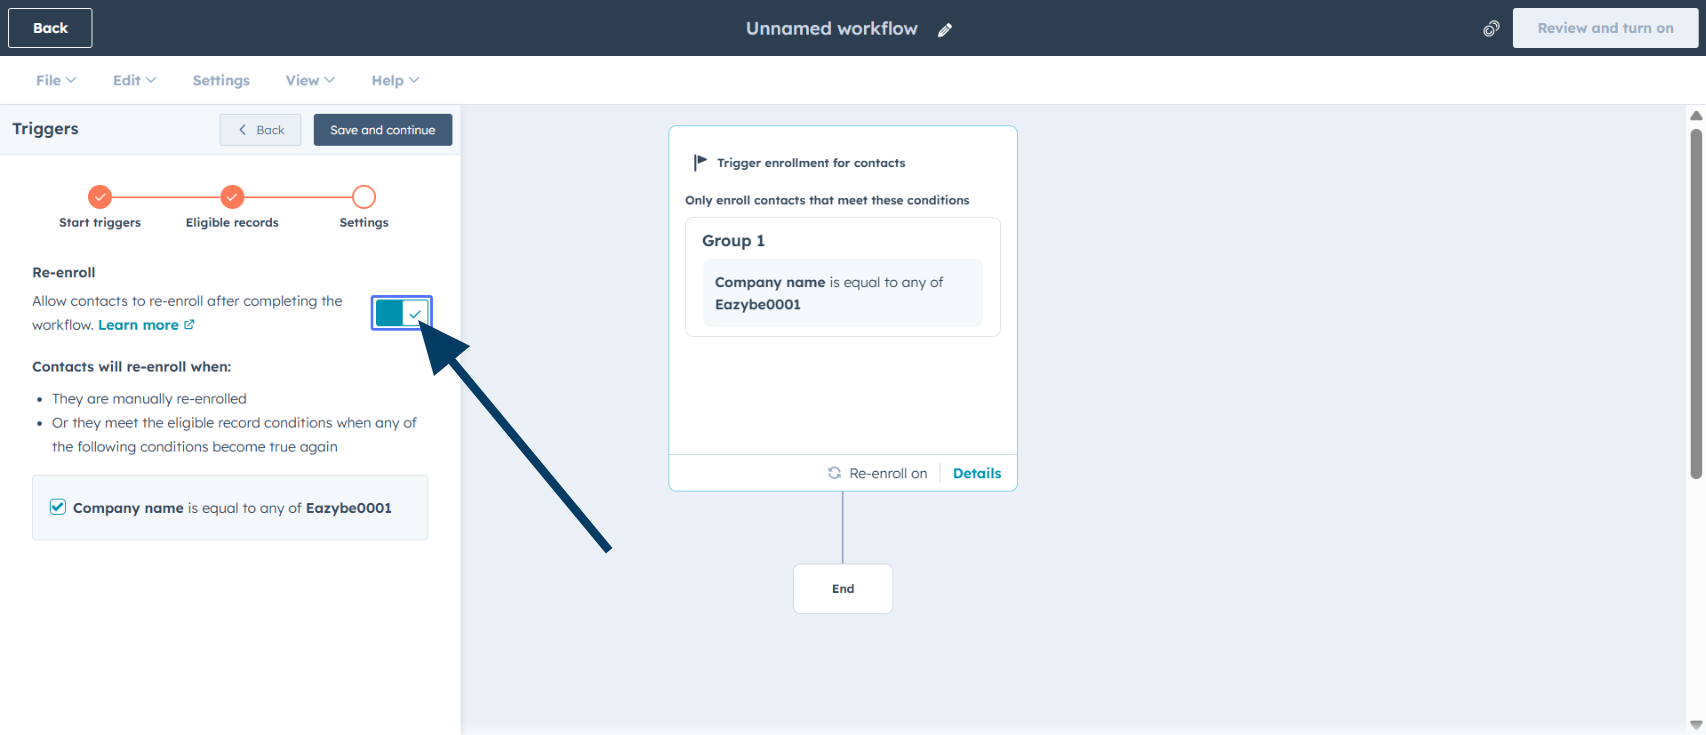
    <img src="https://mintcdn.com/eazybe/sttSA_SpGc2Das_j/images/1933597311.png?fit=max&auto=format&n=sttSA_SpGc2Das_j&q=85&s=ee9e0a9c7fd5752b54a2a1fb9960d1bc" alt="Activar reinscripción" width="1706" height="735" data-path="images/1933597311.png" />

    <Warning>
      Configura la reinscripción con cuidado para evitar mensajes duplicados.
    </Warning>
  </Step>

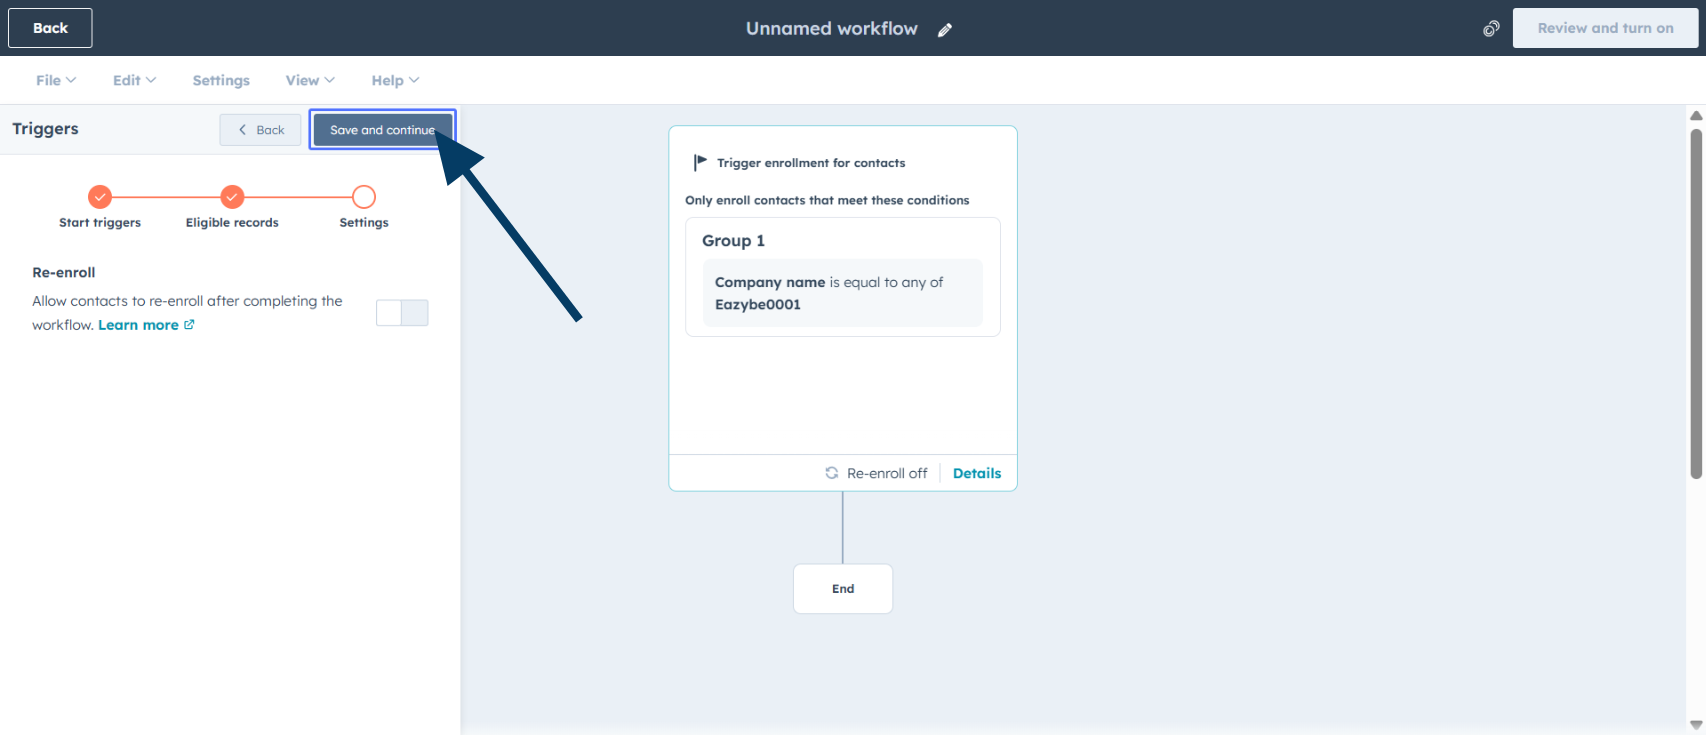
  <Step title="Guarda la configuración de inscripción">
    Haz clic en **Save and continue** para guardar la configuración.
    <img src="https://mintcdn.com/eazybe/qywAPyIJqEacfaRw/images/1933597304.png?fit=max&auto=format&n=qywAPyIJqEacfaRw&q=85&s=c38c685ac2df9a4ccb4f0a0fa813cf94" alt="Guardar configuración" width="1706" height="735" data-path="images/1933597304.png" />
  </Step>

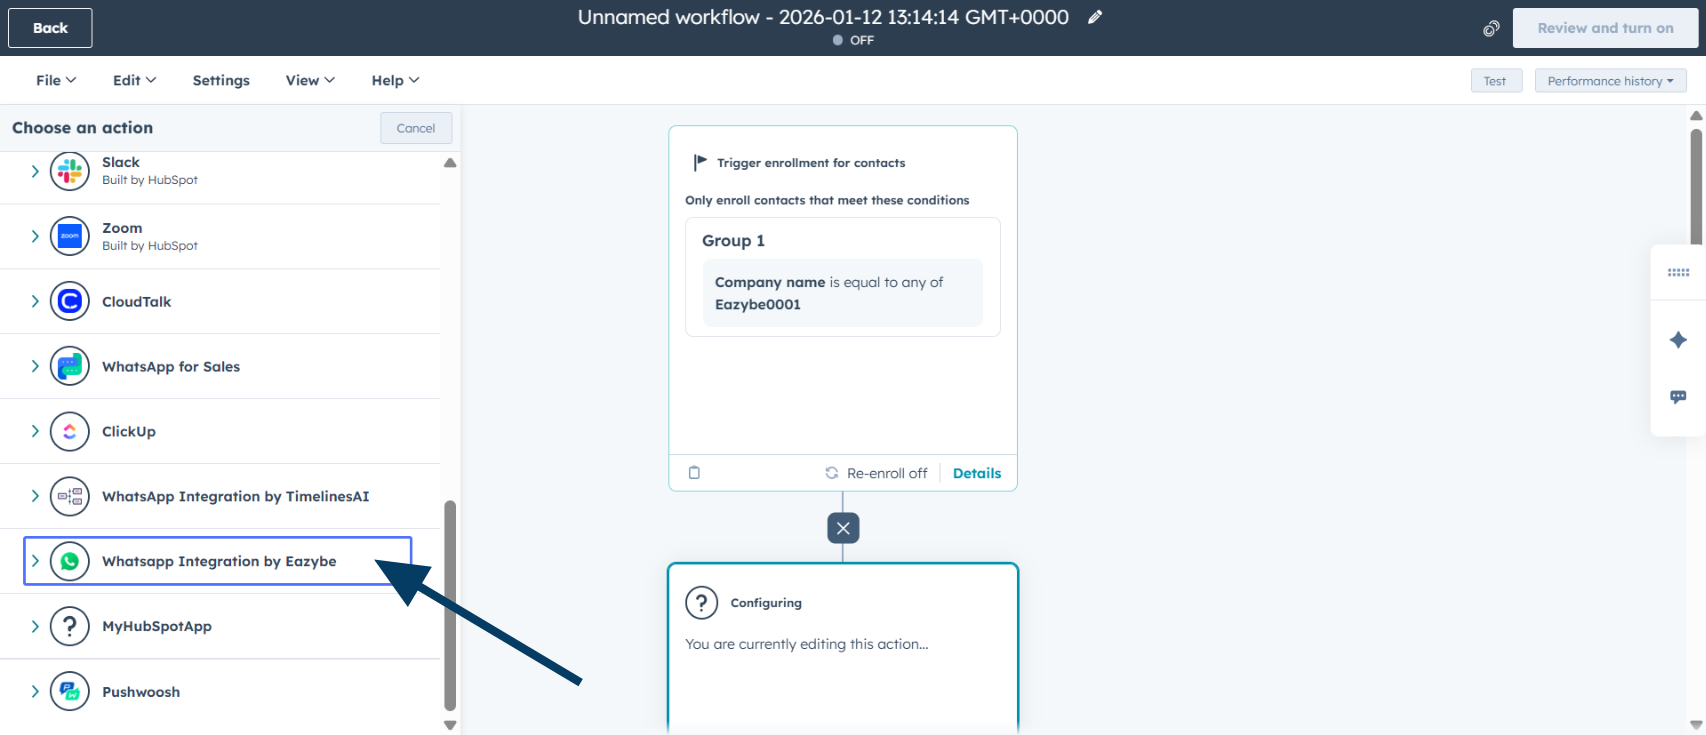
  <Step title="Añade la integración de WhatsApp">
    Selecciona **WhatsApp Integration by Eazybe** en el panel de acciones.
    <img src="https://mintcdn.com/eazybe/sttSA_SpGc2Das_j/images/1933597323.png?fit=max&auto=format&n=sttSA_SpGc2Das_j&q=85&s=89a16153763b80e659d08f0e454a1c2d" alt="Integración de WhatsApp" width="1706" height="735" data-path="images/1933597323.png" />
  </Step>

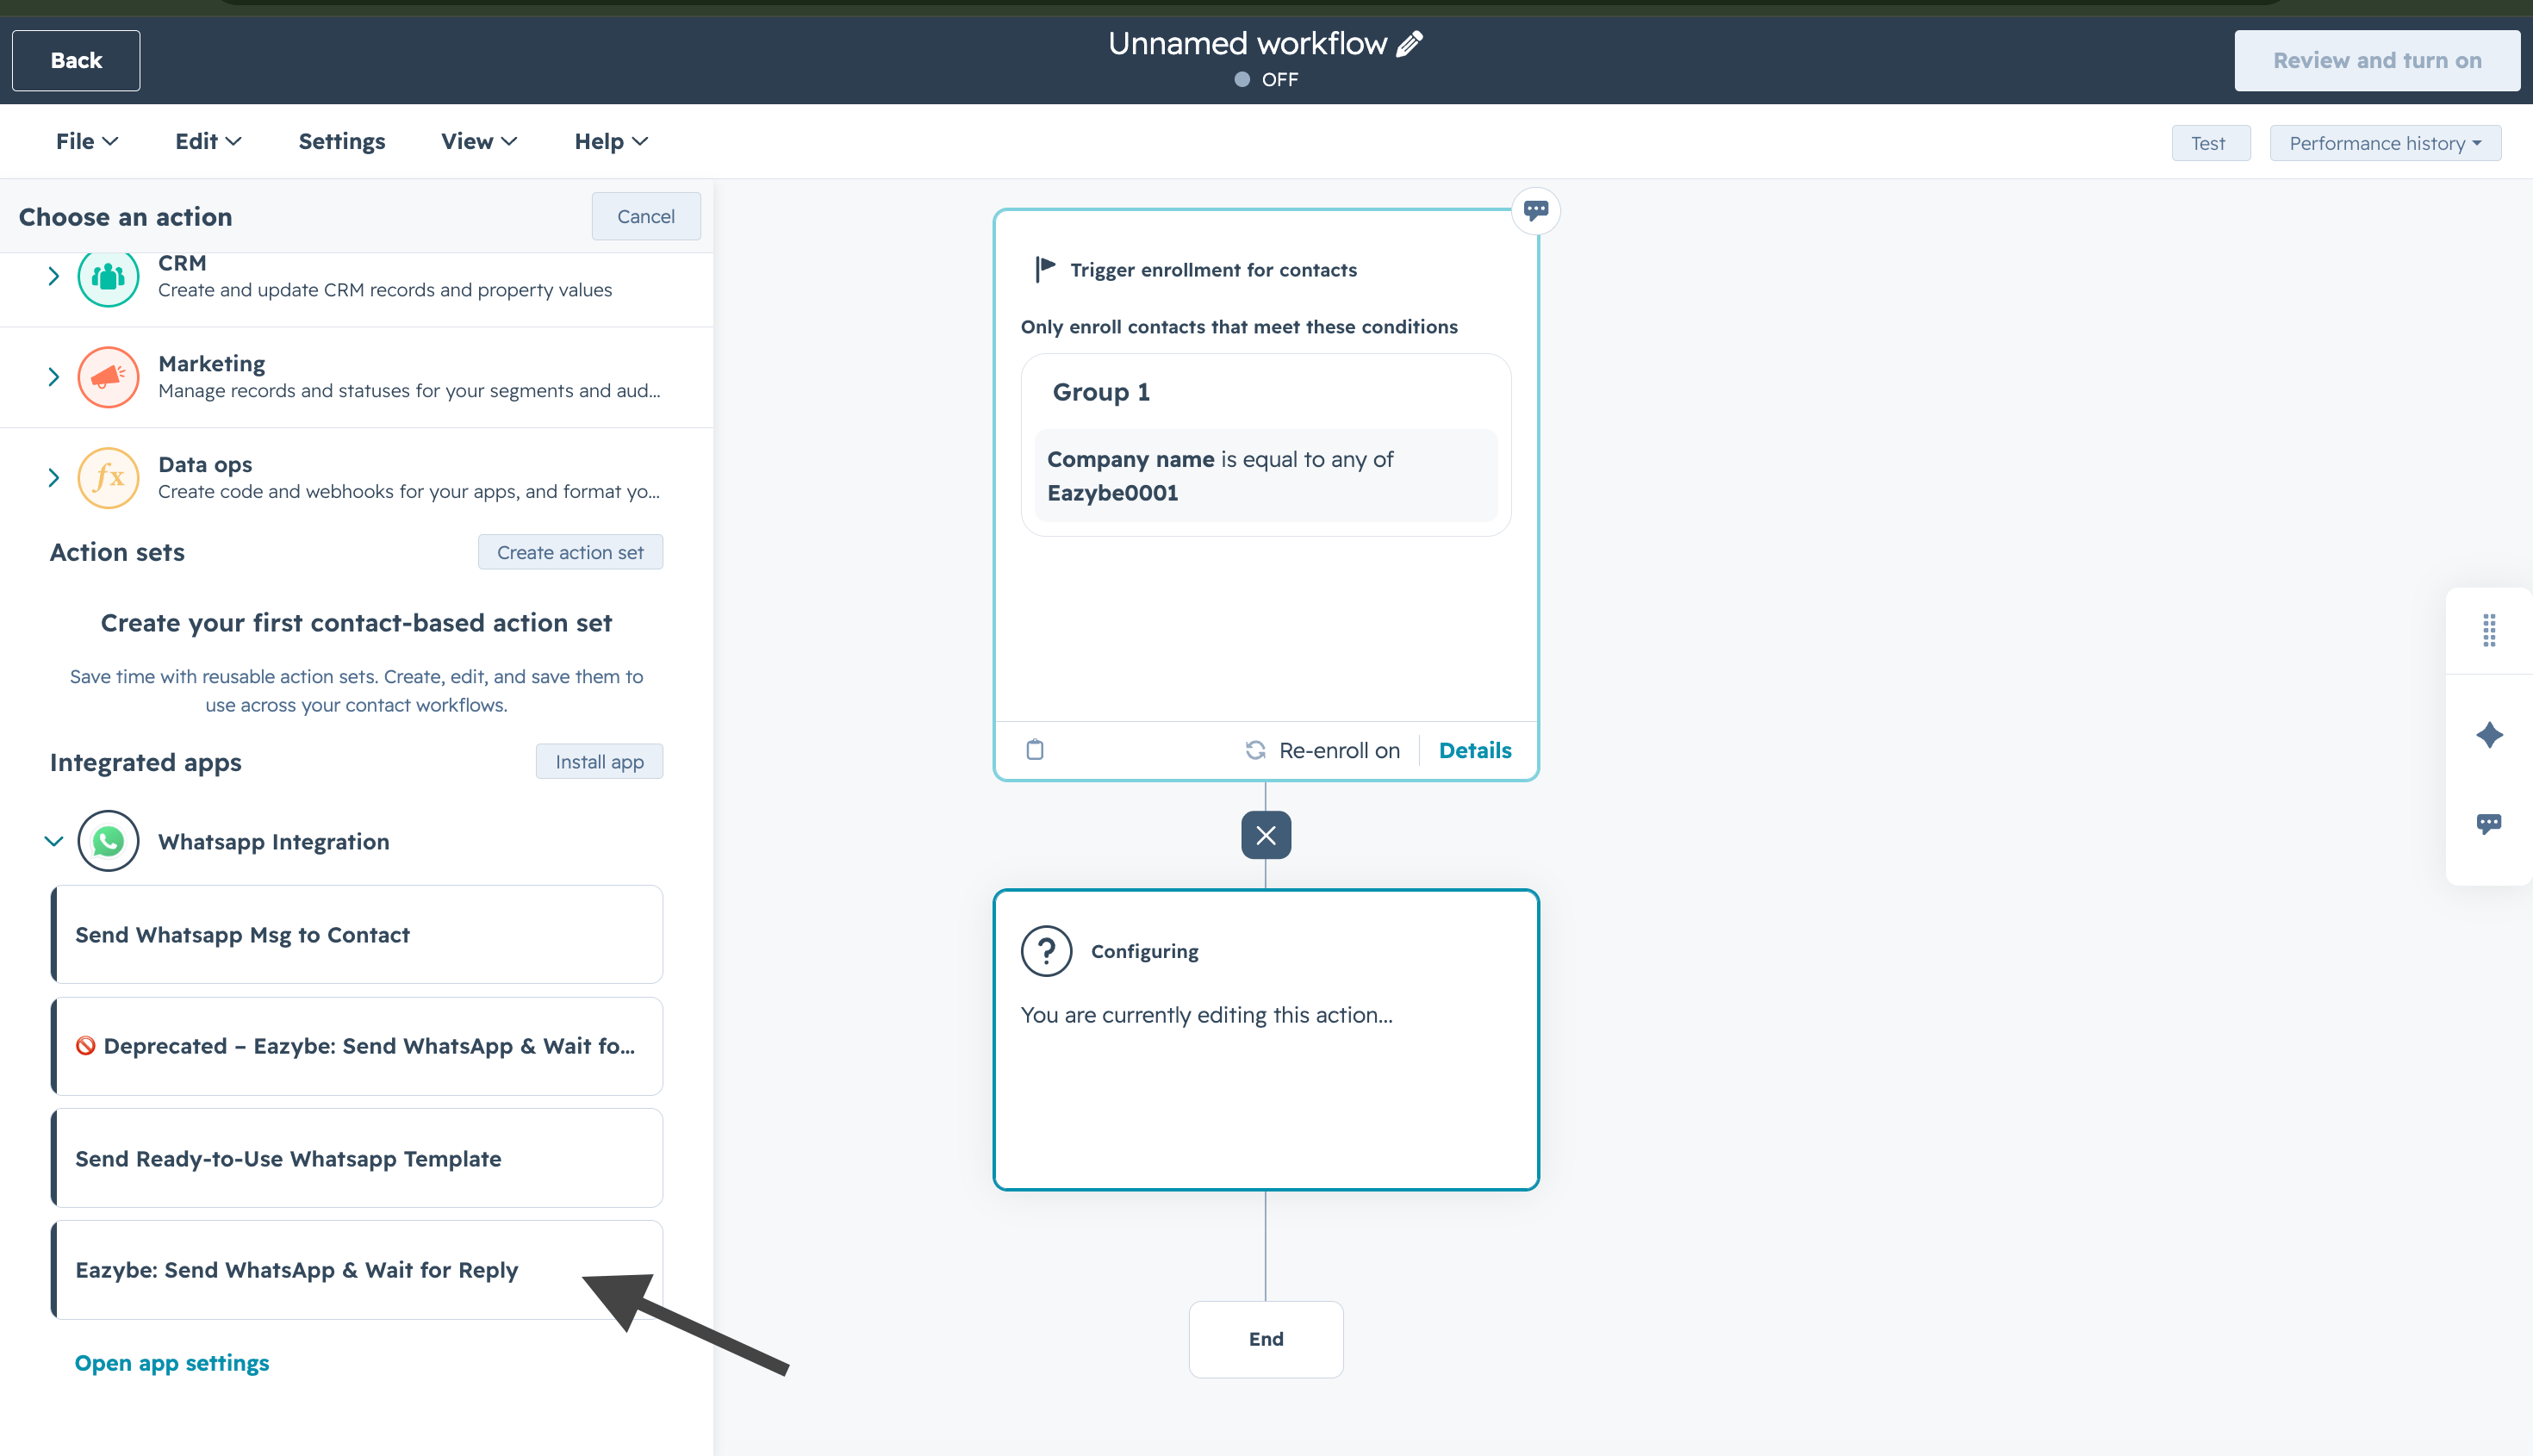
  <Step title="Selecciona la acción de plantilla">
    Haz clic en **Send WhatsApp & Wait for Reply** para elegir una plantilla preaprobada.
    <img src="https://mintcdn.com/eazybe/NZtXvr5CRt0MZpuu/images/hubspot-wait-reply-select-action.png?fit=max&auto=format&n=NZtXvr5CRt0MZpuu&q=85&s=6da9c894203452bfd4d4bb3aa2a7a902" alt="Seleccionar Enviar WhatsApp y esperar respuesta" width="2940" height="1690" data-path="images/hubspot-wait-reply-select-action.png" />
  </Step>

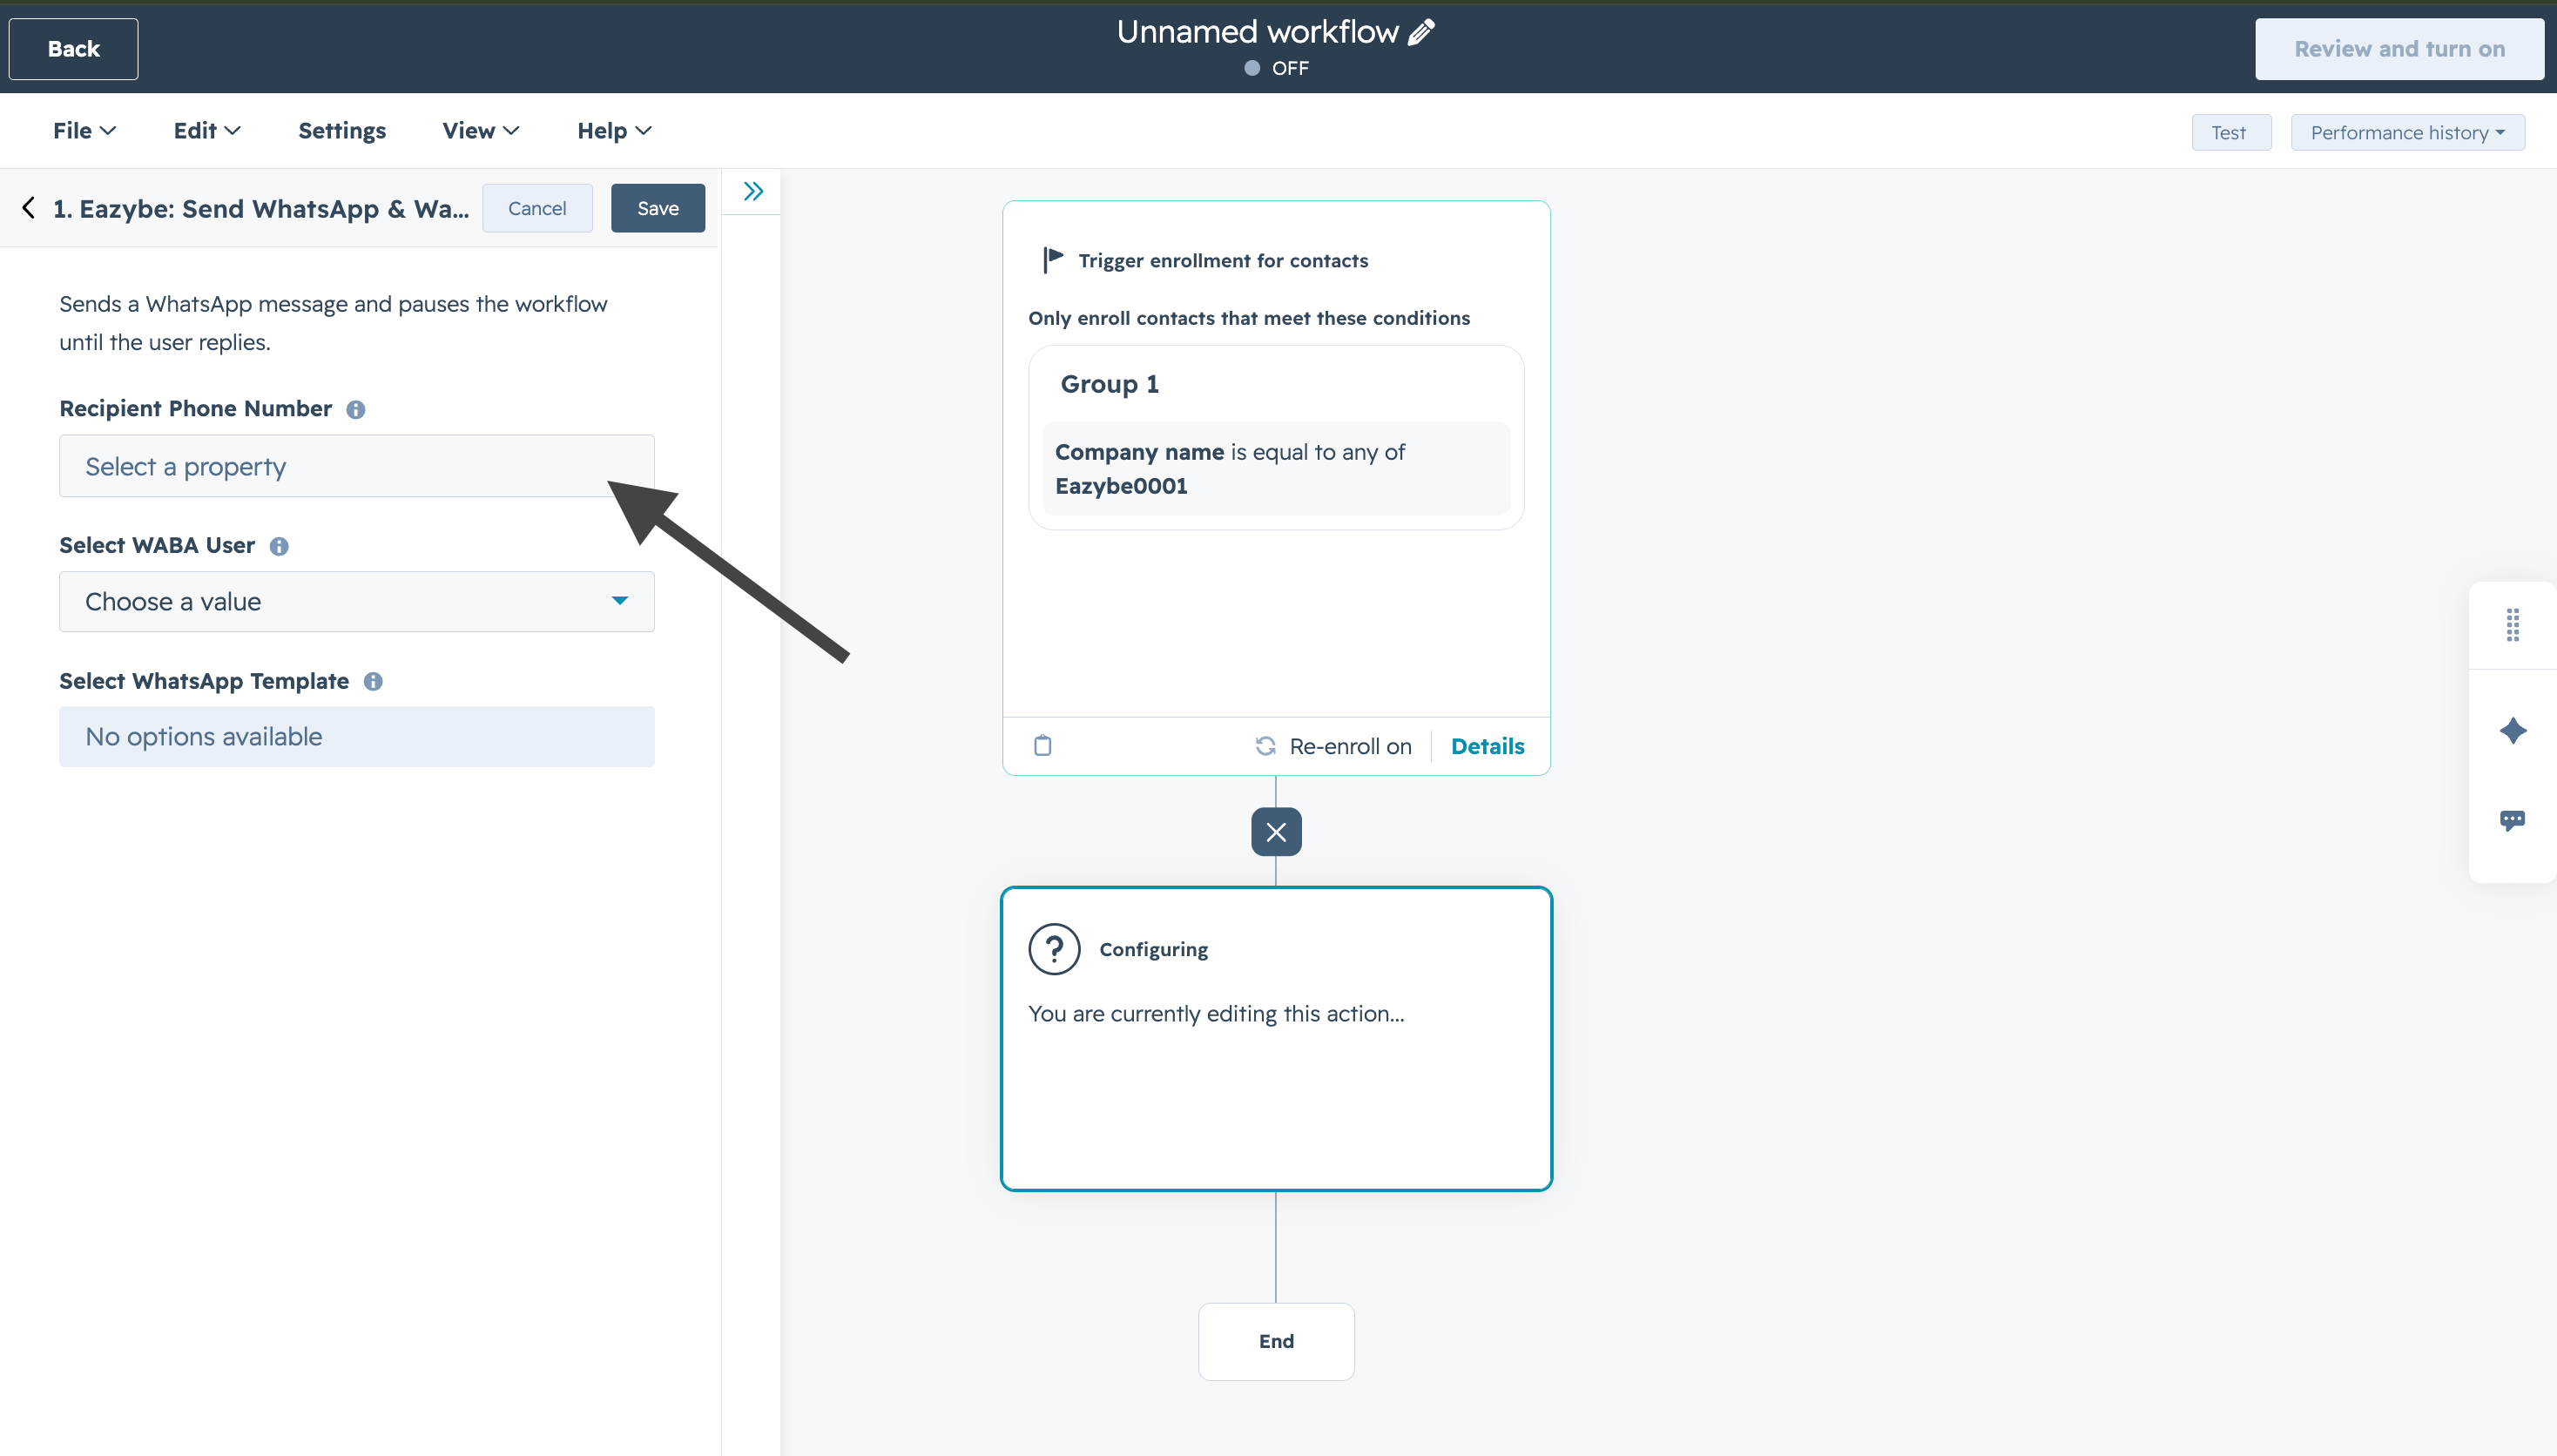
  <Step title="Número de teléfono del destinatario">
    Haz clic en **Recipient Phone Number** y elige **Mobile phone number**, **Phone number** o **WhatsApp phone number**.
    <img src="https://mintcdn.com/eazybe/NZtXvr5CRt0MZpuu/images/hubspot-wait-reply-recipient-phone-number.png?fit=max&auto=format&n=NZtXvr5CRt0MZpuu&q=85&s=4e948623a43511a32cc2ffbeef157907" alt="Número de teléfono del destinatario" width="2936" height="1672" data-path="images/hubspot-wait-reply-recipient-phone-number.png" />

    <Tip>
      Guarda los números en formato internacional; por ejemplo, +1234567890.
    </Tip>
  </Step>

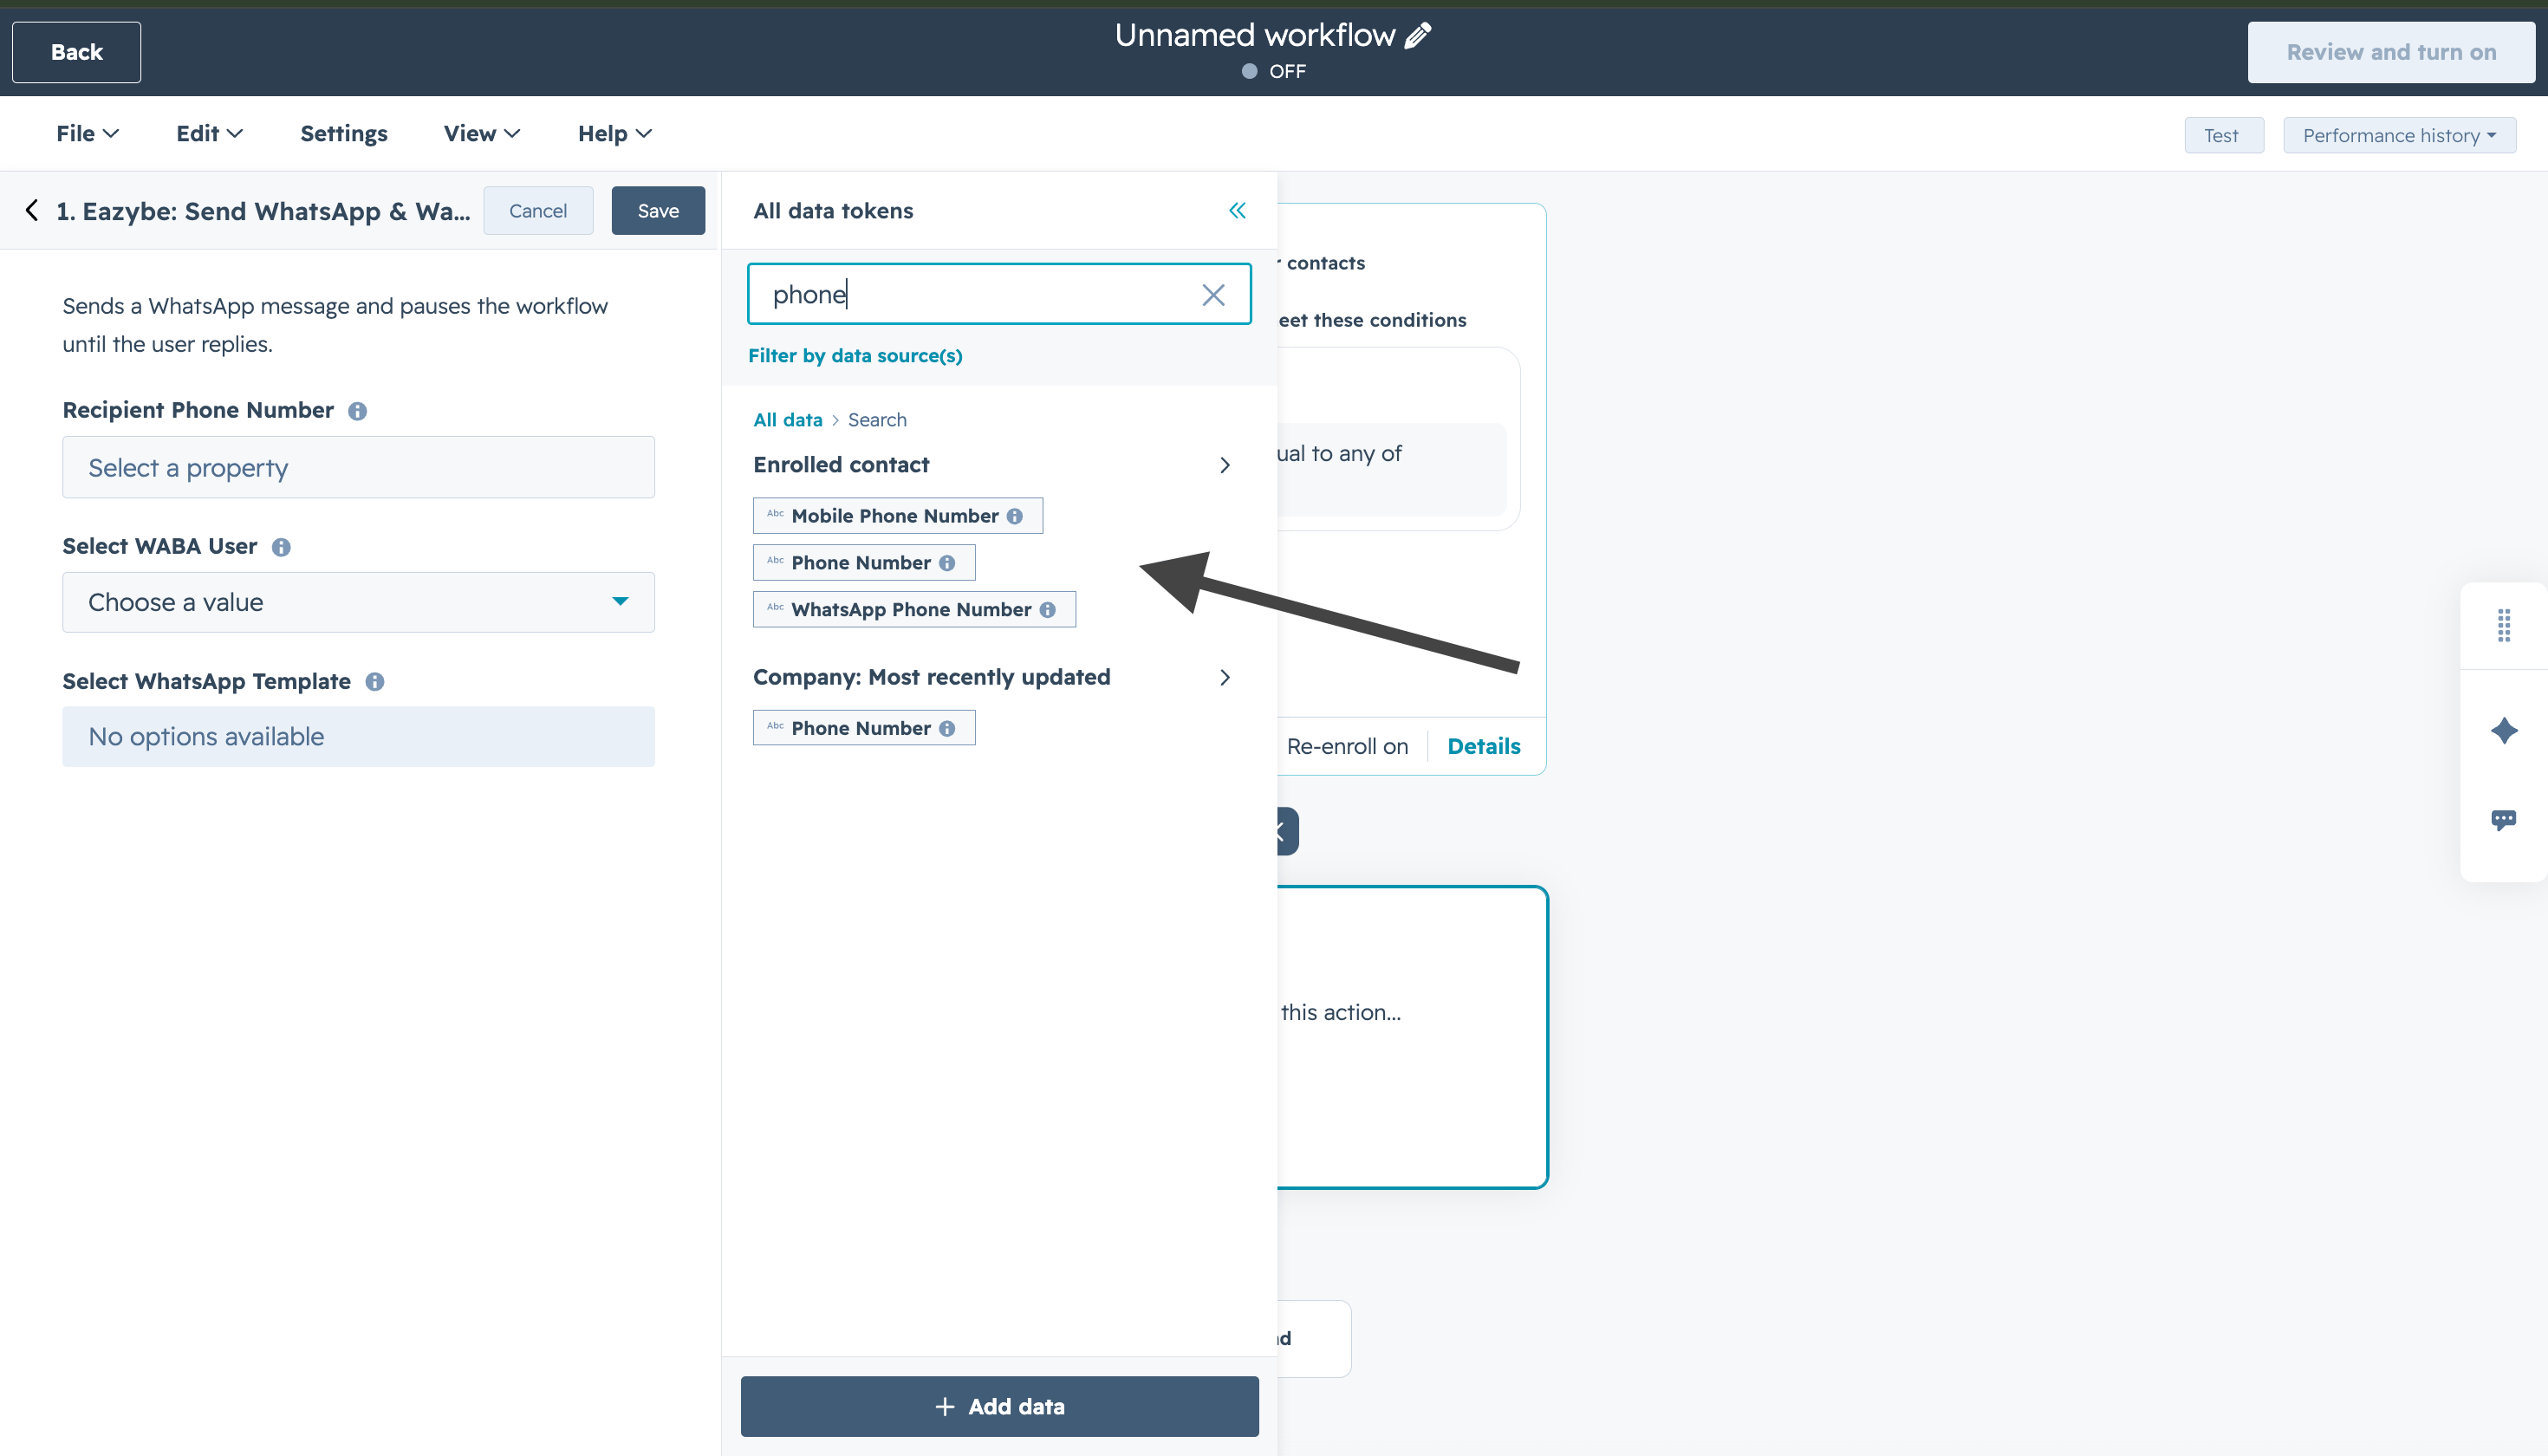
  <Step title="Selecciona una propiedad de teléfono">
    Elige **Mobile phone number**, **Phone number** o **WhatsApp phone number**.
    <img src="https://mintcdn.com/eazybe/NZtXvr5CRt0MZpuu/images/hubspot-wait-reply-select-phone-property.png?fit=max&auto=format&n=NZtXvr5CRt0MZpuu&q=85&s=5ff9d179918017ac6ff360d0e669c5ba" alt="Seleccionar una propiedad de teléfono" width="2940" height="1680" data-path="images/hubspot-wait-reply-select-phone-property.png" />
  </Step>

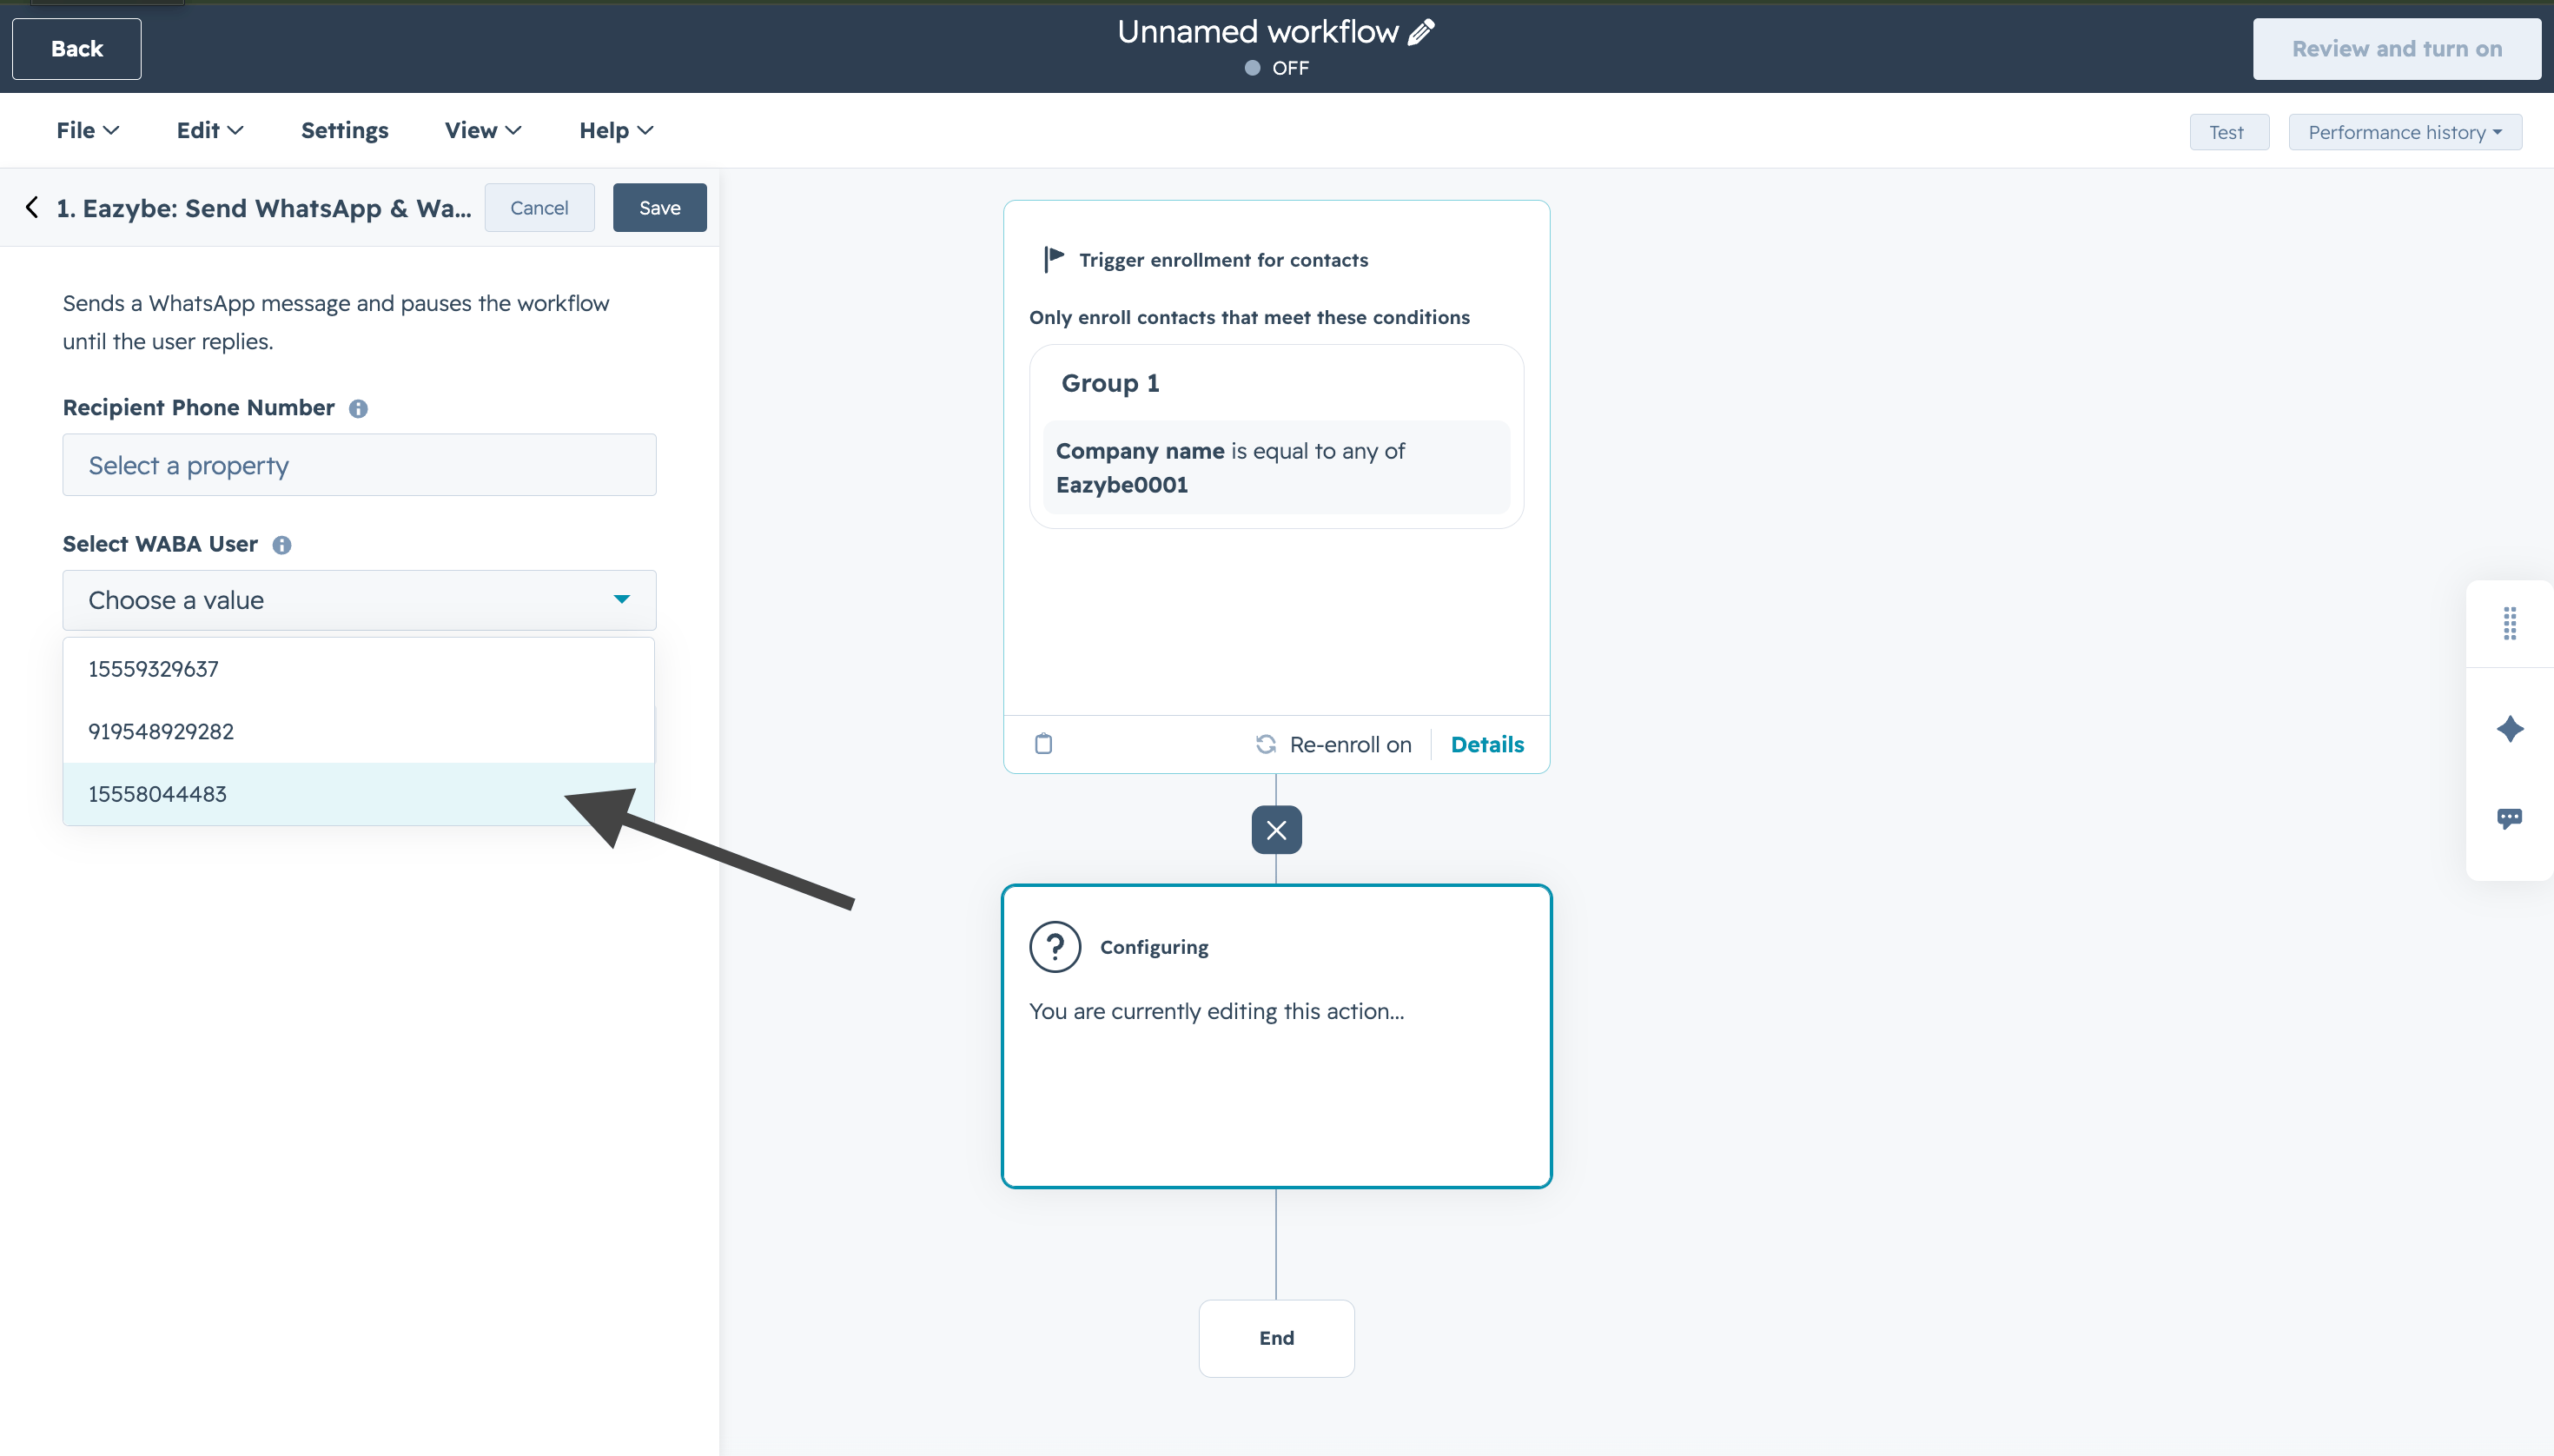
  <Step title="Elige el número de WABA">
    Selecciona un usuario de WABA entre las opciones disponibles.
    <img src="https://mintcdn.com/eazybe/NZtXvr5CRt0MZpuu/images/hubspot-wait-reply-choose-whatsapp-template.png?fit=max&auto=format&n=NZtXvr5CRt0MZpuu&q=85&s=c72b0b28488e3ab5d05c4bff9d9523ec" alt="Elegir un número de WABA" width="2940" height="1676" data-path="images/hubspot-wait-reply-choose-whatsapp-template.png" />
  </Step>

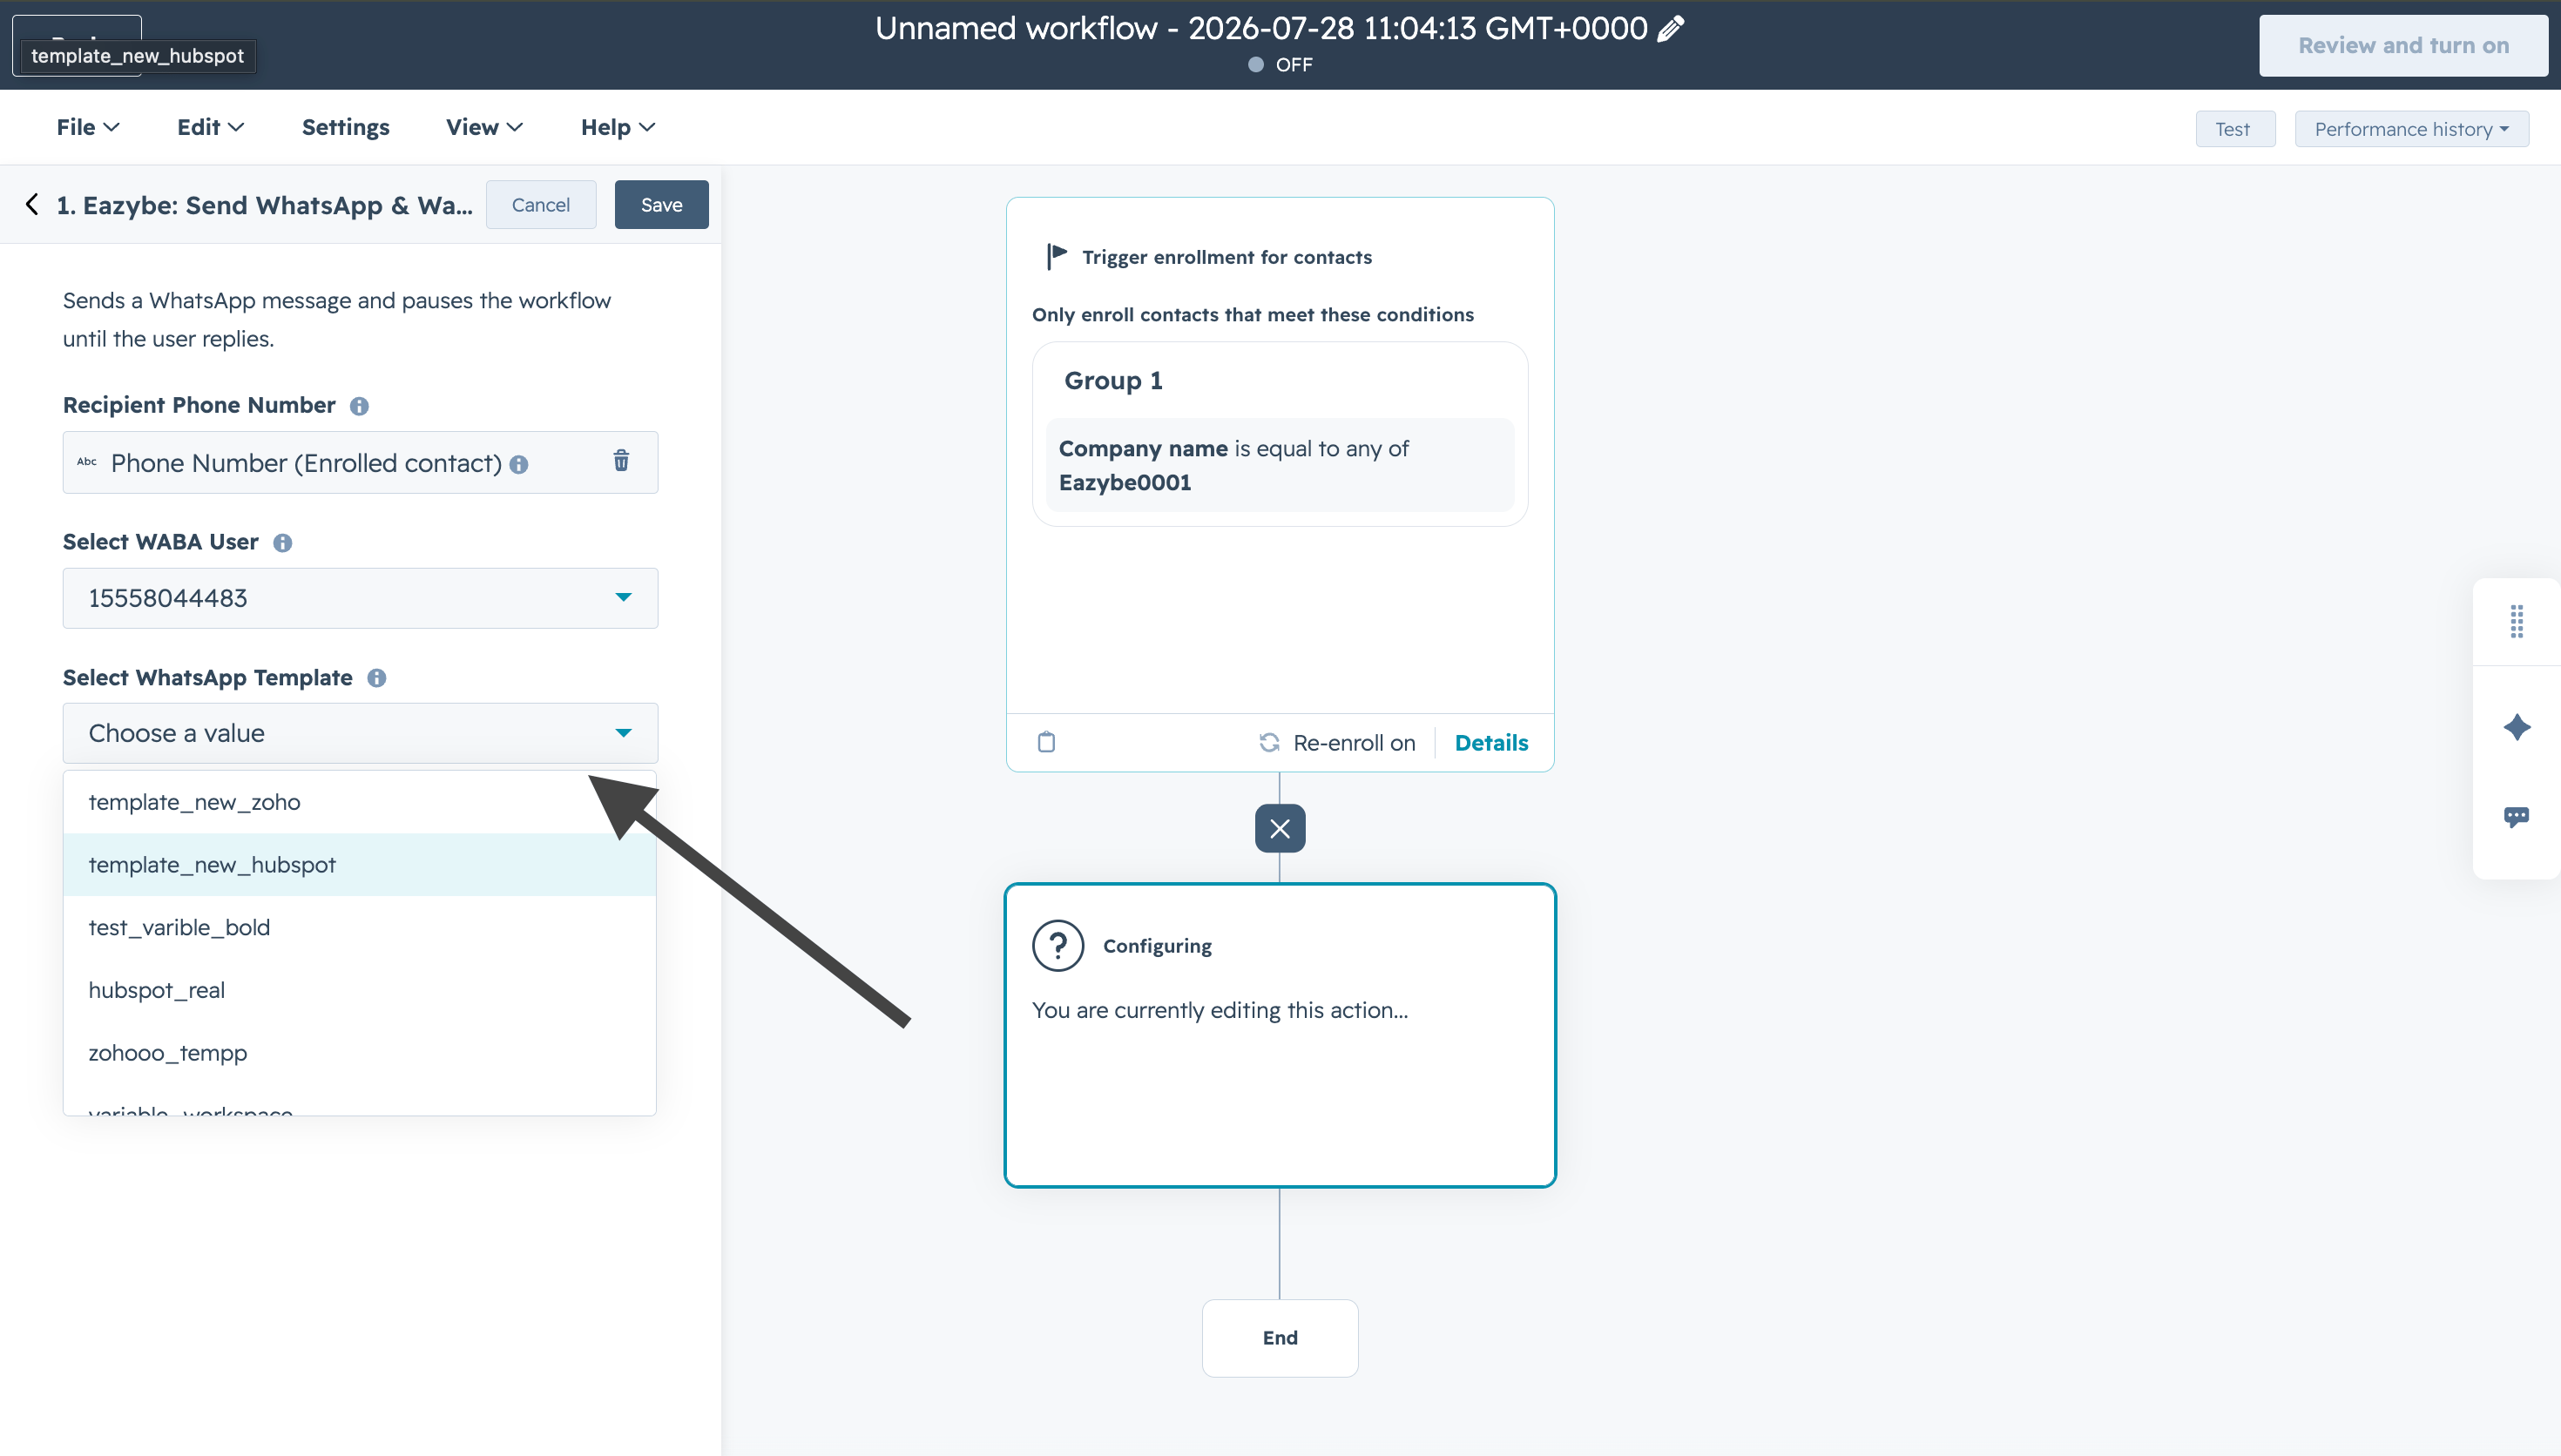
  <Step title="Elige una plantilla con botones">
    Selecciona una plantilla con botones aprobada para crear una rama condicional.
    <img src="https://mintcdn.com/eazybe/NZtXvr5CRt0MZpuu/images/hubspot-wait-reply-select-whatsapp-template.png?fit=max&auto=format&n=NZtXvr5CRt0MZpuu&q=85&s=a48d48e60335bfeca4eed31fb86250d1" alt="Elegir una plantilla con botones" width="2940" height="1672" data-path="images/hubspot-wait-reply-select-whatsapp-template.png" />
  </Step>

  <Step title="Guarda la selección de plantilla">
    Haz clic en **Save** para confirmar la selección.
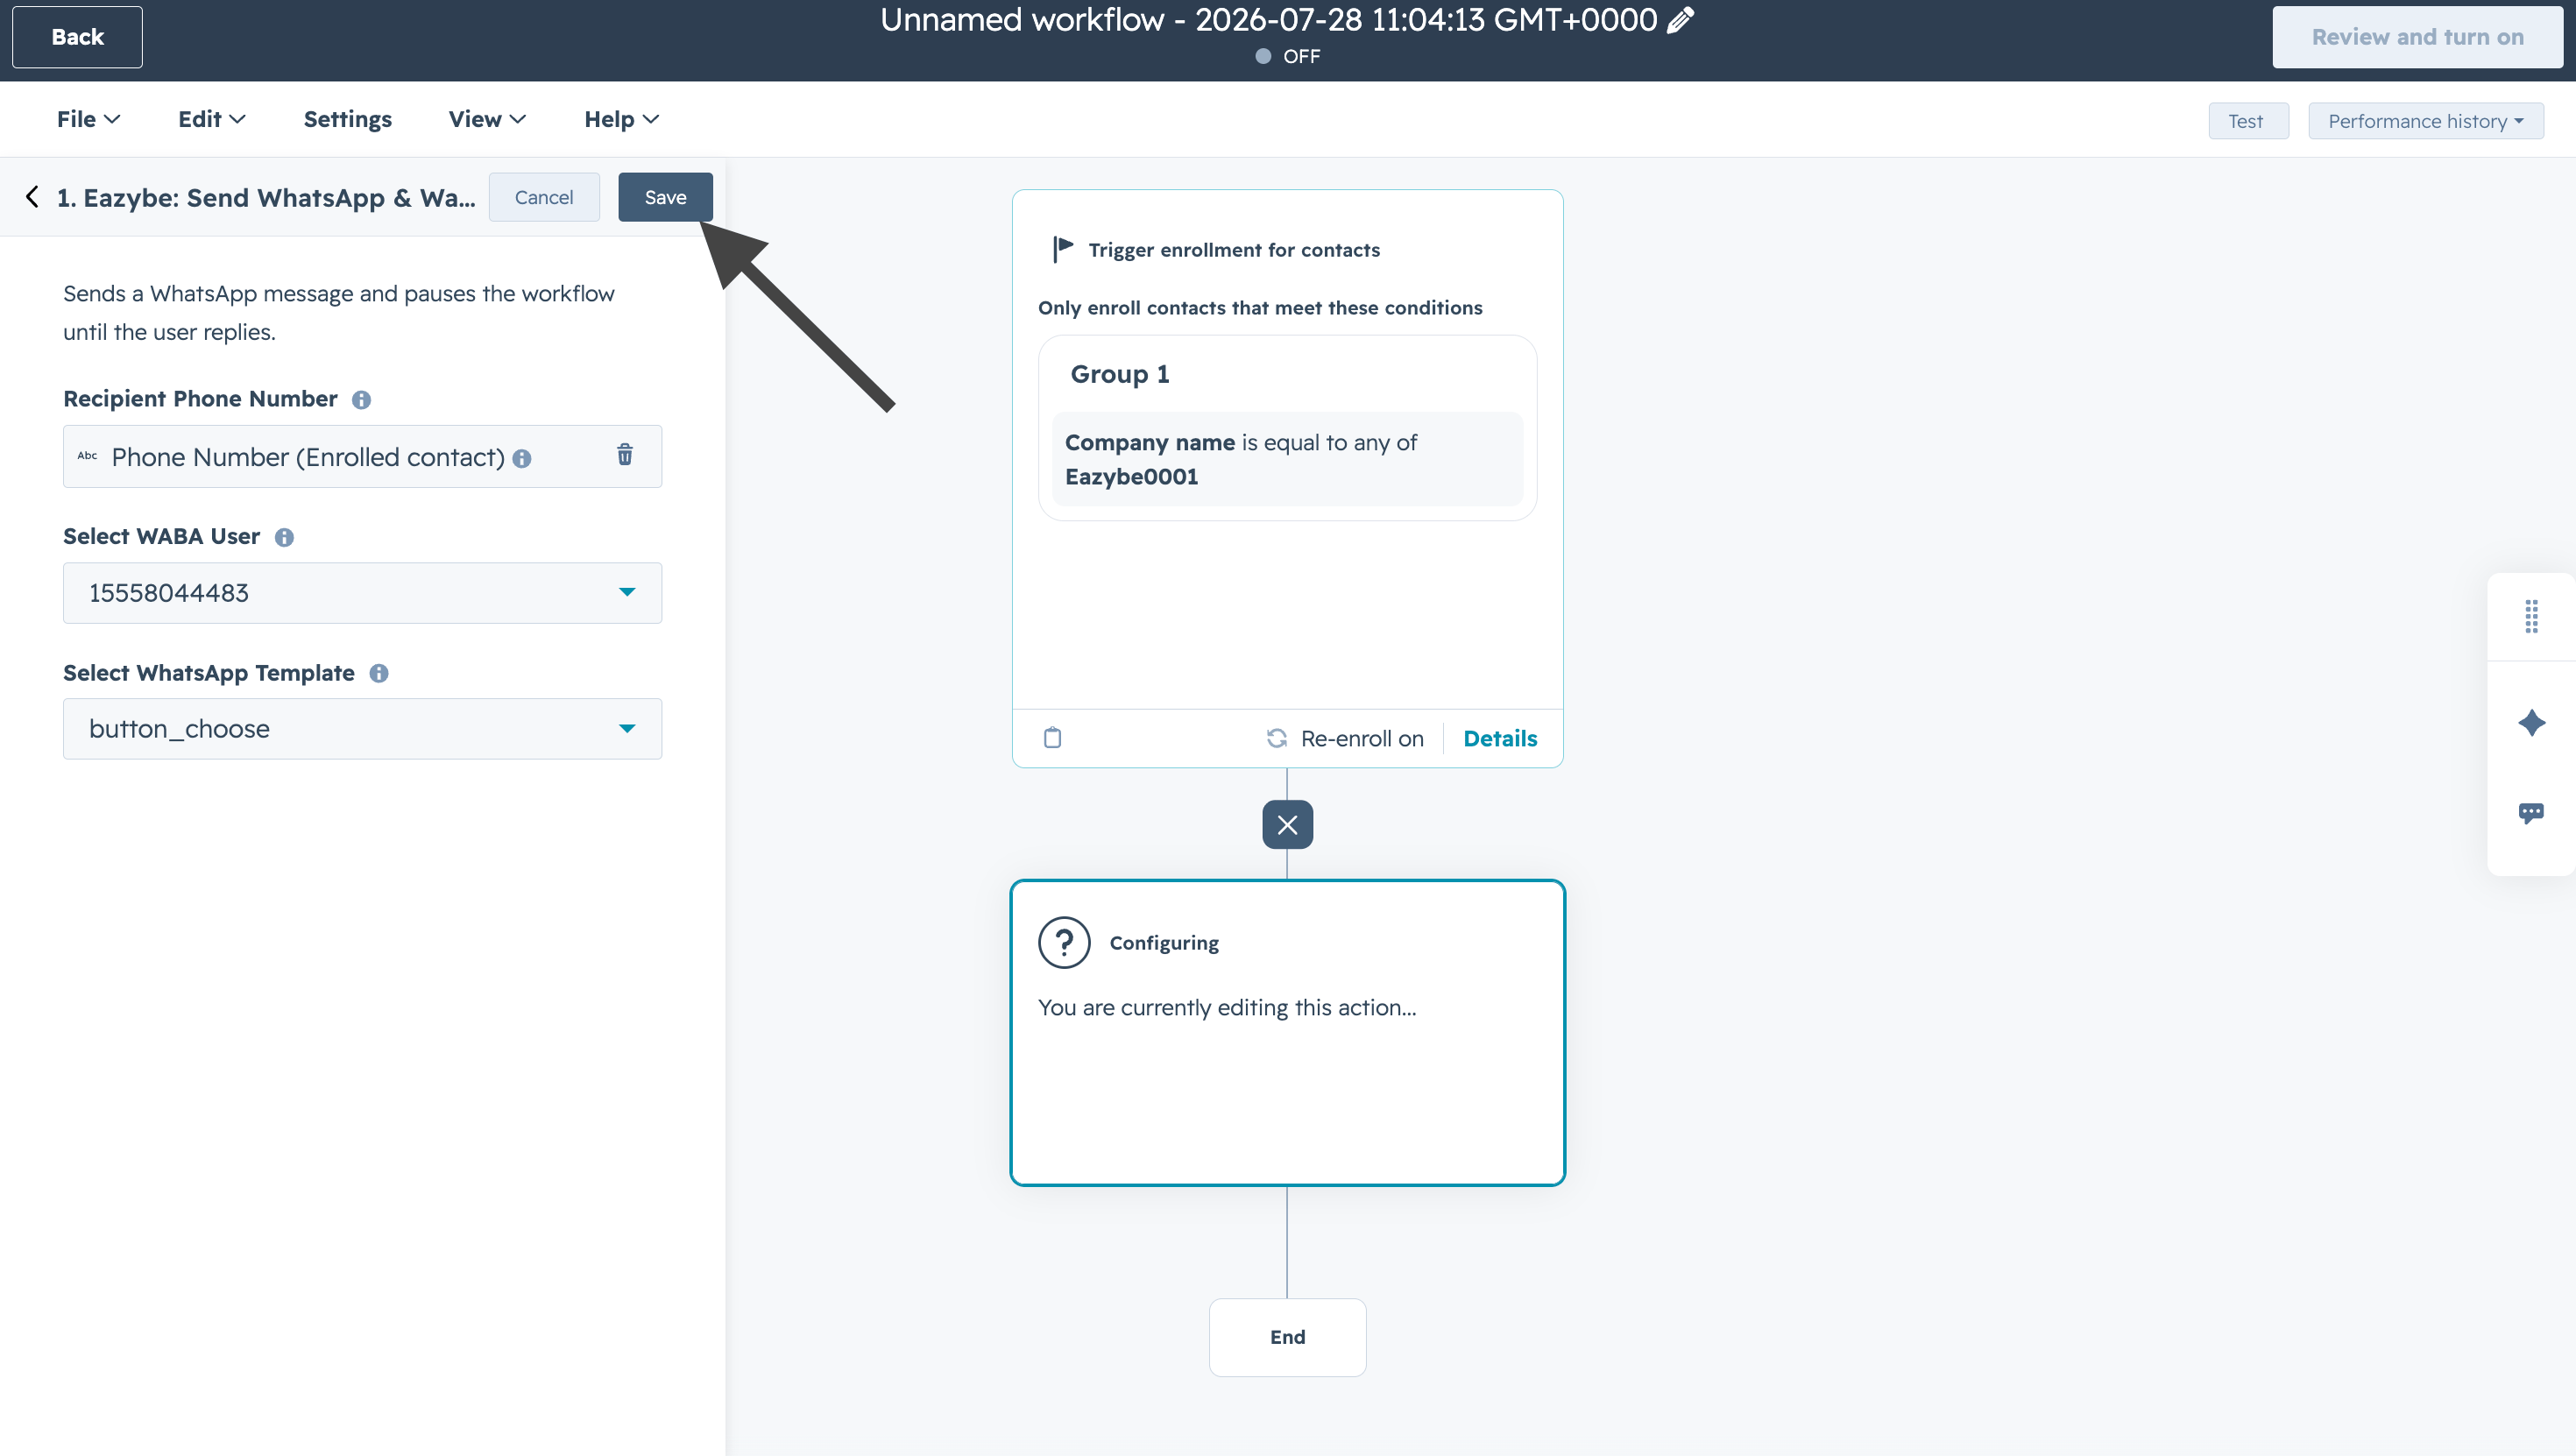
    <img src="https://mintcdn.com/eazybe/NZtXvr5CRt0MZpuu/images/hubspot-wait-reply-save-template-selection.png?fit=max&auto=format&n=NZtXvr5CRt0MZpuu&q=85&s=9840ed9c860a57f444403969f4dae373" alt="Guardar la selección de plantilla" width="2940" height="1662" data-path="images/hubspot-wait-reply-save-template-selection.png" />
  </Step>

  <Step title="Crea una nueva rama">
    Haz clic en **+** y crea una nueva rama.
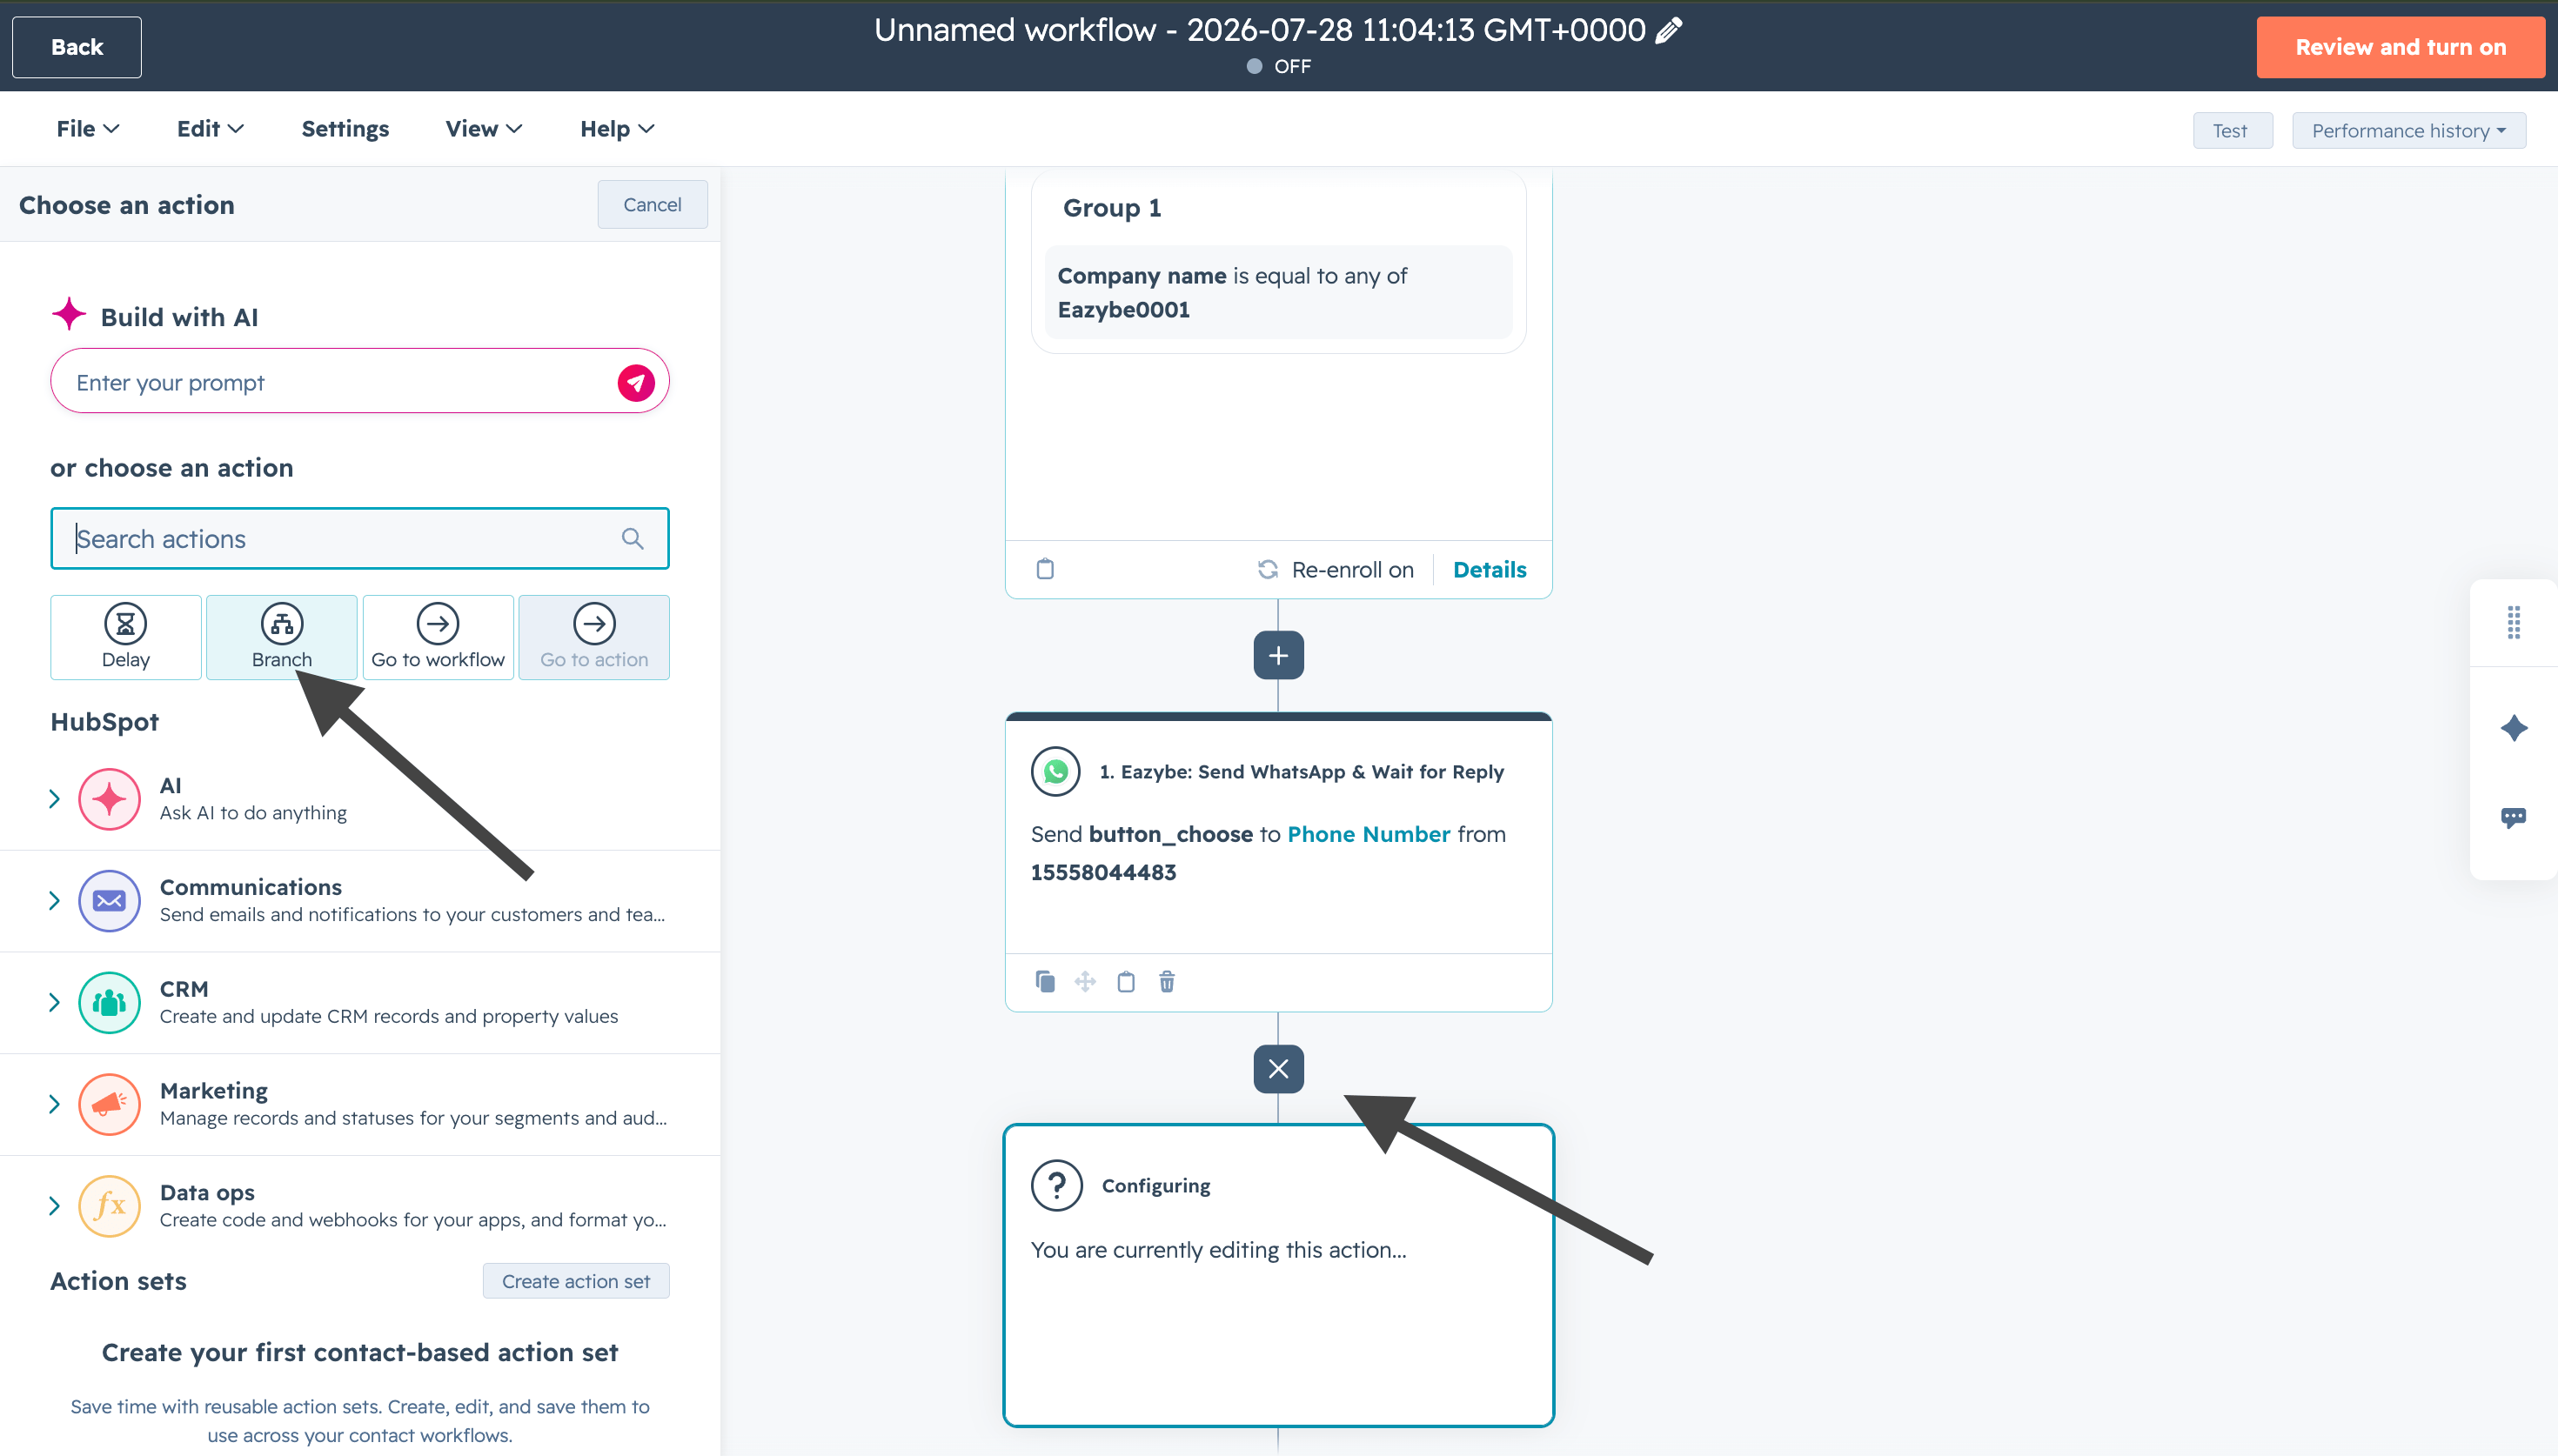
    <img src="https://mintcdn.com/eazybe/NZtXvr5CRt0MZpuu/images/hubspot-wait-reply-create-new-branch.png?fit=max&auto=format&n=NZtXvr5CRt0MZpuu&q=85&s=e132c7b621b4e4968be768a82c2f5b4f" alt="Crear una nueva rama" width="2940" height="1674" data-path="images/hubspot-wait-reply-create-new-branch.png" />
  </Step>

  <Step title="Selecciona una rama">
    Elige un tipo de rama para **enviar contactos a ramas**.
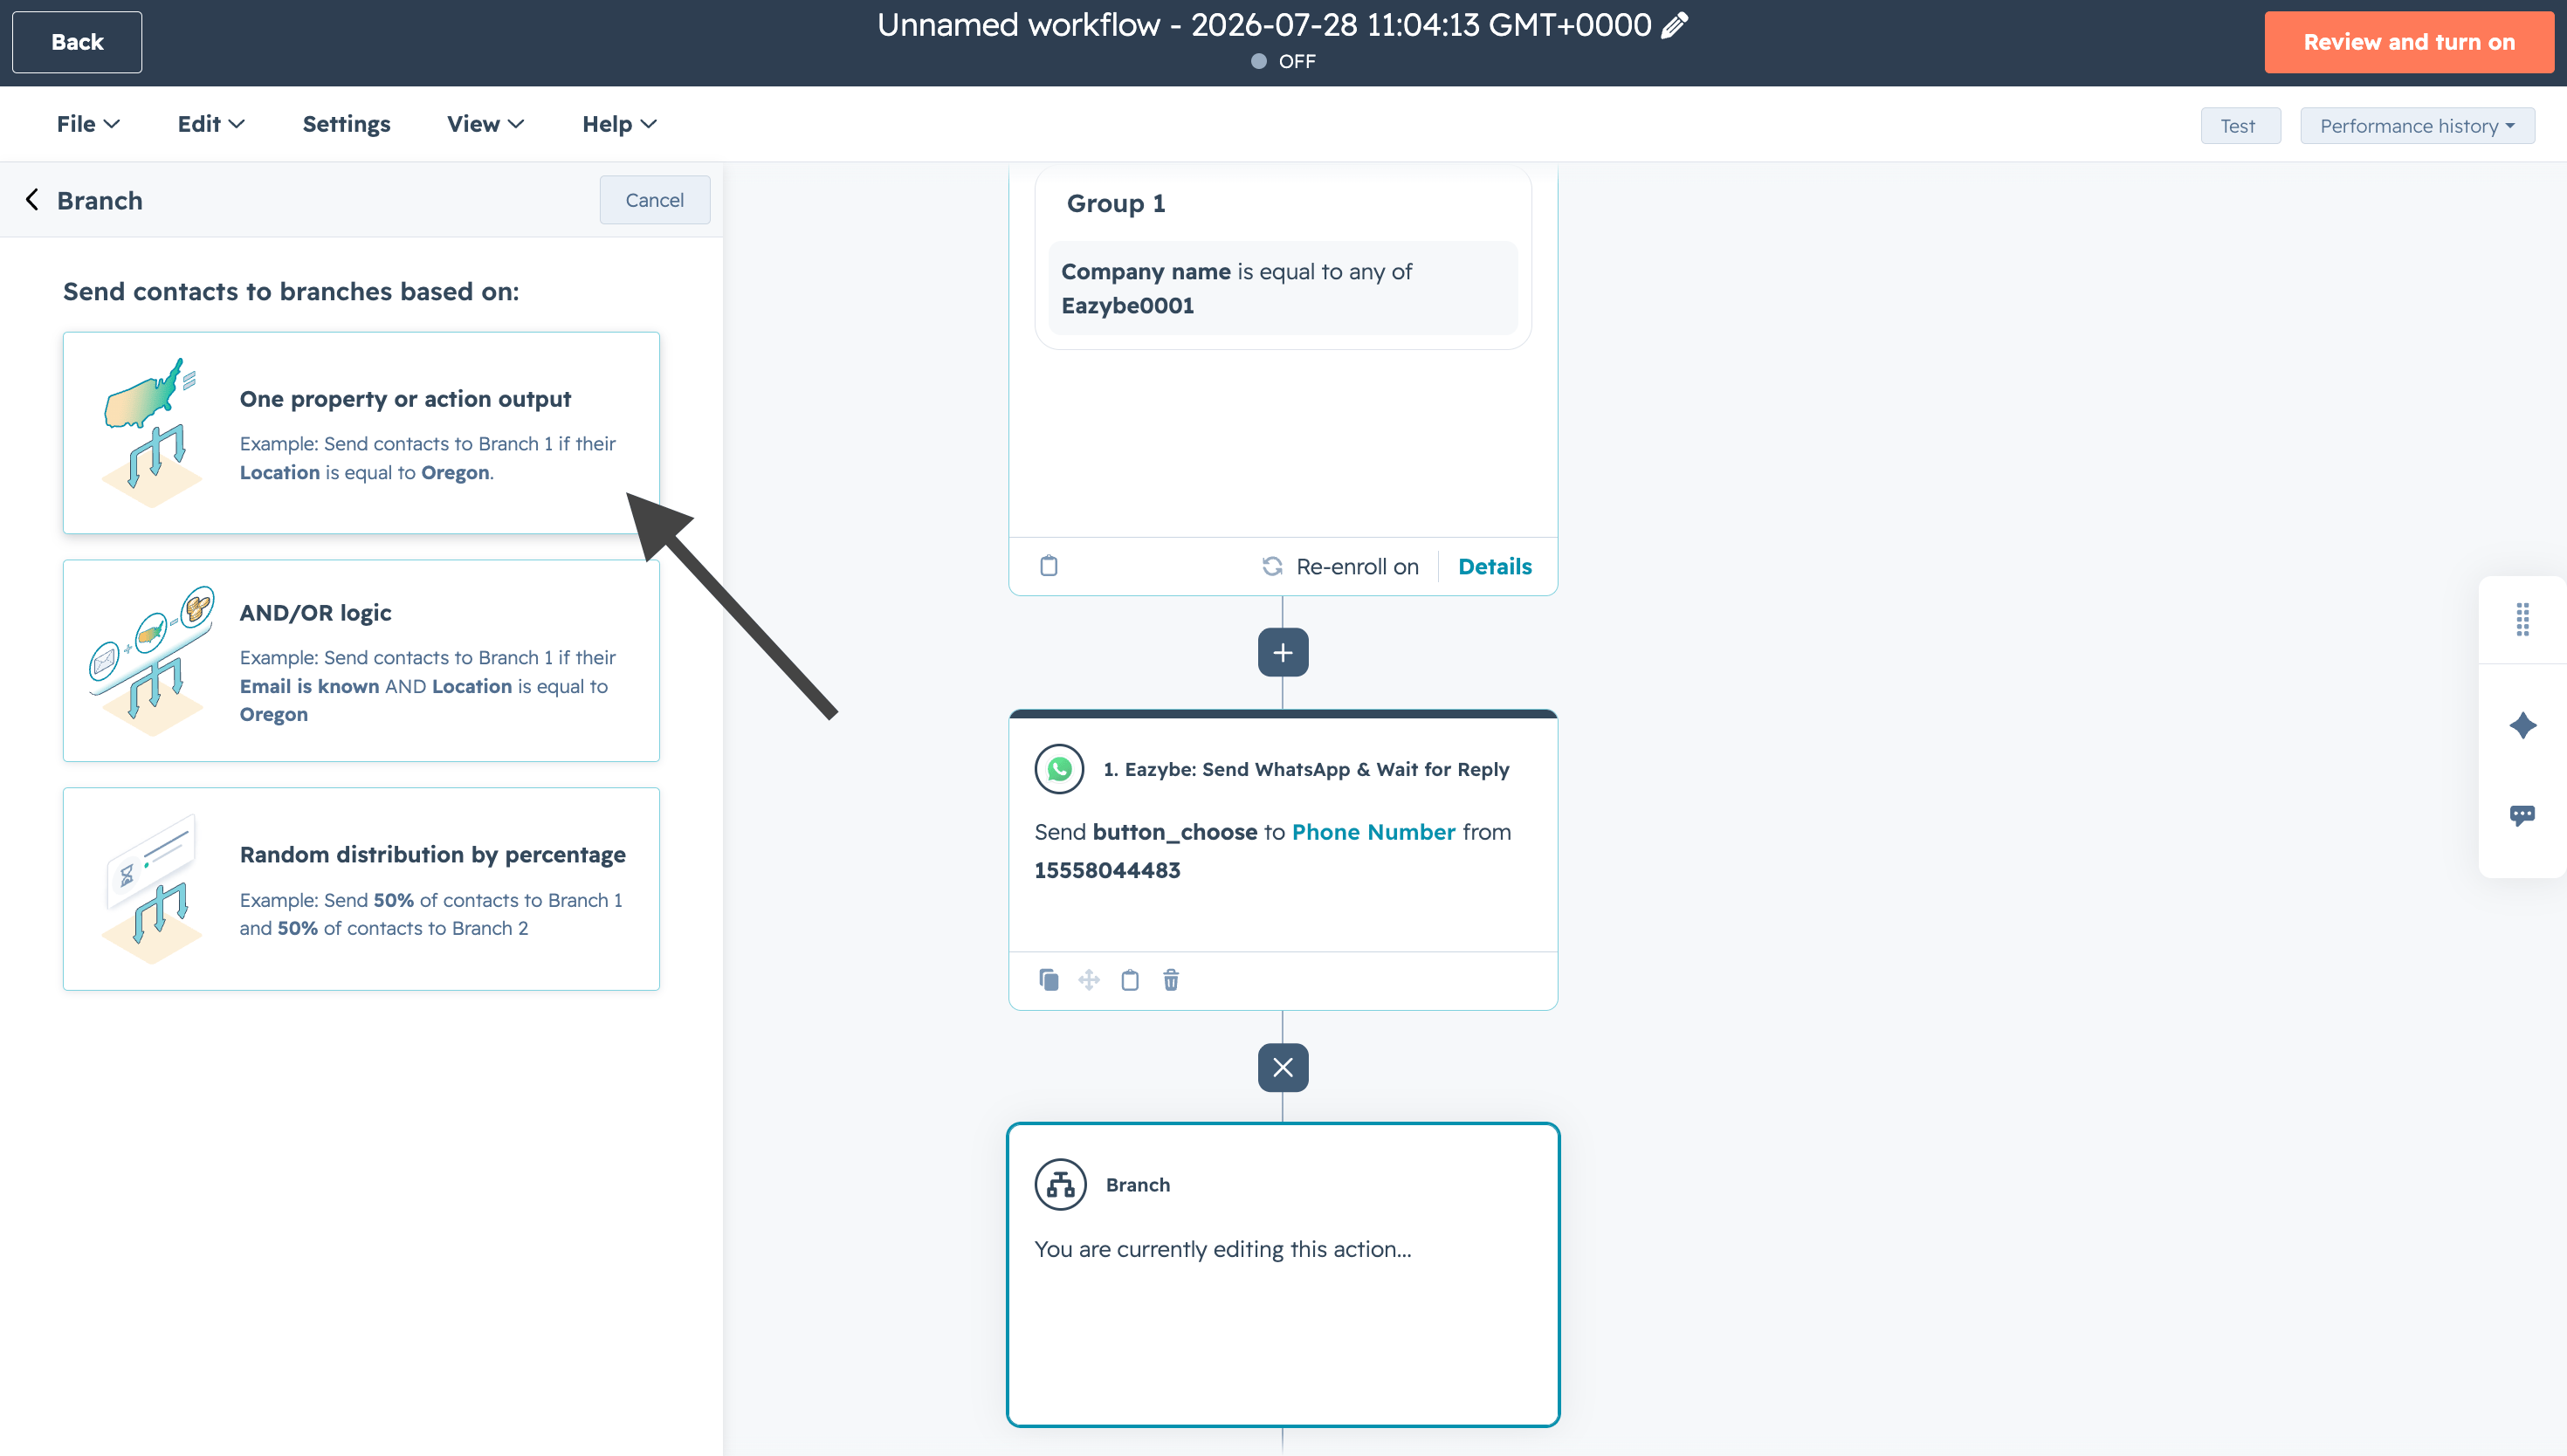
    <img src="https://mintcdn.com/eazybe/NZtXvr5CRt0MZpuu/images/hubspot-wait-reply-select-branch.png?fit=max&auto=format&n=NZtXvr5CRt0MZpuu&q=85&s=c701652005a1743618598e4721b74dd0" alt="Seleccionar un tipo de rama" width="2940" height="1668" data-path="images/hubspot-wait-reply-select-branch.png" />
  </Step>

  <Step title="Selecciona el valor de la propiedad">
    Elige la propiedad **User WhatsApp Reply** de **1. Eazybe: Send WhatsApp & Wait for Reply**.
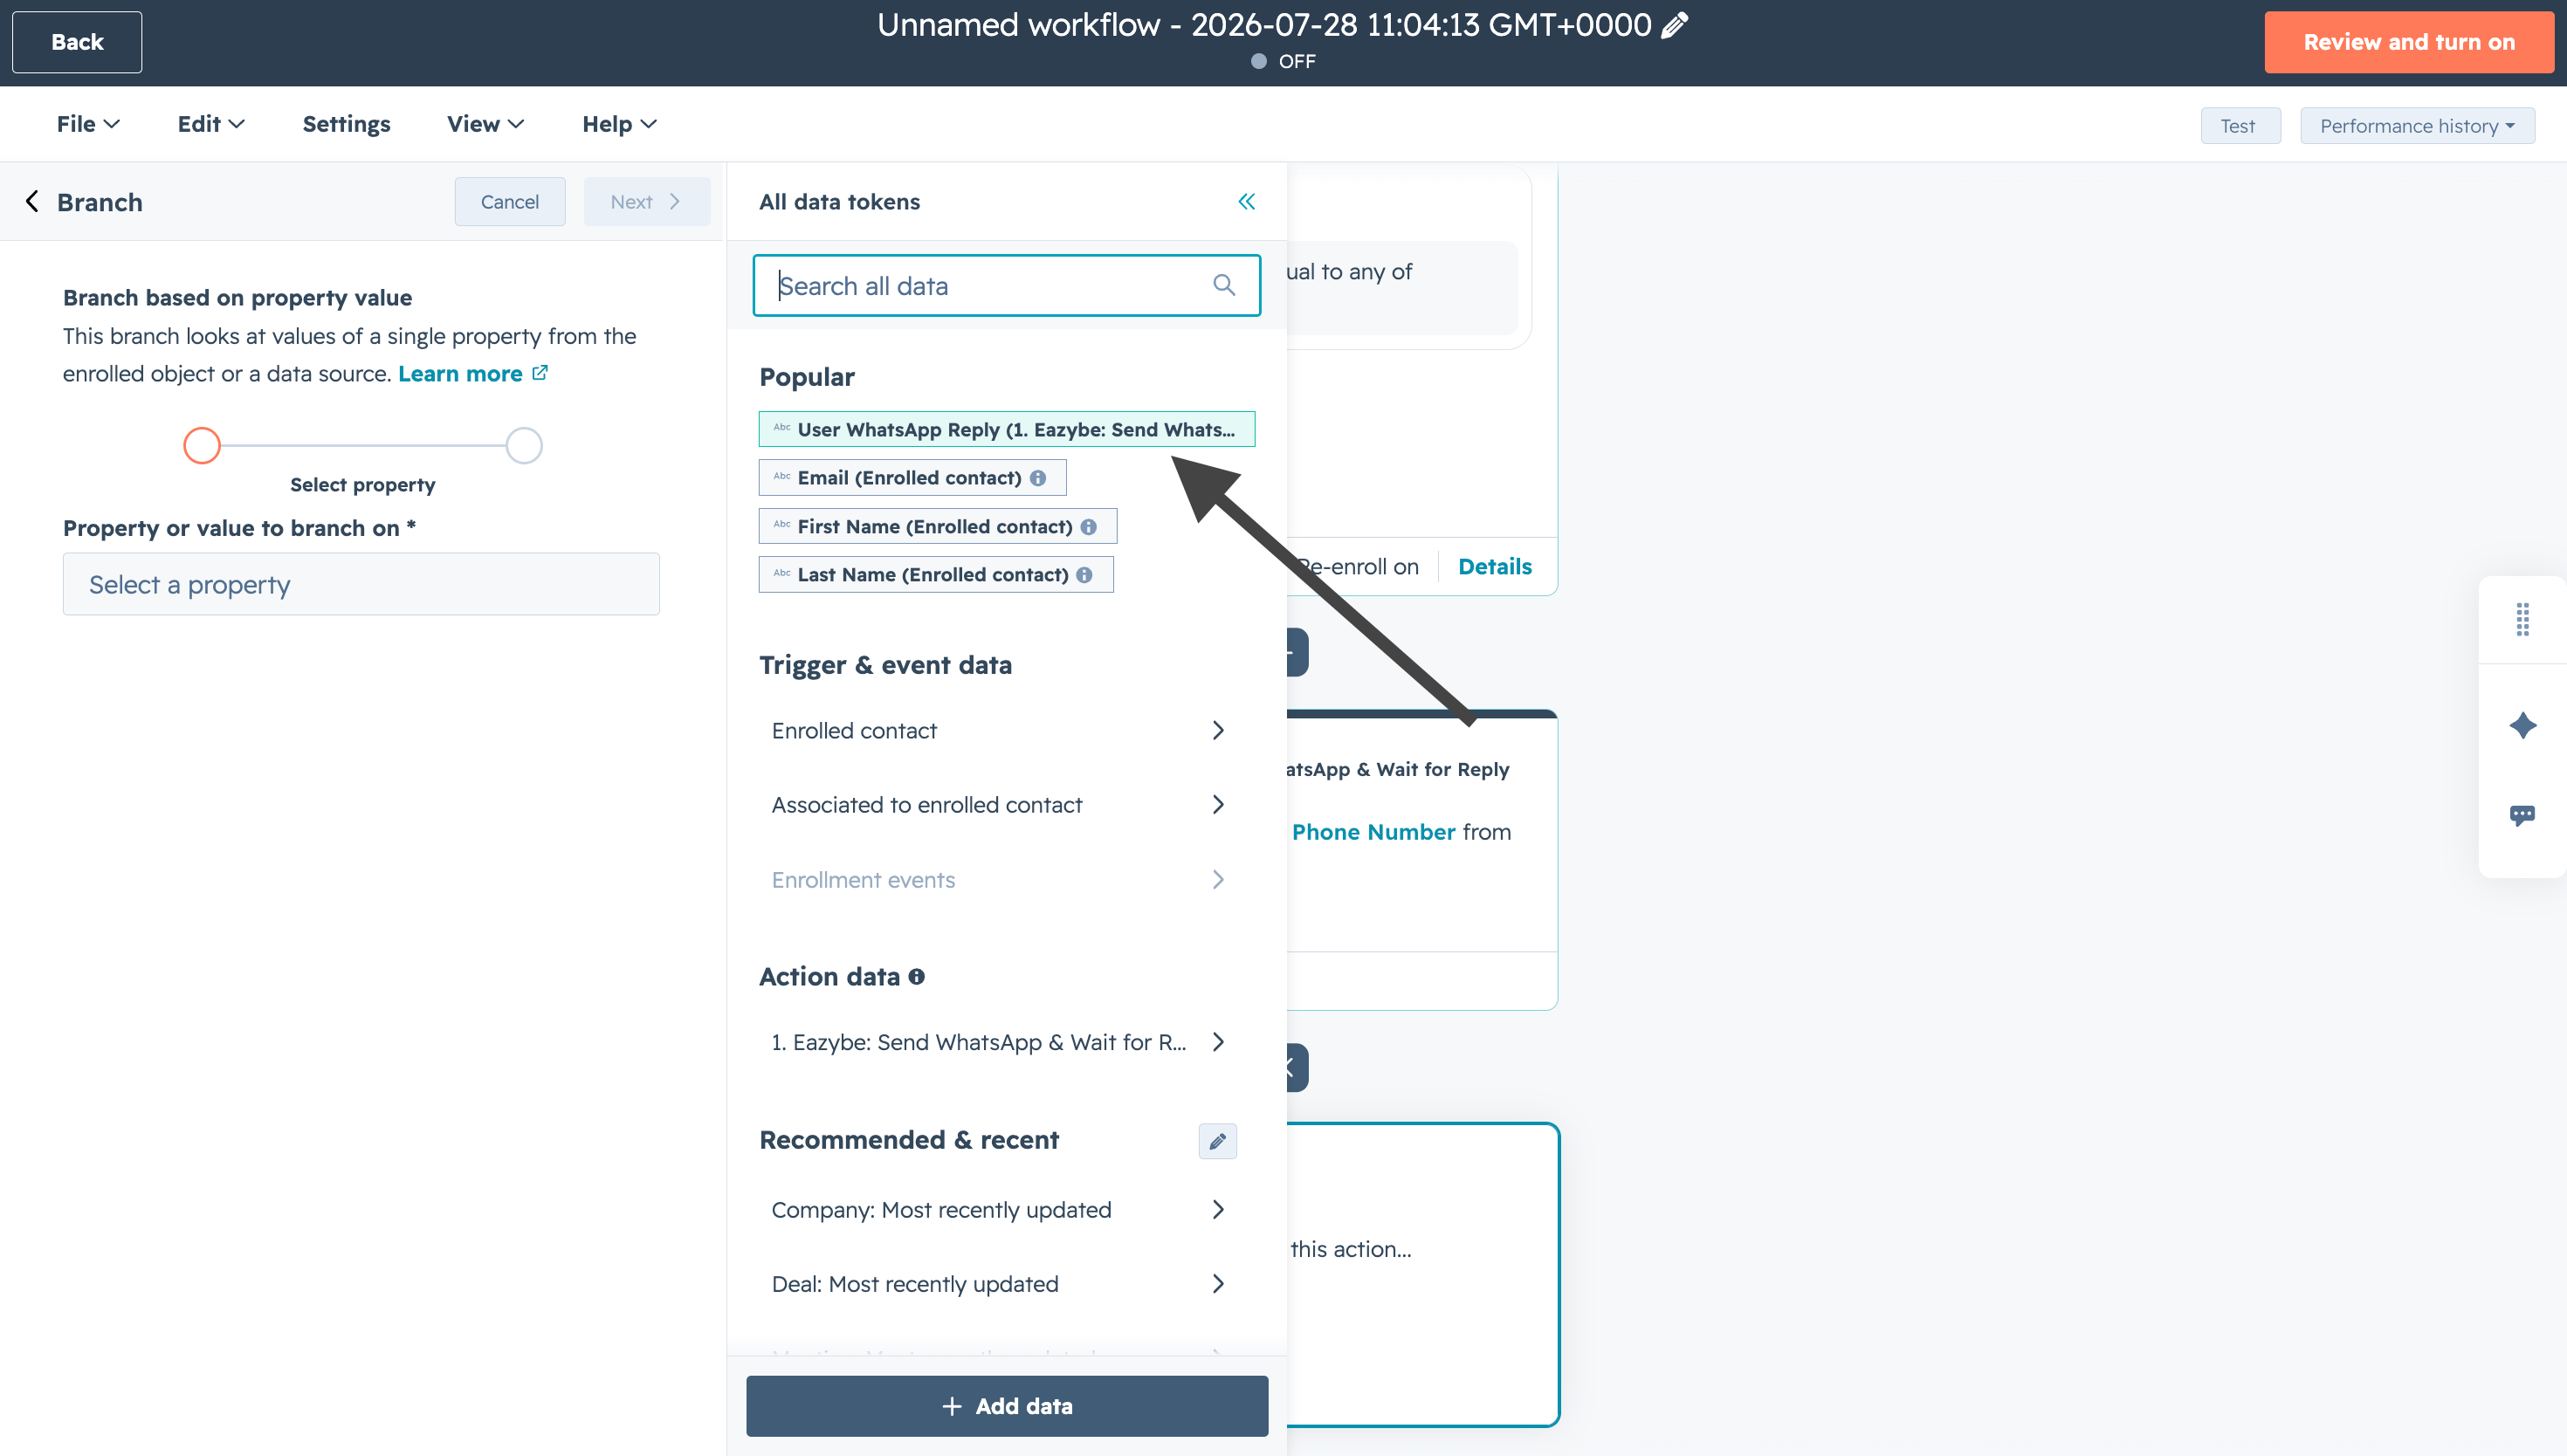
    <img src="https://mintcdn.com/eazybe/NZtXvr5CRt0MZpuu/images/hubspot-wait-reply-select-property-value.png?fit=max&auto=format&n=NZtXvr5CRt0MZpuu&q=85&s=b0388ab83f52ec7969ae8e23bf45dec3" alt="Seleccionar la propiedad de respuesta" width="2940" height="1668" data-path="images/hubspot-wait-reply-select-property-value.png" />
  </Step>

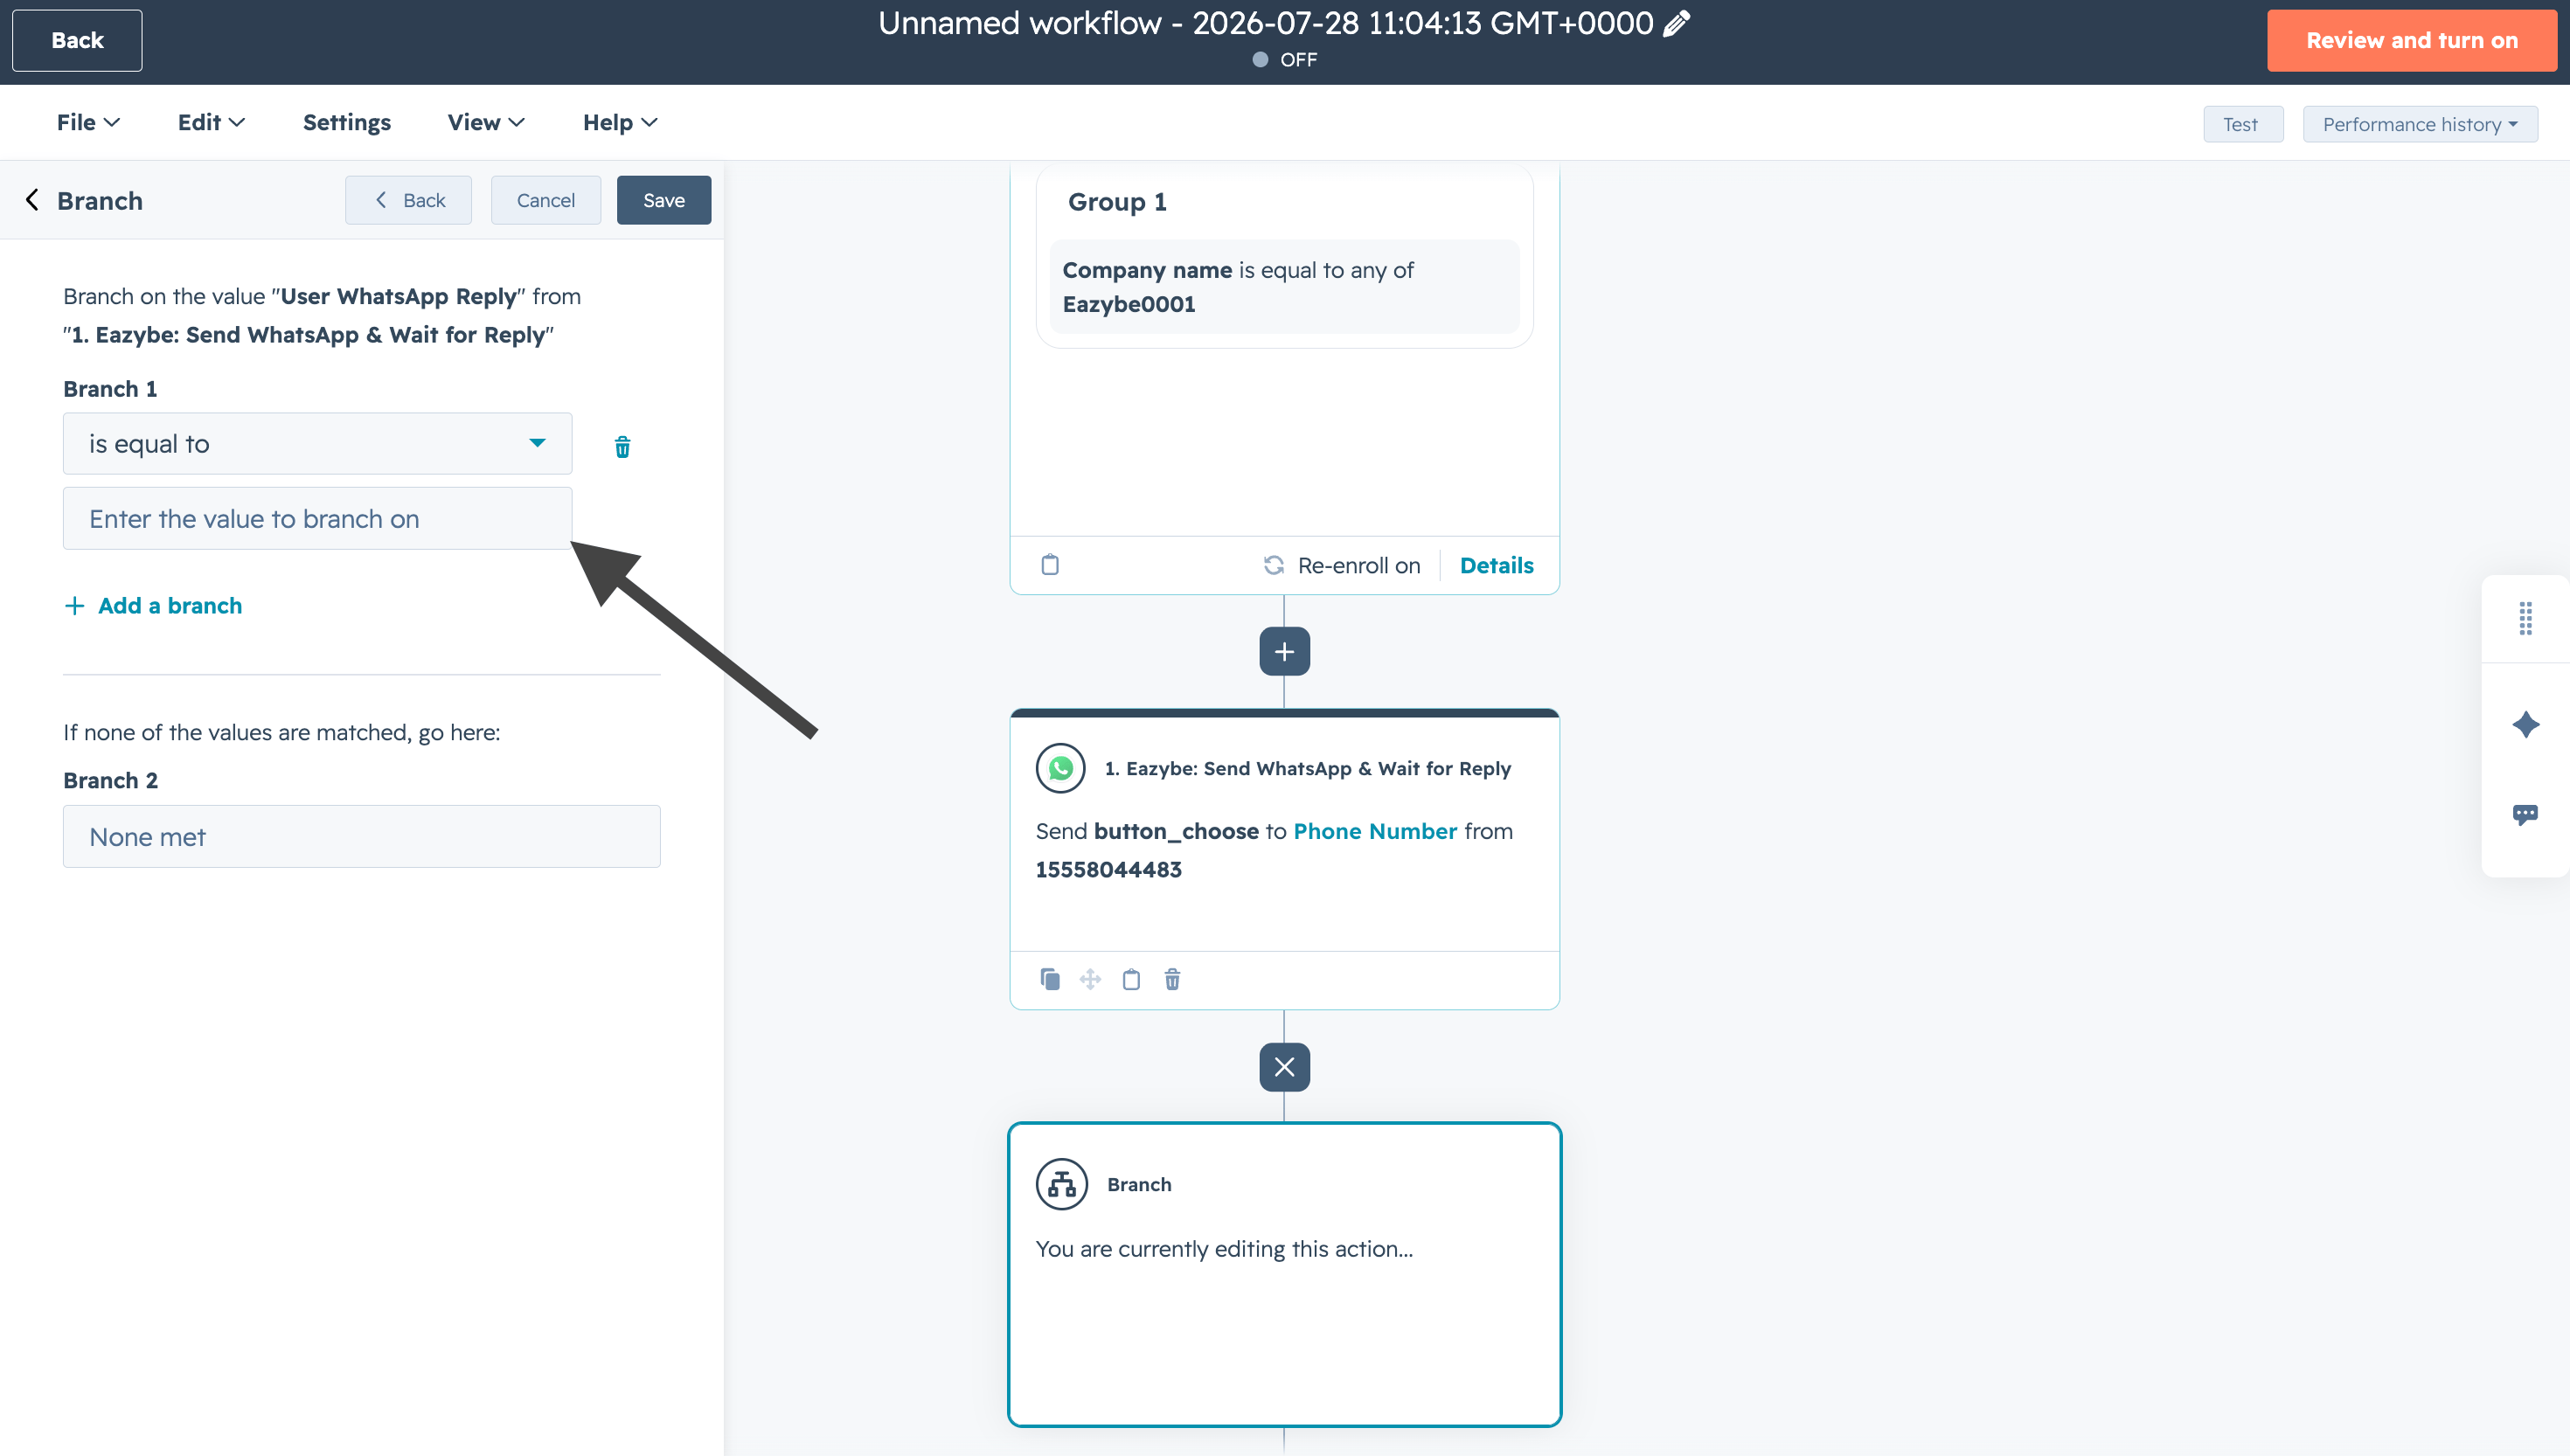
  <Step title="Define el valor de la condición">
    Añade un valor de condición de rama basado en el nombre del botón de la plantilla.
    <img src="https://mintcdn.com/eazybe/NZtXvr5CRt0MZpuu/images/hubspot-wait-reply-branch-condition-value.png?fit=max&auto=format&n=NZtXvr5CRt0MZpuu&q=85&s=4e8e2bdfc73fb6b68e73add7ed826bc0" alt="Añadir un valor de condición" width="2940" height="1666" data-path="images/hubspot-wait-reply-branch-condition-value.png" />
  </Step>

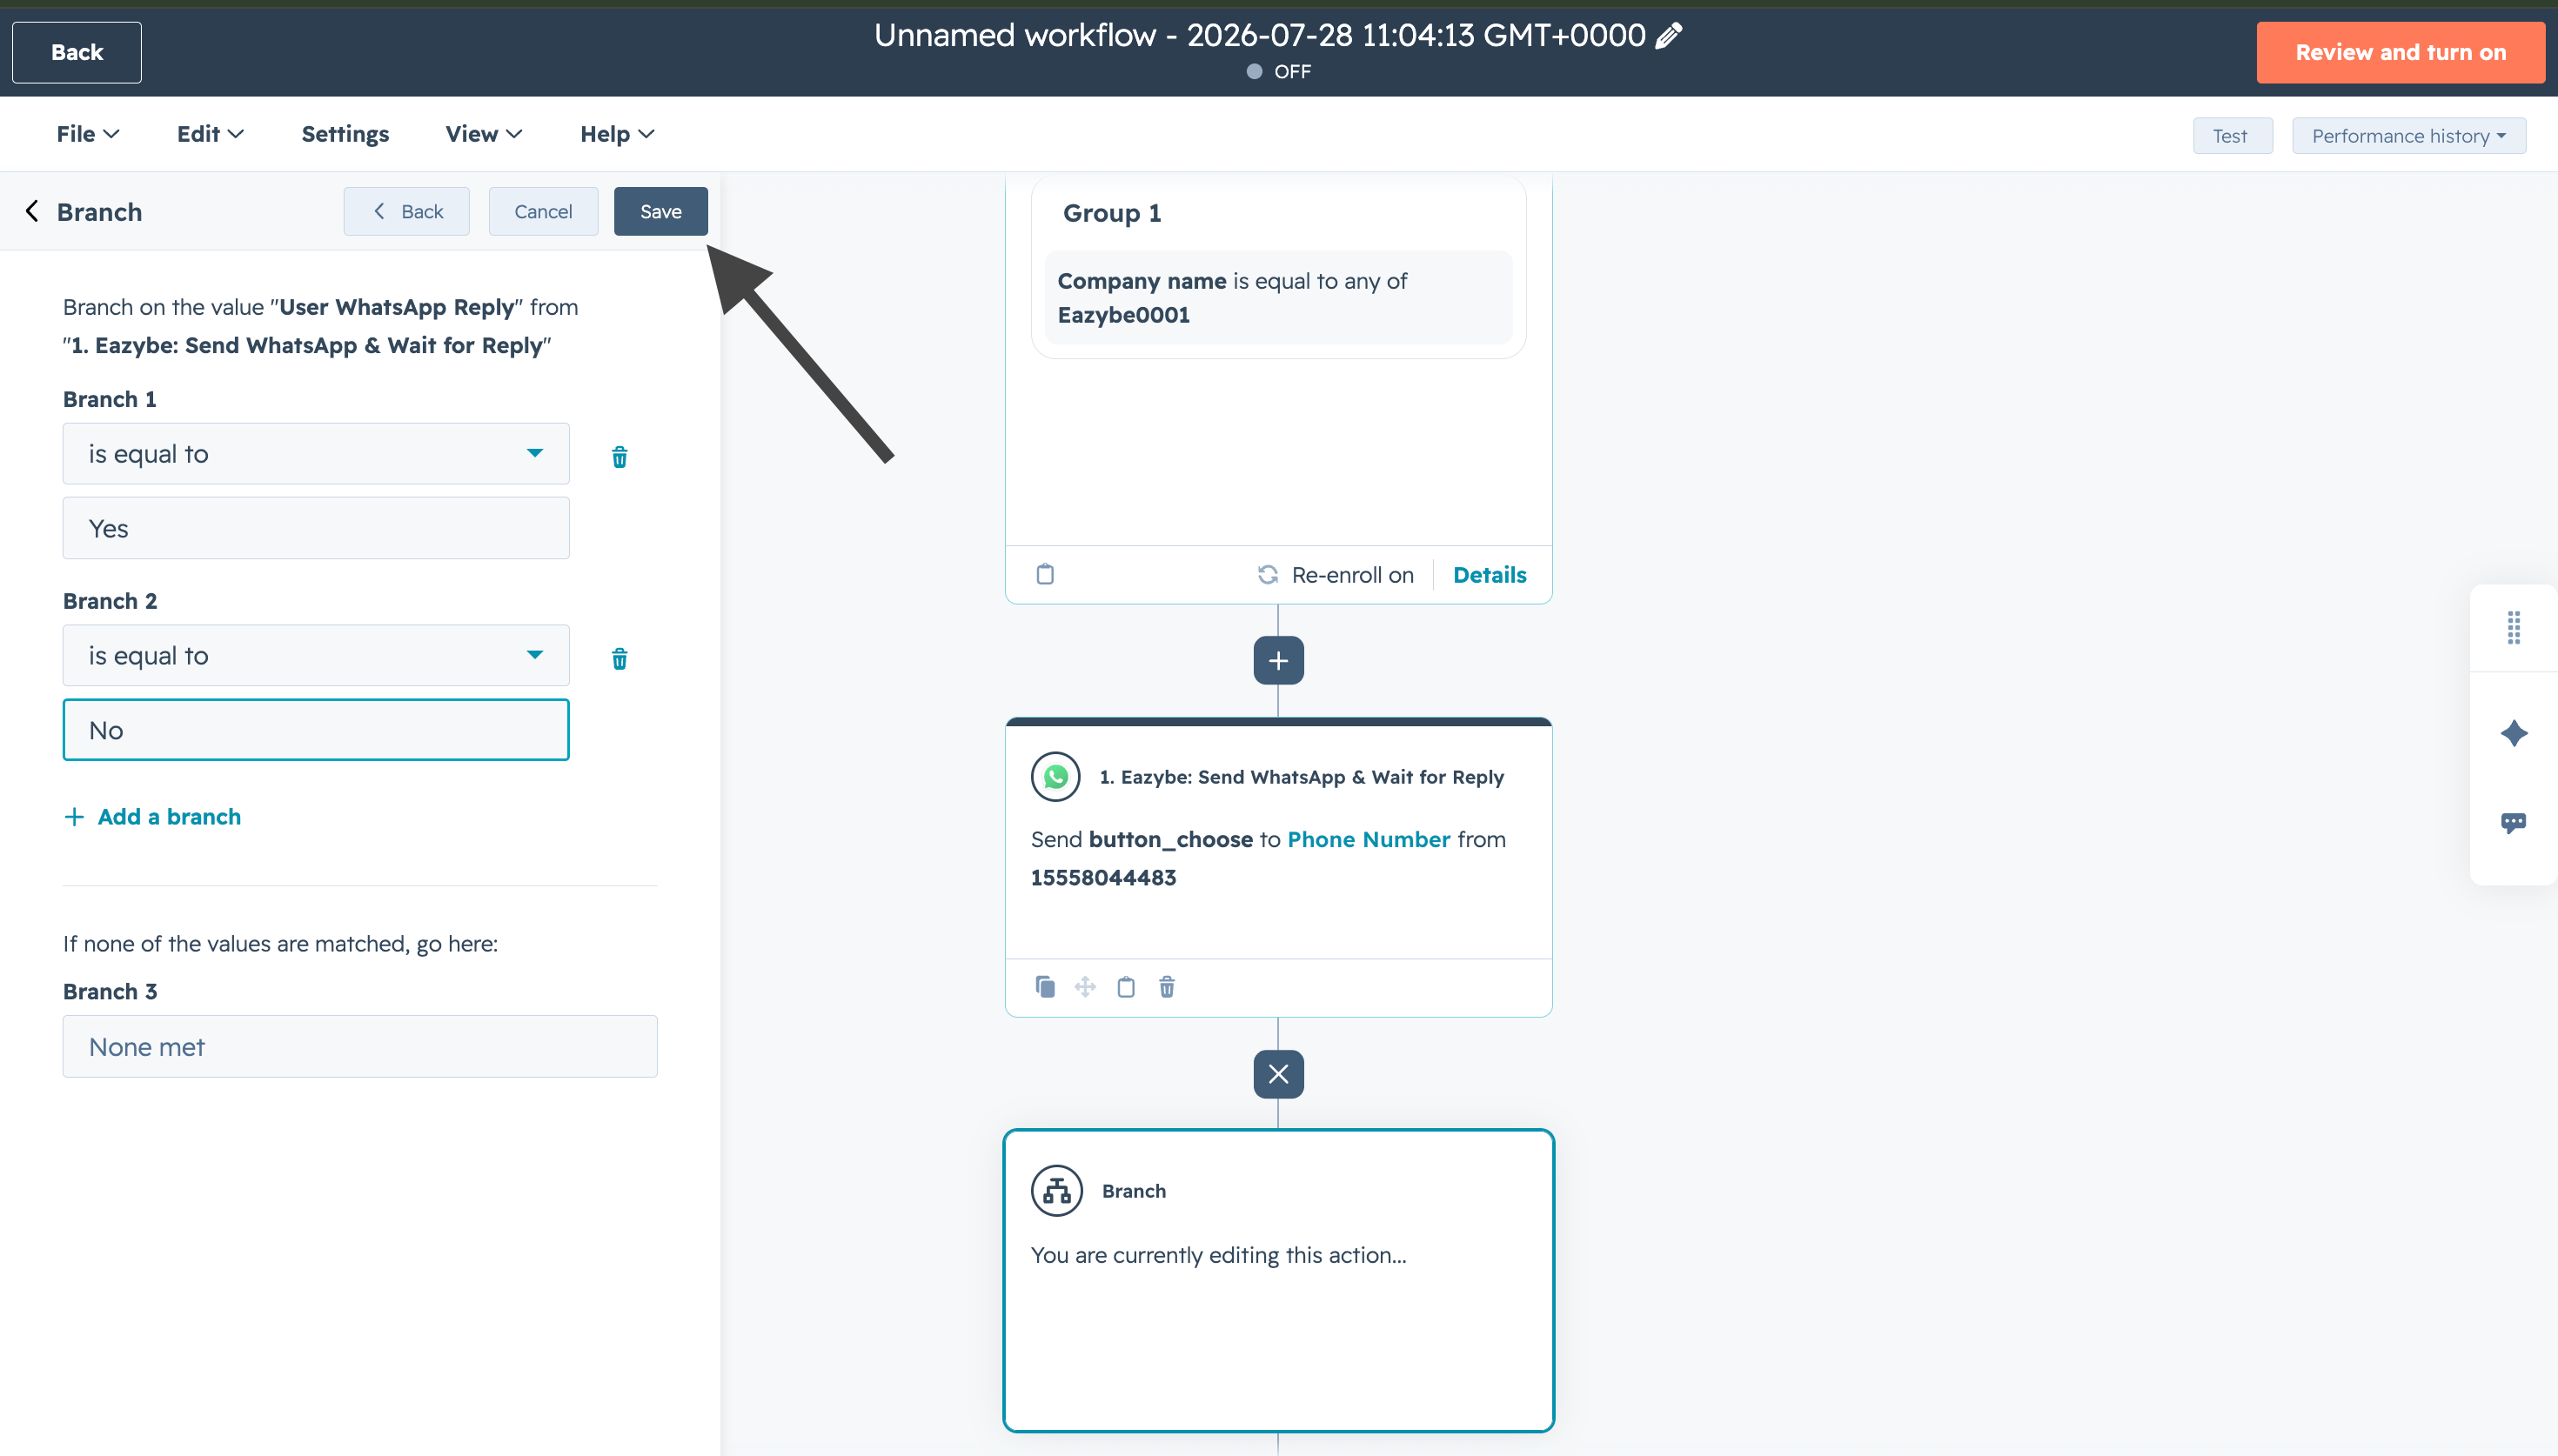
  <Step title="Guarda los valores de la rama">
    Haz clic en **Save** después de añadir los valores.
    <img src="https://mintcdn.com/eazybe/NZtXvr5CRt0MZpuu/images/hubspot-wait-reply-save-branch-values.png?fit=max&auto=format&n=NZtXvr5CRt0MZpuu&q=85&s=16dbb79da88573e327ef4f3fc6d012c7" alt="Guardar los valores de la rama" width="2940" height="1674" data-path="images/hubspot-wait-reply-save-branch-values.png" />
  </Step>

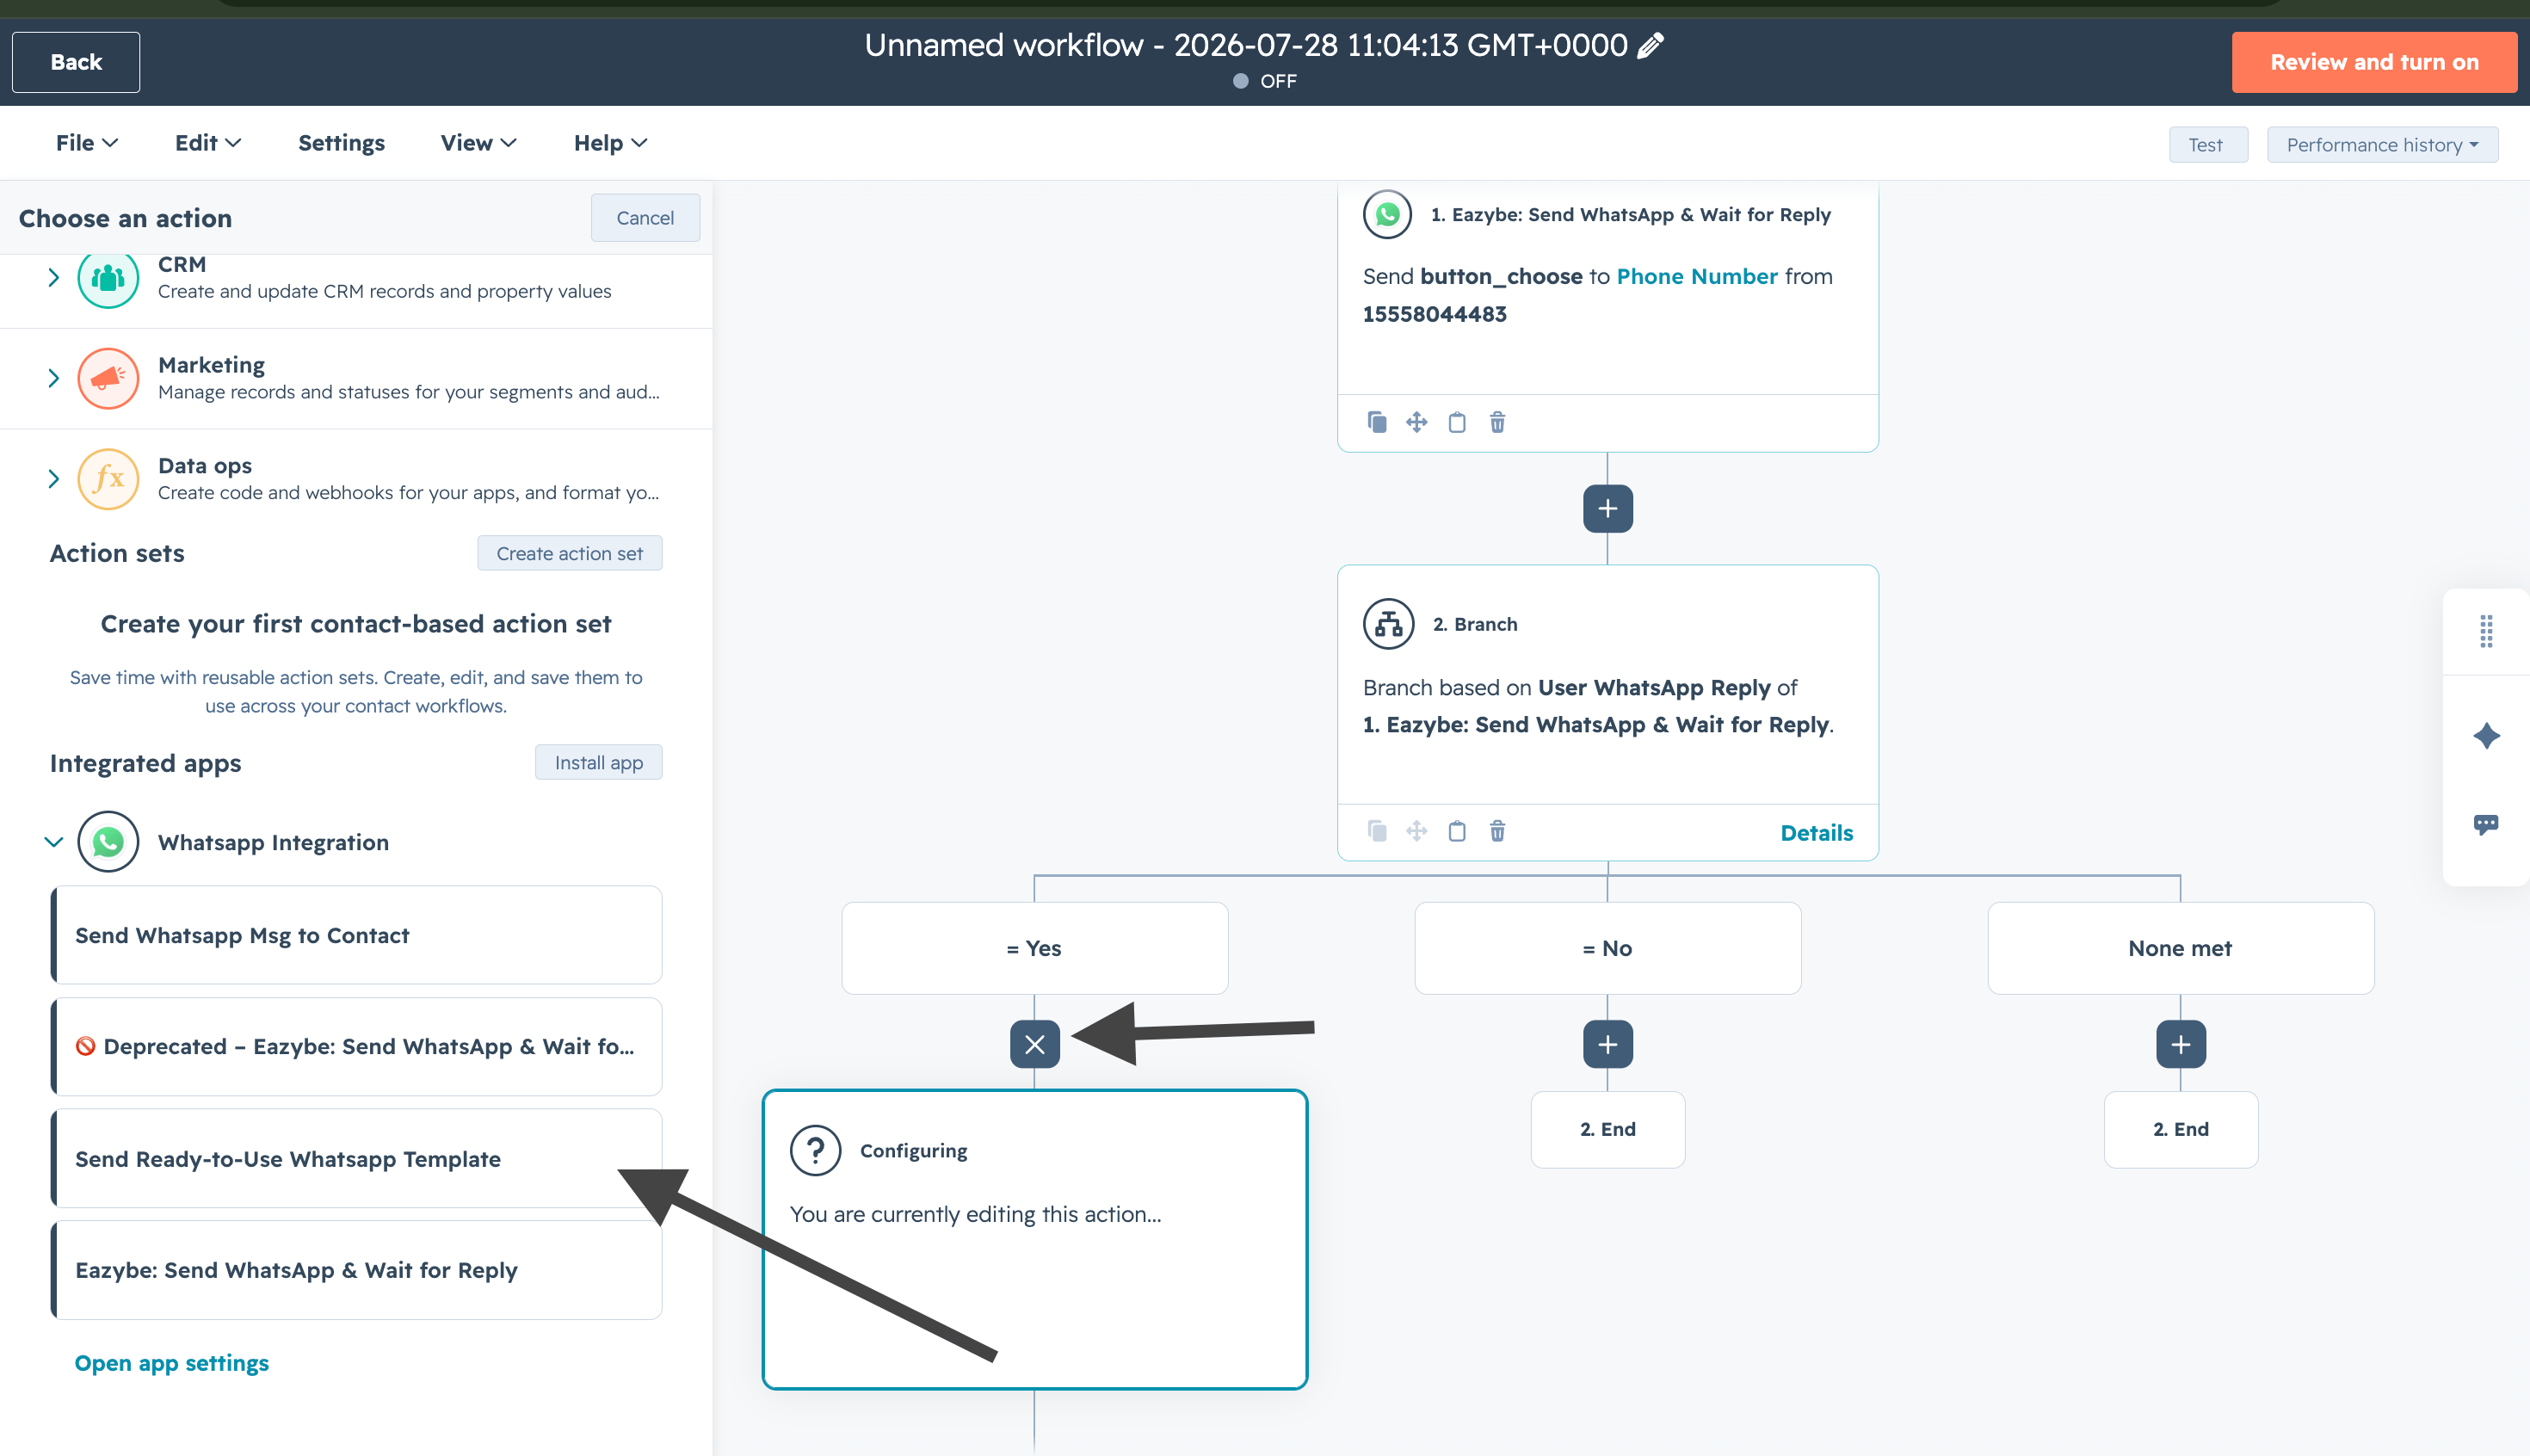
  <Step title="Añade una plantilla a la rama condicional">
    Haz clic en **+** para añadir una plantilla a cada valor. Cuando el usuario pulsa un botón, se activa la plantilla correspondiente.
    <img src="https://mintcdn.com/eazybe/NZtXvr5CRt0MZpuu/images/hubspot-wait-reply-add-template-condition-branch.png?fit=max&auto=format&n=NZtXvr5CRt0MZpuu&q=85&s=30220606afbb35a3df1478f253962e2d" alt="Añadir una plantilla a la rama" width="2940" height="1692" data-path="images/hubspot-wait-reply-add-template-condition-branch.png" />
  </Step>

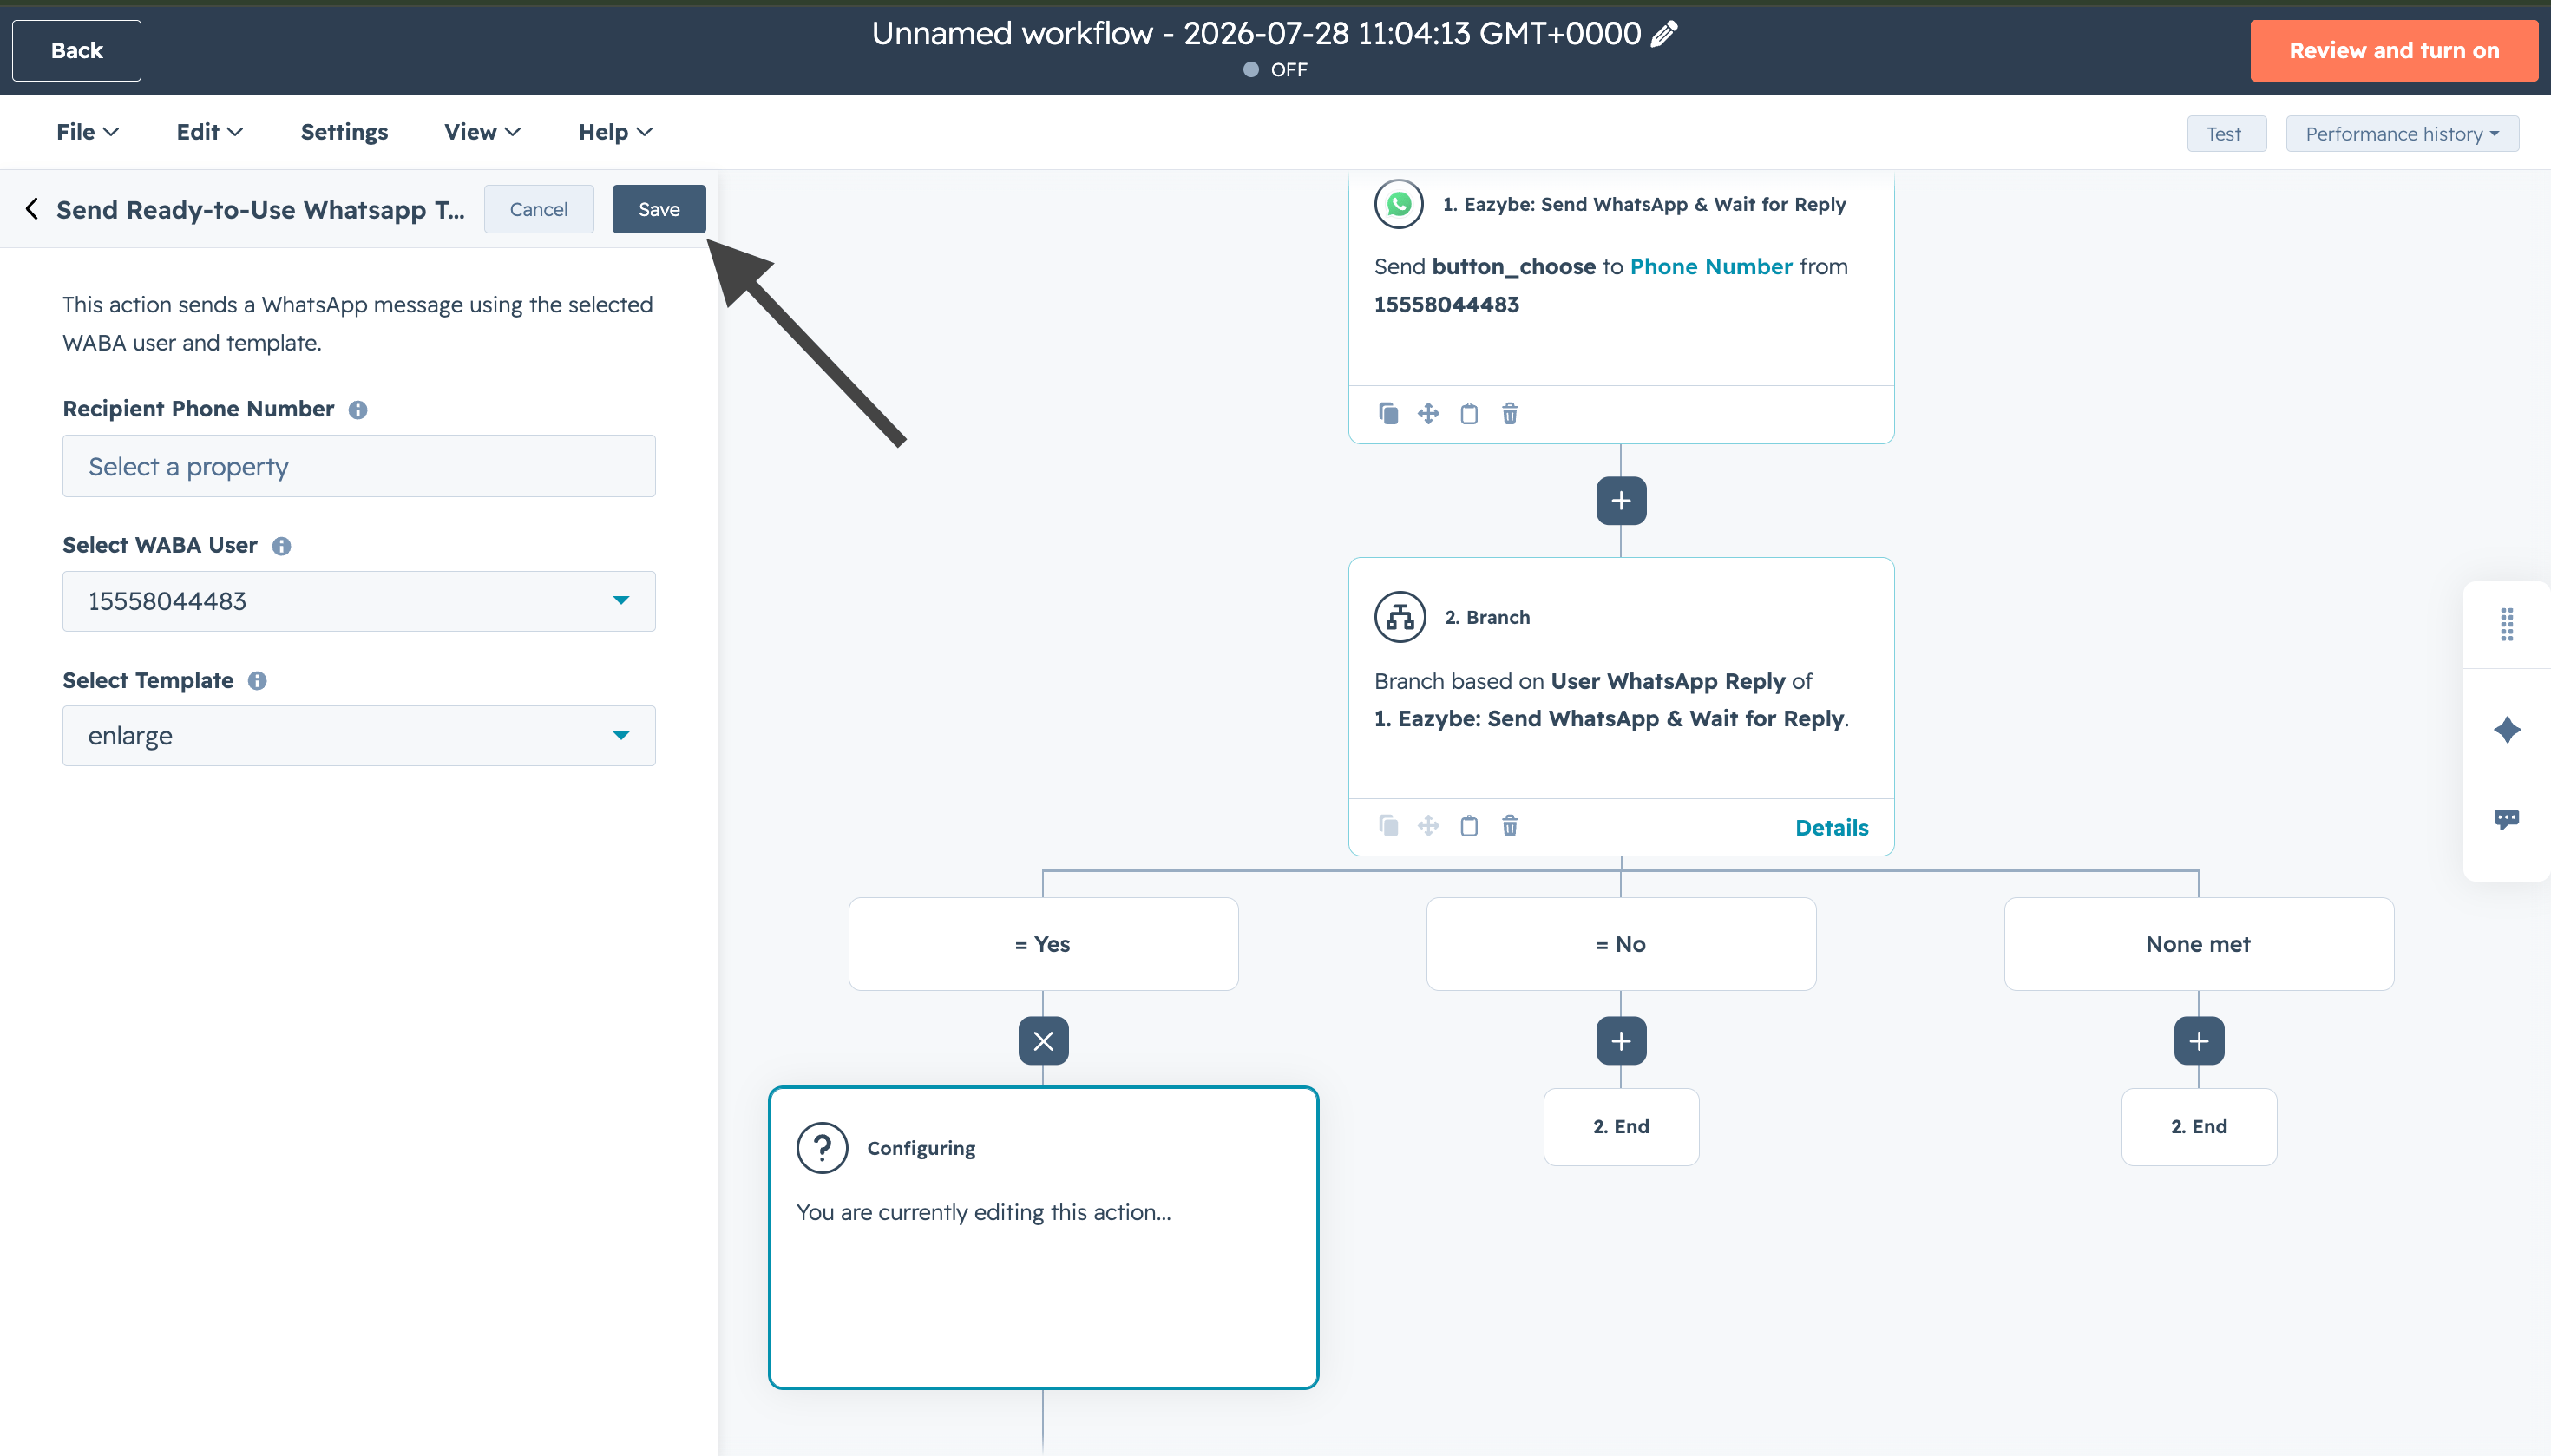
  <Step title="Guarda la plantilla">
    Haz clic en **Save** para guardar la plantilla del valor de rama.
    <img src="https://mintcdn.com/eazybe/NZtXvr5CRt0MZpuu/images/hubspot-wait-reply-save-branch-template.png?fit=max&auto=format&n=NZtXvr5CRt0MZpuu&q=85&s=57c2bef7e8894d5b29e0b90ff7a9e344" alt="Guardar la plantilla" width="2940" height="1678" data-path="images/hubspot-wait-reply-save-branch-template.png" />
  </Step>

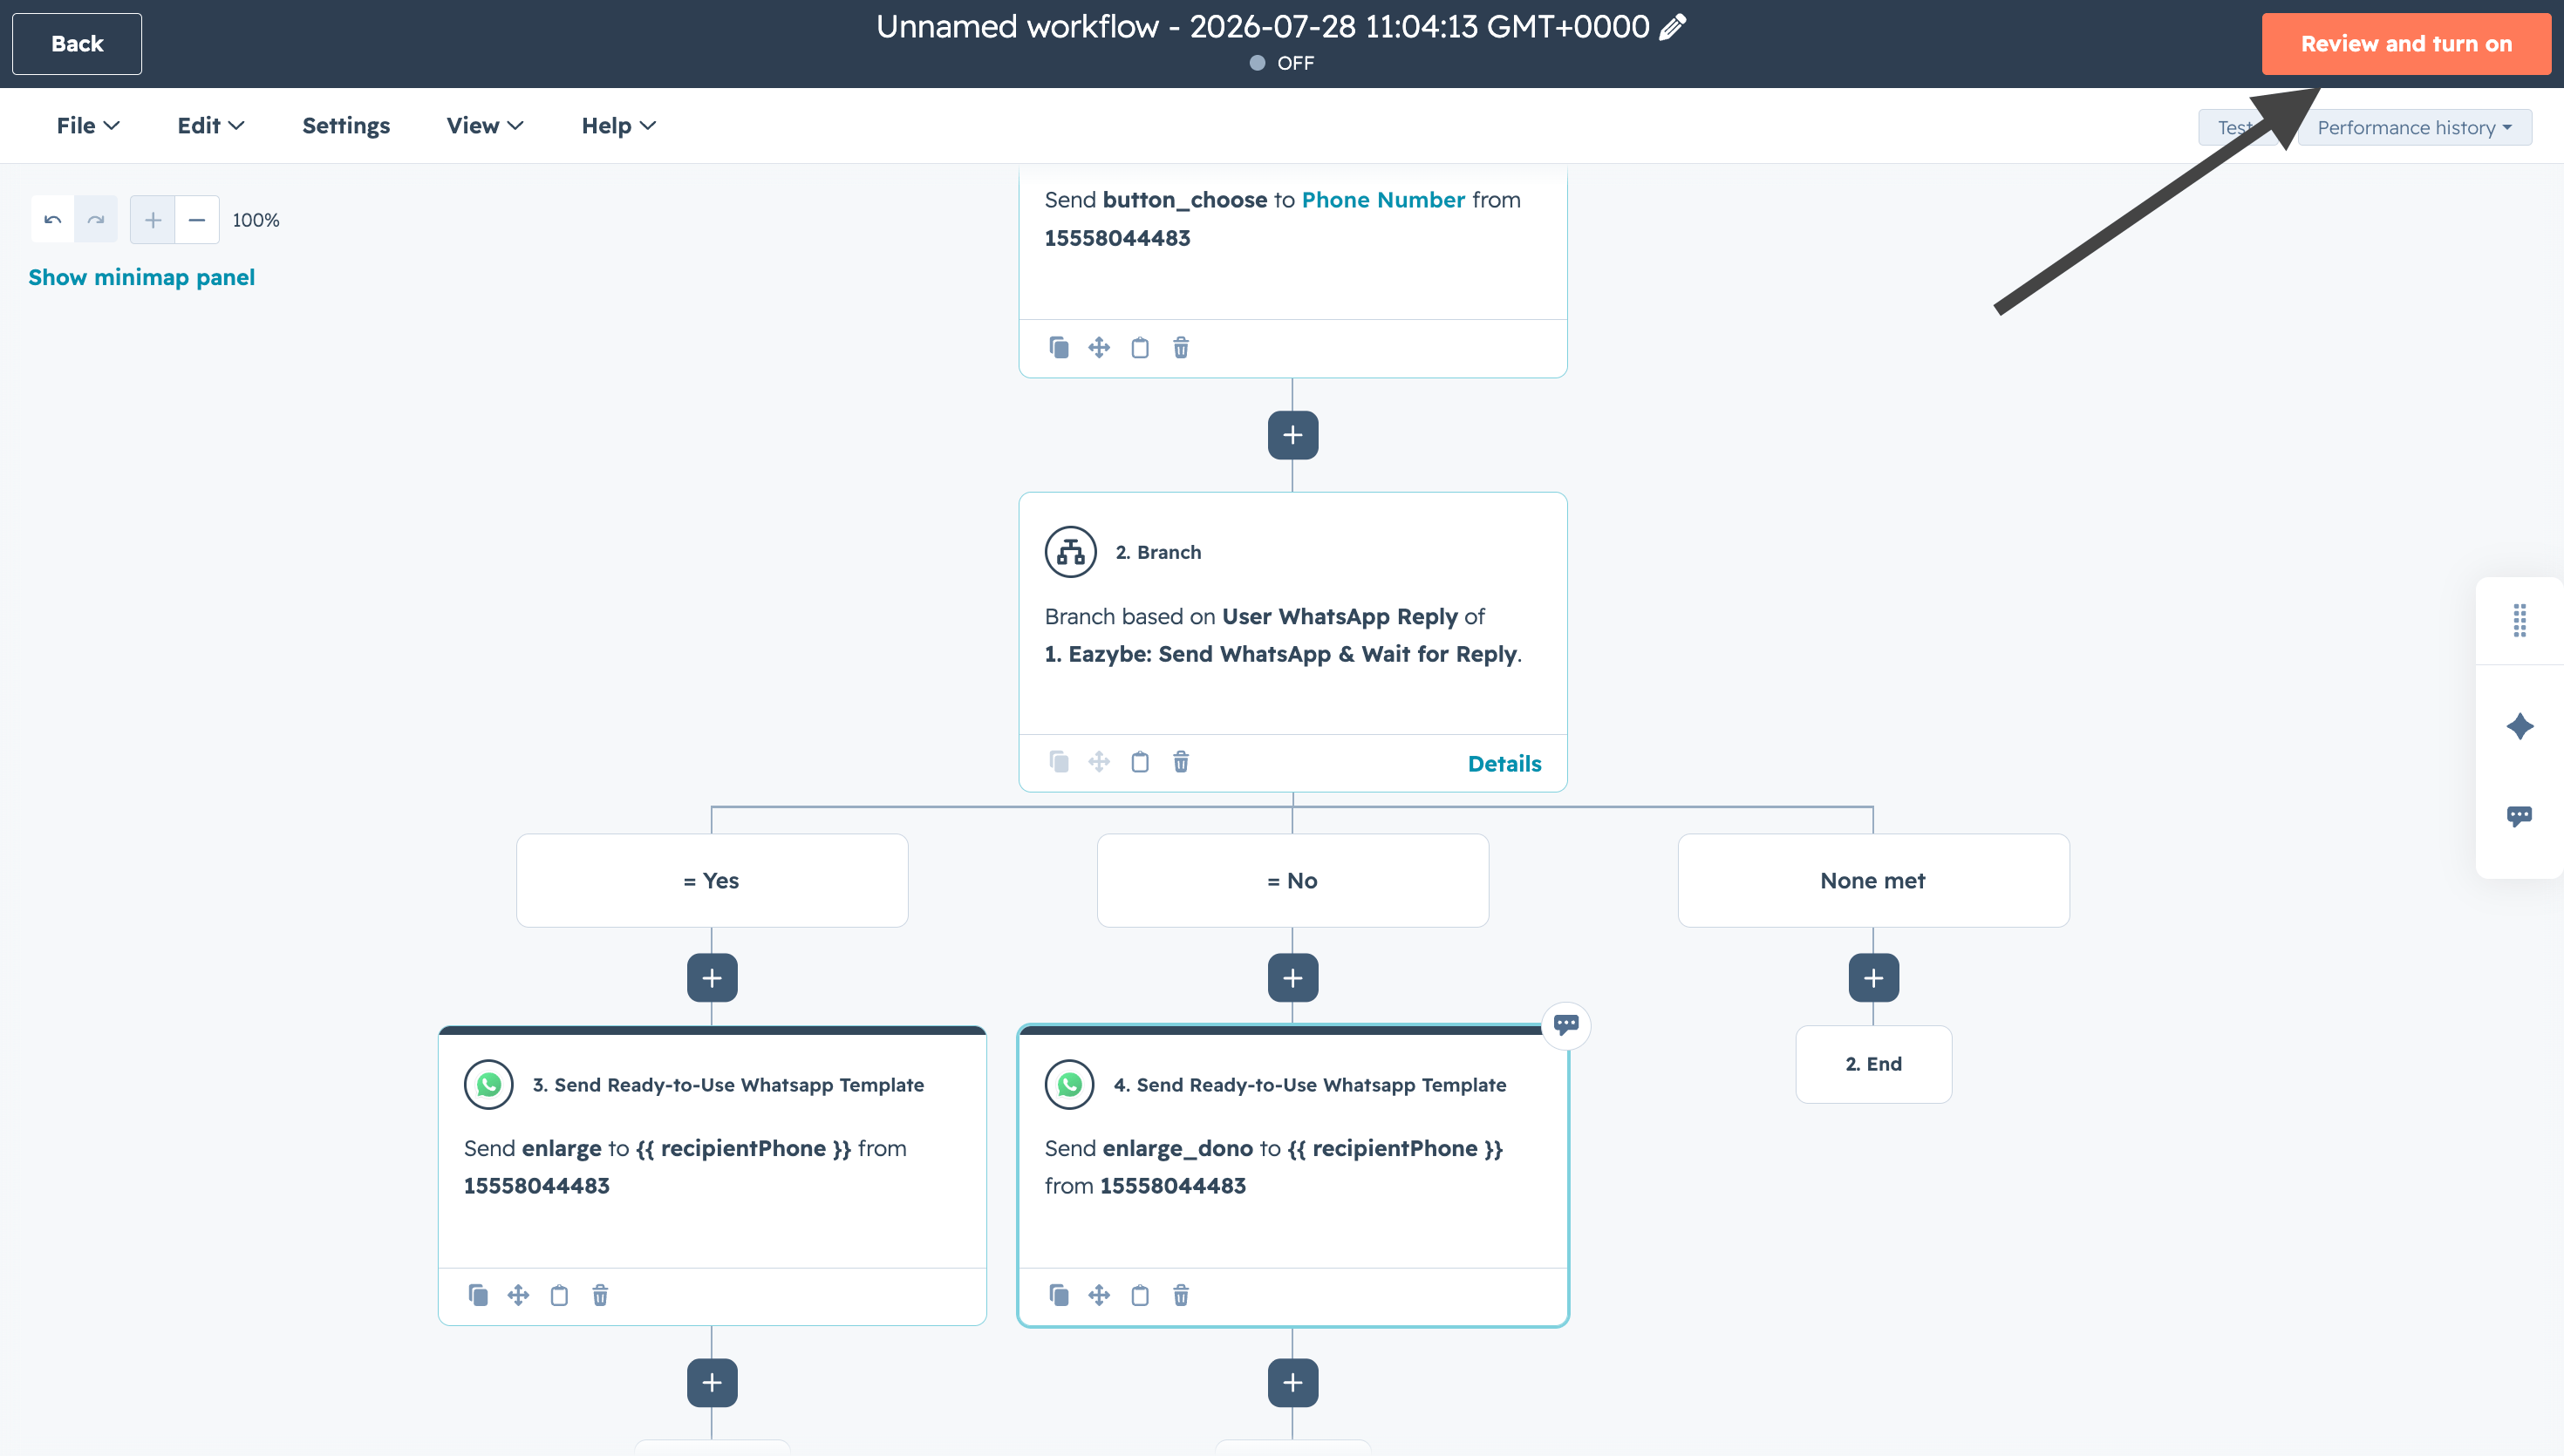
  <Step title="Revisa y activa">
    Haz clic en **Review and turn on** después de añadir plantillas para todos los valores.
    <img src="https://mintcdn.com/eazybe/NZtXvr5CRt0MZpuu/images/hubspot-wait-reply-review-and-turn-on.png?fit=max&auto=format&n=NZtXvr5CRt0MZpuu&q=85&s=97b2c03371c6a2cba72c69b2782b145e" alt="Revisar y activar el flujo de trabajo" width="2940" height="1670" data-path="images/hubspot-wait-reply-review-and-turn-on.png" />
  </Step>

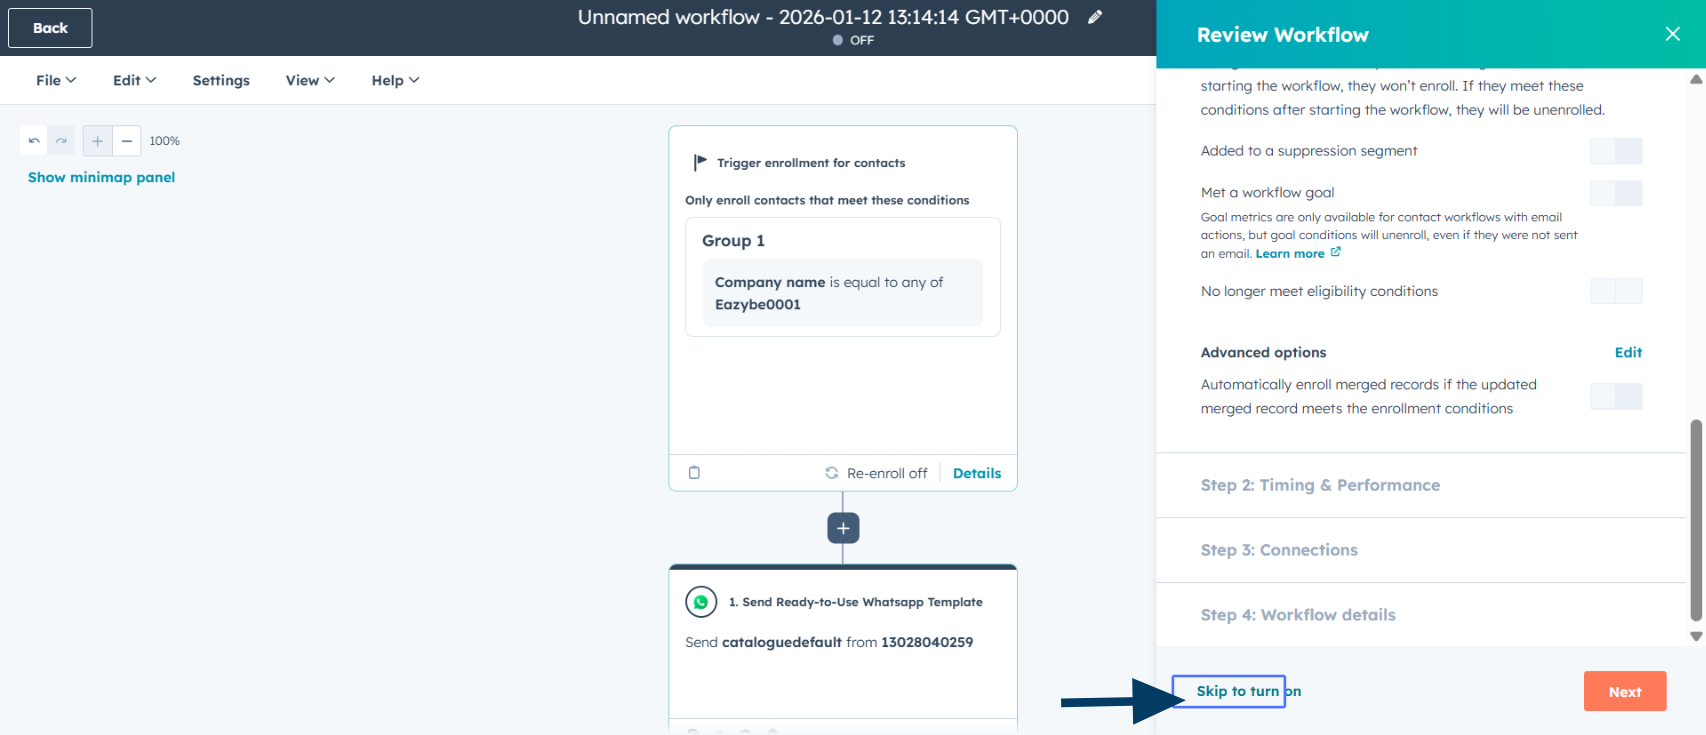
  <Step title="Revisión final">
    Haz clic en **Skip to turn on** o en **Next** para realizar comprobaciones adicionales.
    <img src="https://mintcdn.com/eazybe/sttSA_SpGc2Das_j/images/1933597322.png?fit=max&auto=format&n=sttSA_SpGc2Das_j&q=85&s=17f0aac402513087df3d72d8b69cdf28" alt="Revisión final" width="1706" height="735" data-path="images/1933597322.png" />
  </Step>

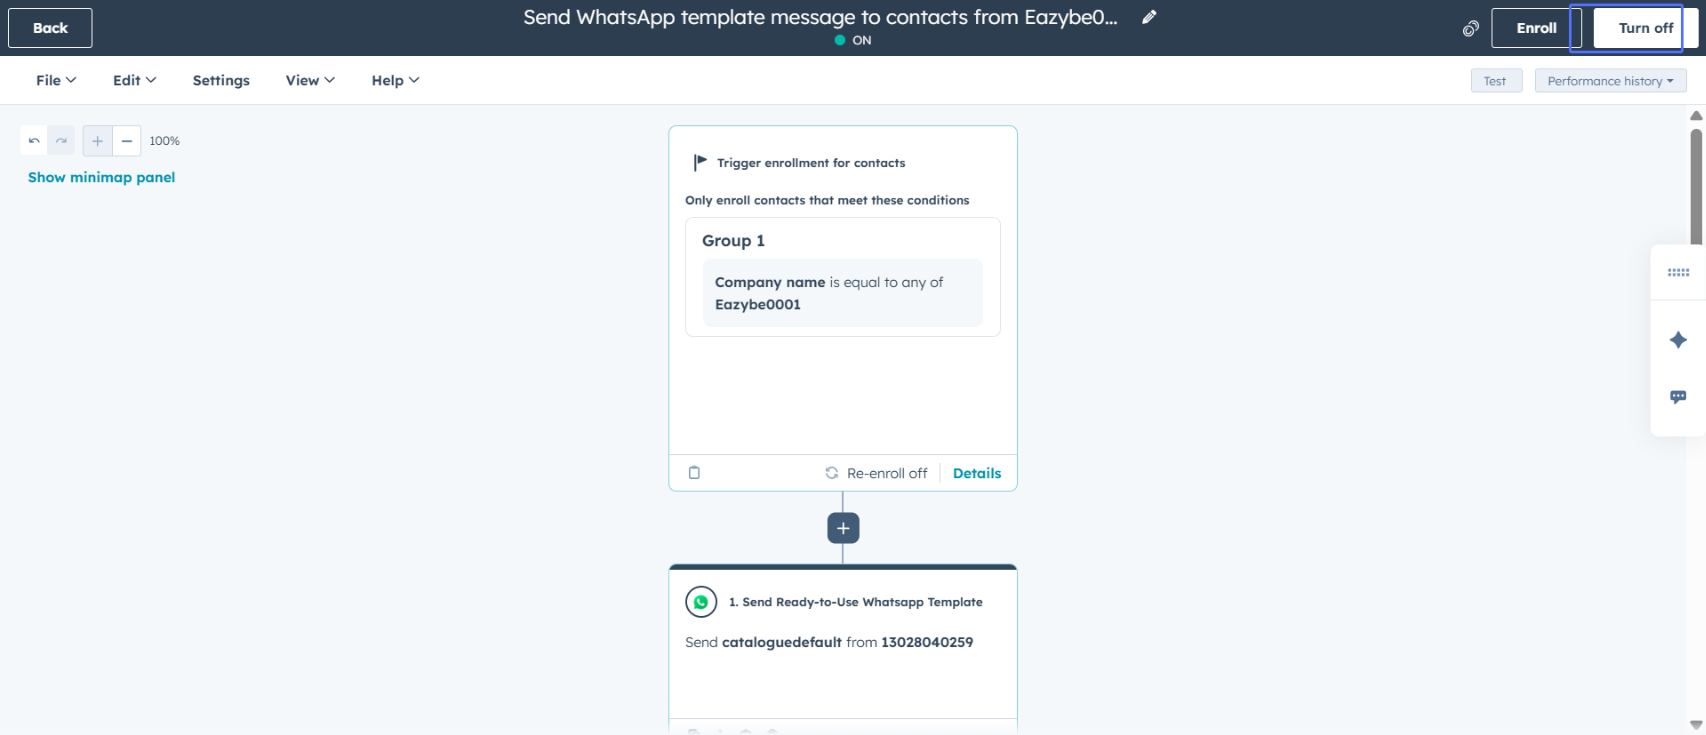
  <Step title="Activa el flujo de trabajo">
    Haz clic en **Turn on workflow** para activar la automatización.
    <img src="https://mintcdn.com/eazybe/sttSA_SpGc2Das_j/images/1933597319.png?fit=max&auto=format&n=sttSA_SpGc2Das_j&q=85&s=8282bc7471da0efd3a29d105b490b361" alt="Activar el flujo de trabajo" width="1706" height="735" data-path="images/1933597319.png" />
  </Step>
</Steps>

## Tu flujo de trabajo está listo

Tu flujo de trabajo de HubSpot ya puede enviar mensajes de WhatsApp y dirigir a los contactos según el botón que pulsen.

<Check>
  El flujo se activará cuando un contacto cumpla los criterios y continuará por la rama correspondiente a su respuesta.
</Check>

## Recursos relacionados

<CardGroup cols={2}>
  <Card title="Enviar WhatsApp mediante flujos de trabajo" icon="paper-plane" href="/es/integrations/hubspot/create-workflow">
    Obtén más información sobre los mensajes de WhatsApp en HubSpot
  </Card>

  <Card title="Solucionar problemas del flujo de trabajo" icon="wrench" href="/es/integrations/hubspot/workflow-troubleshoot">
    Problemas comunes y sus soluciones
  </Card>

  <Card title="Crear plantillas con variables de HubSpot" icon="file-code" href="/es/waba/templates/how-to-create-template-with-hubspot-variables">
    Usa propiedades de HubSpot en tus plantillas
  </Card>

  <Card title="Campañas de difusión" icon="bullhorn" href="/es/waba/broadcasting/send-broadcast">
    Envía mensajes masivos de WhatsApp
  </Card>
</CardGroup>

## ¿Necesitas ayuda?

Si tienes alguna pregunta o necesitas ayuda, escribe a [support@eazybe.com](mailto:hey@eazybe.com).
