> ## Documentation Index
> Fetch the complete documentation index at: https://help.eazybe.com/llms.txt
> Use this file to discover all available pages before exploring further.
# Send WhatsApp Messages through a Zoho Workflow
> Set up a Zoho CRM workflow that sends WhatsApp messages through the Eazybe integration when a record meets your conditions.
Use this guide to create a Zoho CRM workflow that sends a WhatsApp message when a contact, lead, deal, or another CRM record meets the conditions you define.
## Before you begin
Make sure you have:
* A Zoho CRM account with permission to create workflow rules.
* The **Zoho trigger** extension installed and showing **Status: Active**.
* Your Zoho CRM account connected to Eazybe.
* The Eazybe extension or app installed for the user who owns the record.
* The recipient's WhatsApp number saved in a Zoho phone field, including the country code.
The Zoho workflow integration is available on the Eazybe **Scalar Plan**. Messages are sent from the WhatsApp number of the contact or lead owner, so assign the correct owner before the workflow runs.
In Zoho CRM, open **Setup**, then go to **Marketplace → All → Installed**. Open **Zoho trigger** and confirm that its **Status** is **Active**.
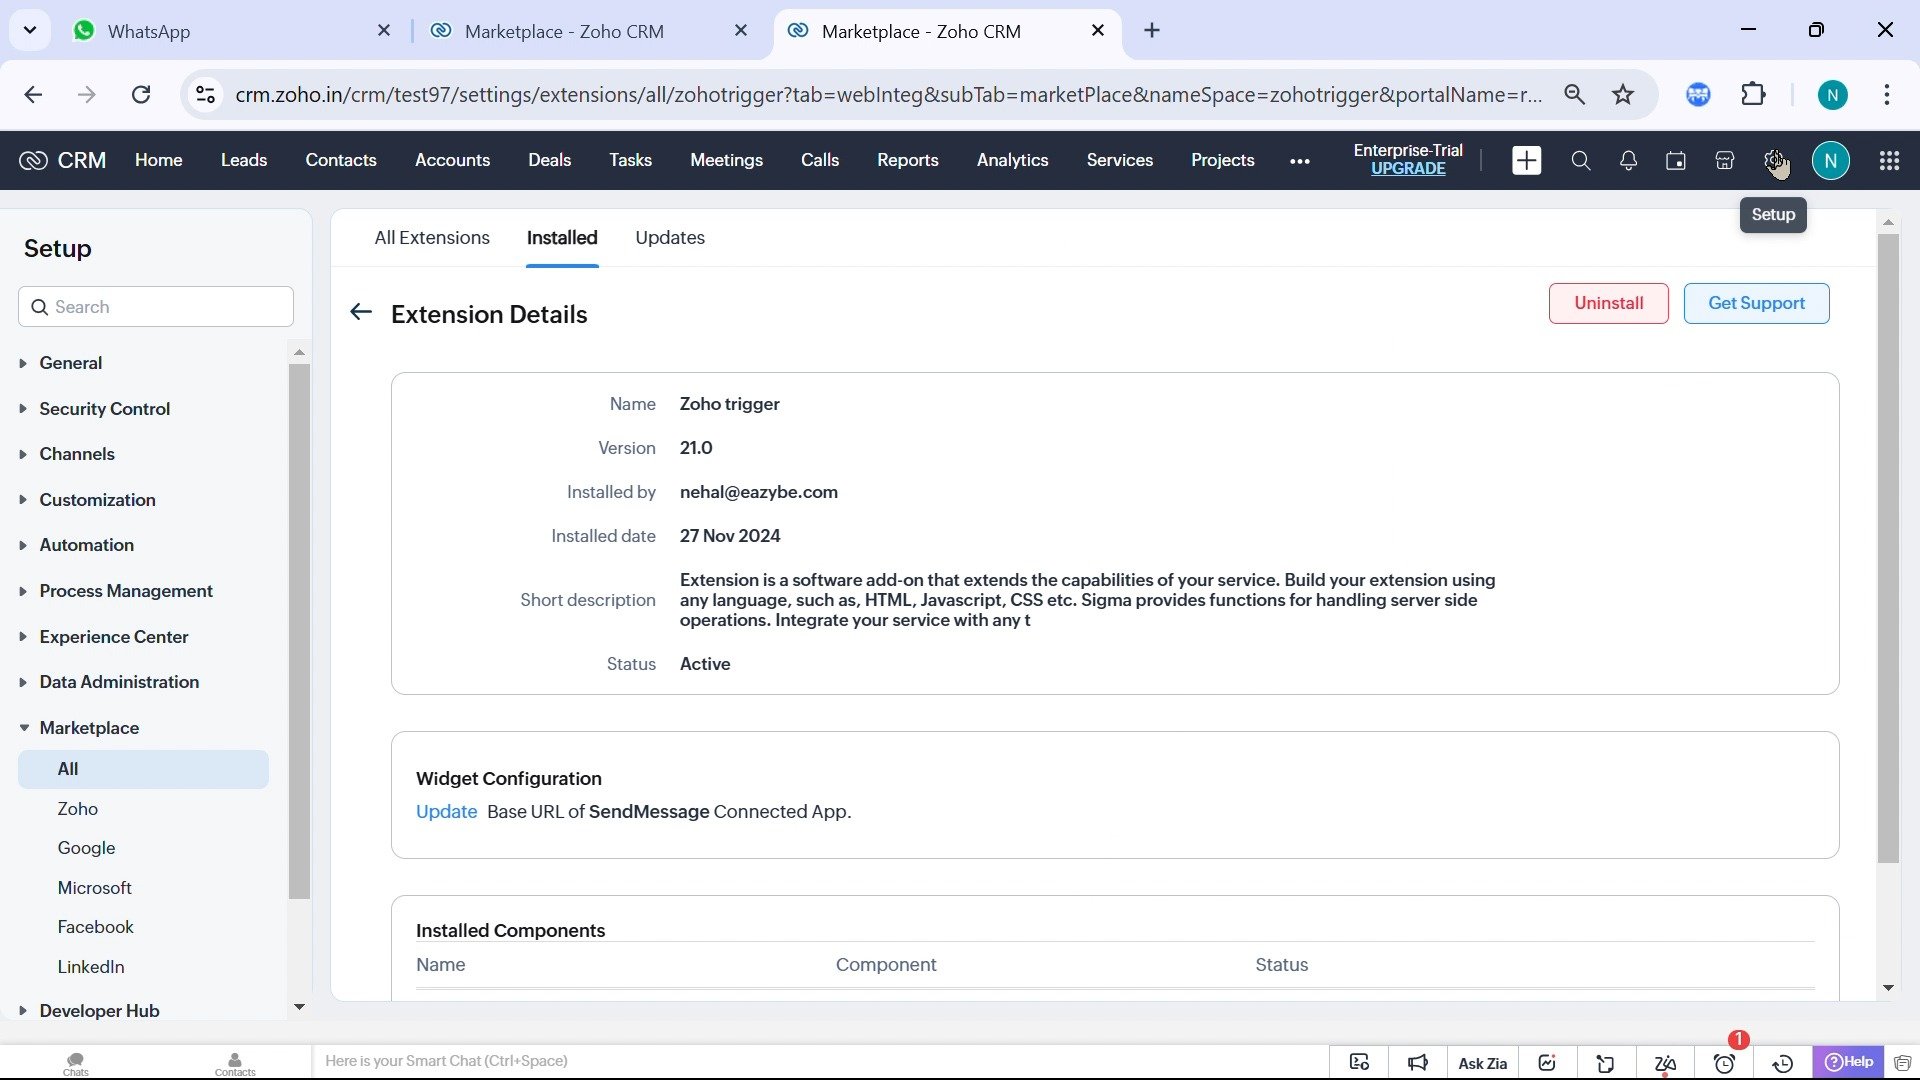 If the extension is not installed, install the Zoho workflow plugin before continuing:
[https://crm.zoho.com/market/installPrivatePlugin.do?portalName=rajatverma\&nameSpace=zohotrigger\&versionIndex=4520363000000413004](https://crm.zoho.com/market/installPrivatePlugin.do?portalName=rajatverma\&nameSpace=zohotrigger\&versionIndex=4520363000000413004)
Select the **Setup** gear in Zoho CRM. In the **Automation** section, click **Workflow Rules**.
If the extension is not installed, install the Zoho workflow plugin before continuing:
[https://crm.zoho.com/market/installPrivatePlugin.do?portalName=rajatverma\&nameSpace=zohotrigger\&versionIndex=4520363000000413004](https://crm.zoho.com/market/installPrivatePlugin.do?portalName=rajatverma\&nameSpace=zohotrigger\&versionIndex=4520363000000413004)
Select the **Setup** gear in Zoho CRM. In the **Automation** section, click **Workflow Rules**.
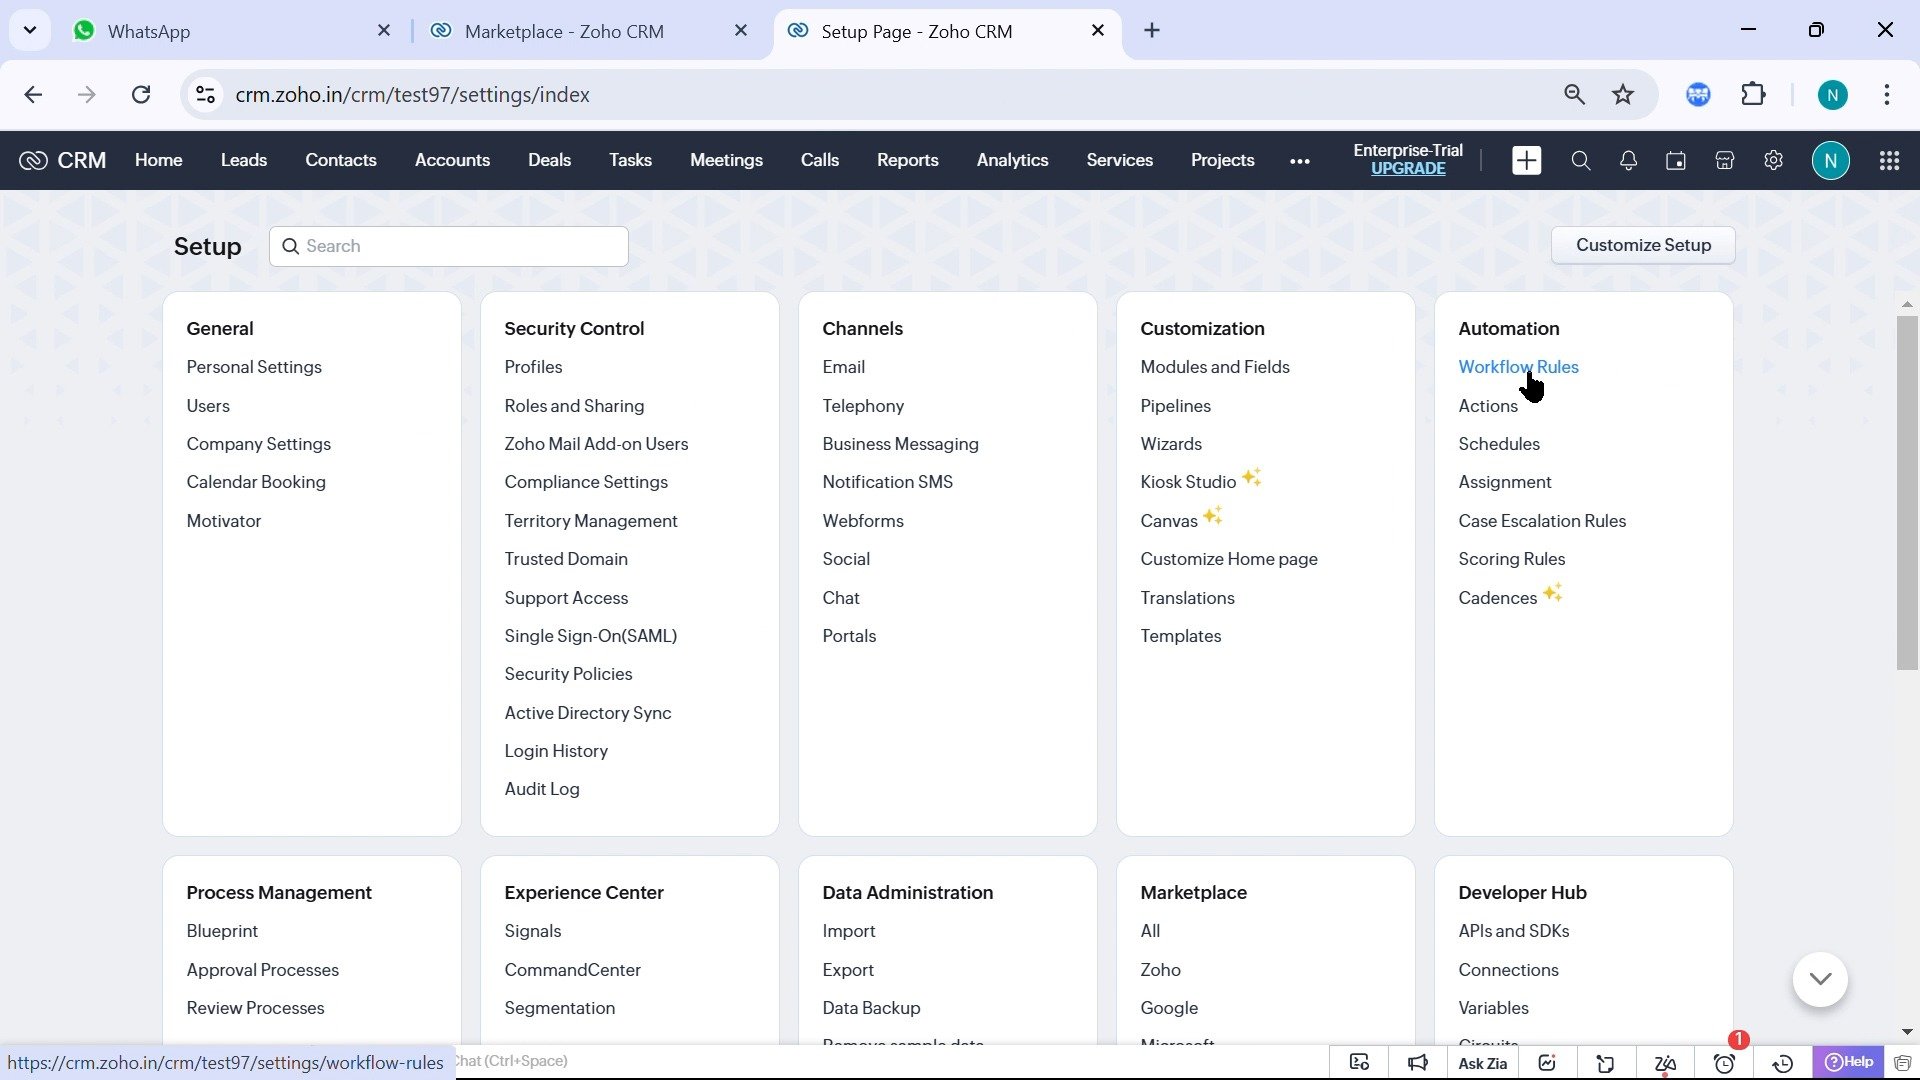 On the **Workflow Rules** page, click **Create Rule**. The **Create New Rule** window opens.
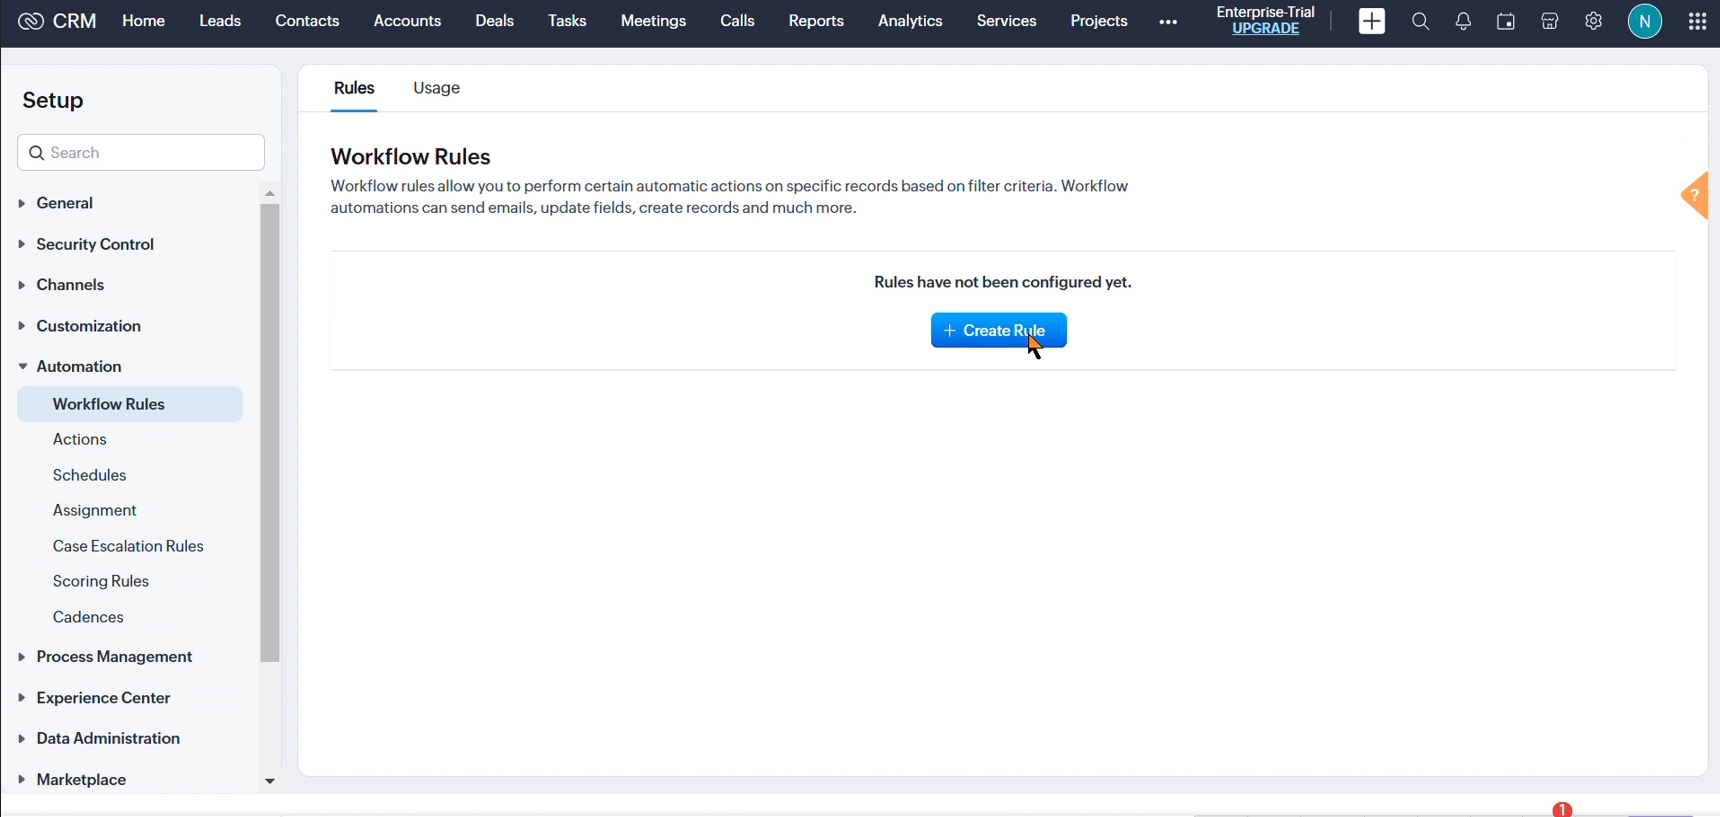 In **Create New Rule**, select the **Module** that contains the recipients, such as **Contacts** or **Leads**. Enter a recognizable **Rule Name**, add a description if needed, and click **Next**.
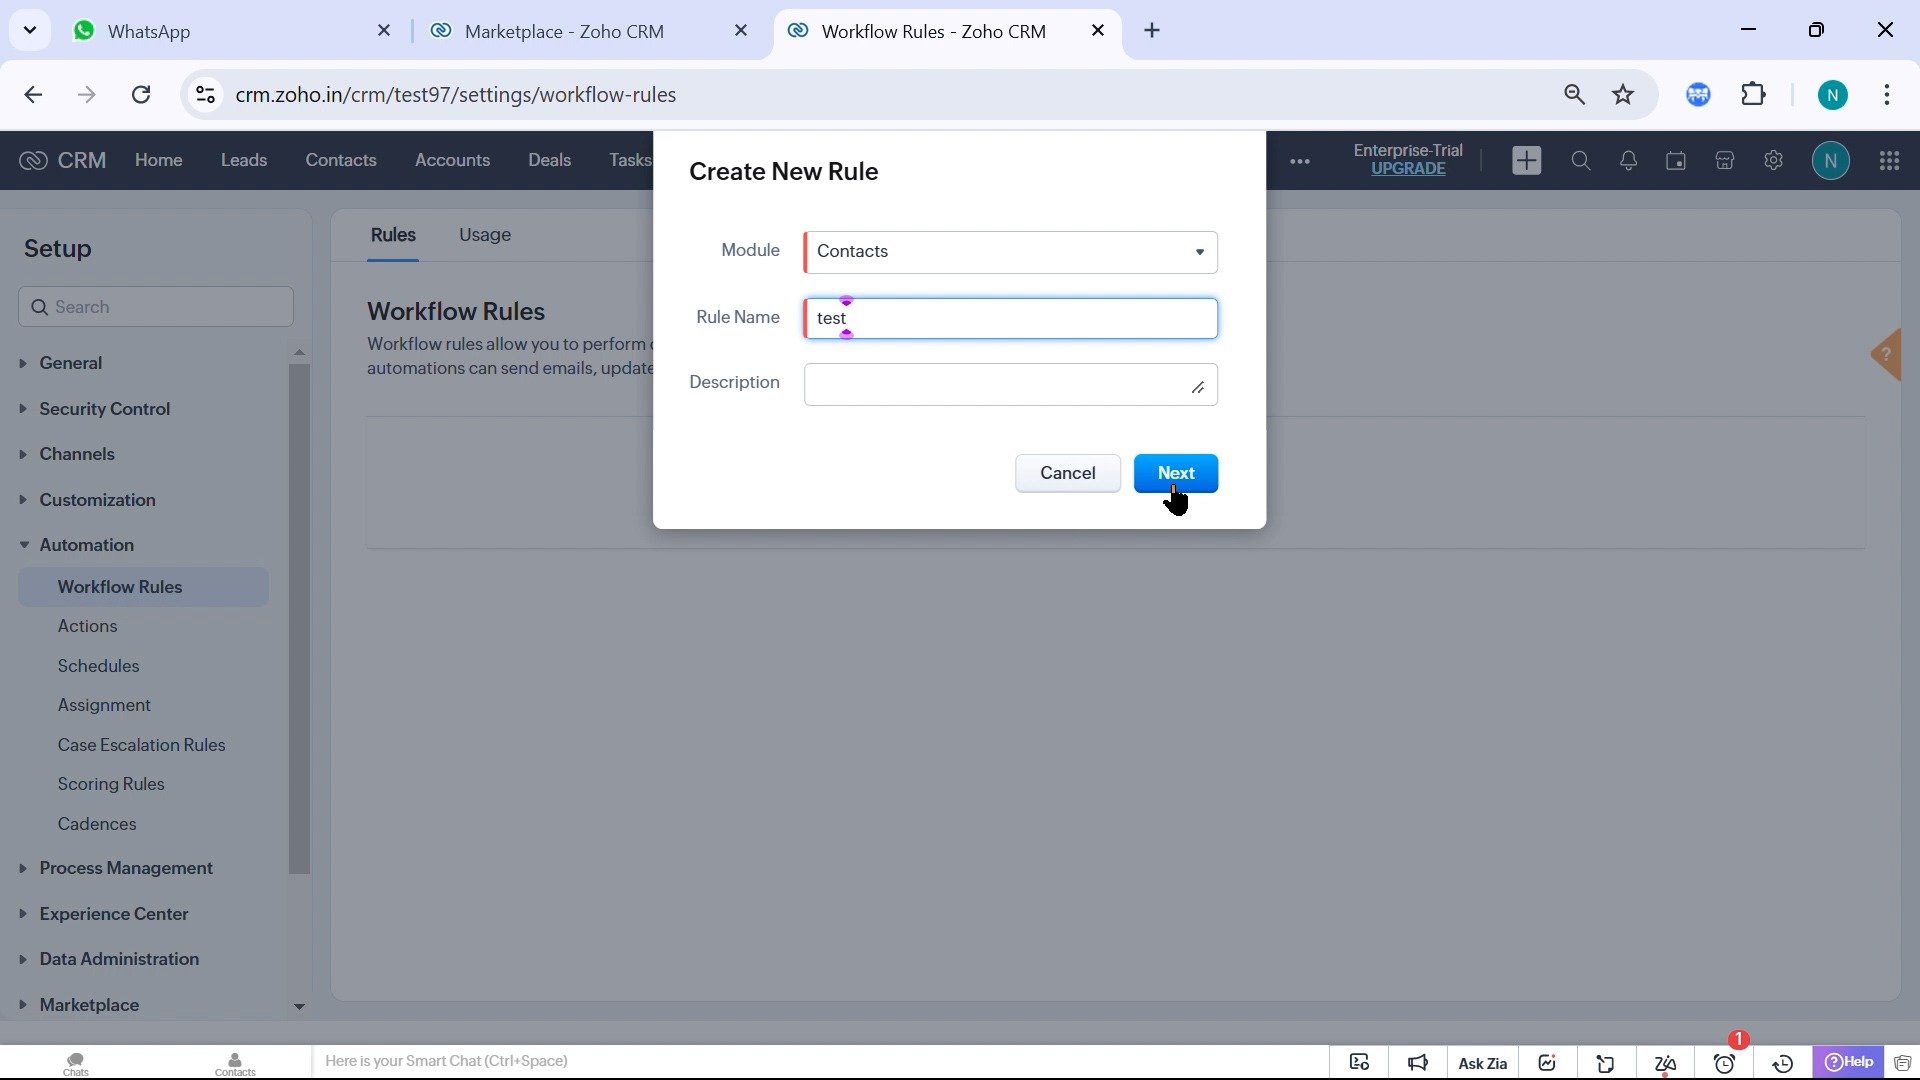 The phone field and owner used later in the workflow come from the module you select here.
Under **Execute this workflow rule based on**, choose the event that should start the workflow, such as **Record action** and **Edit**. Add the field and value conditions, then click **Next**.
The phone field and owner used later in the workflow come from the module you select here.
Under **Execute this workflow rule based on**, choose the event that should start the workflow, such as **Record action** and **Edit**. Add the field and value conditions, then click **Next**.
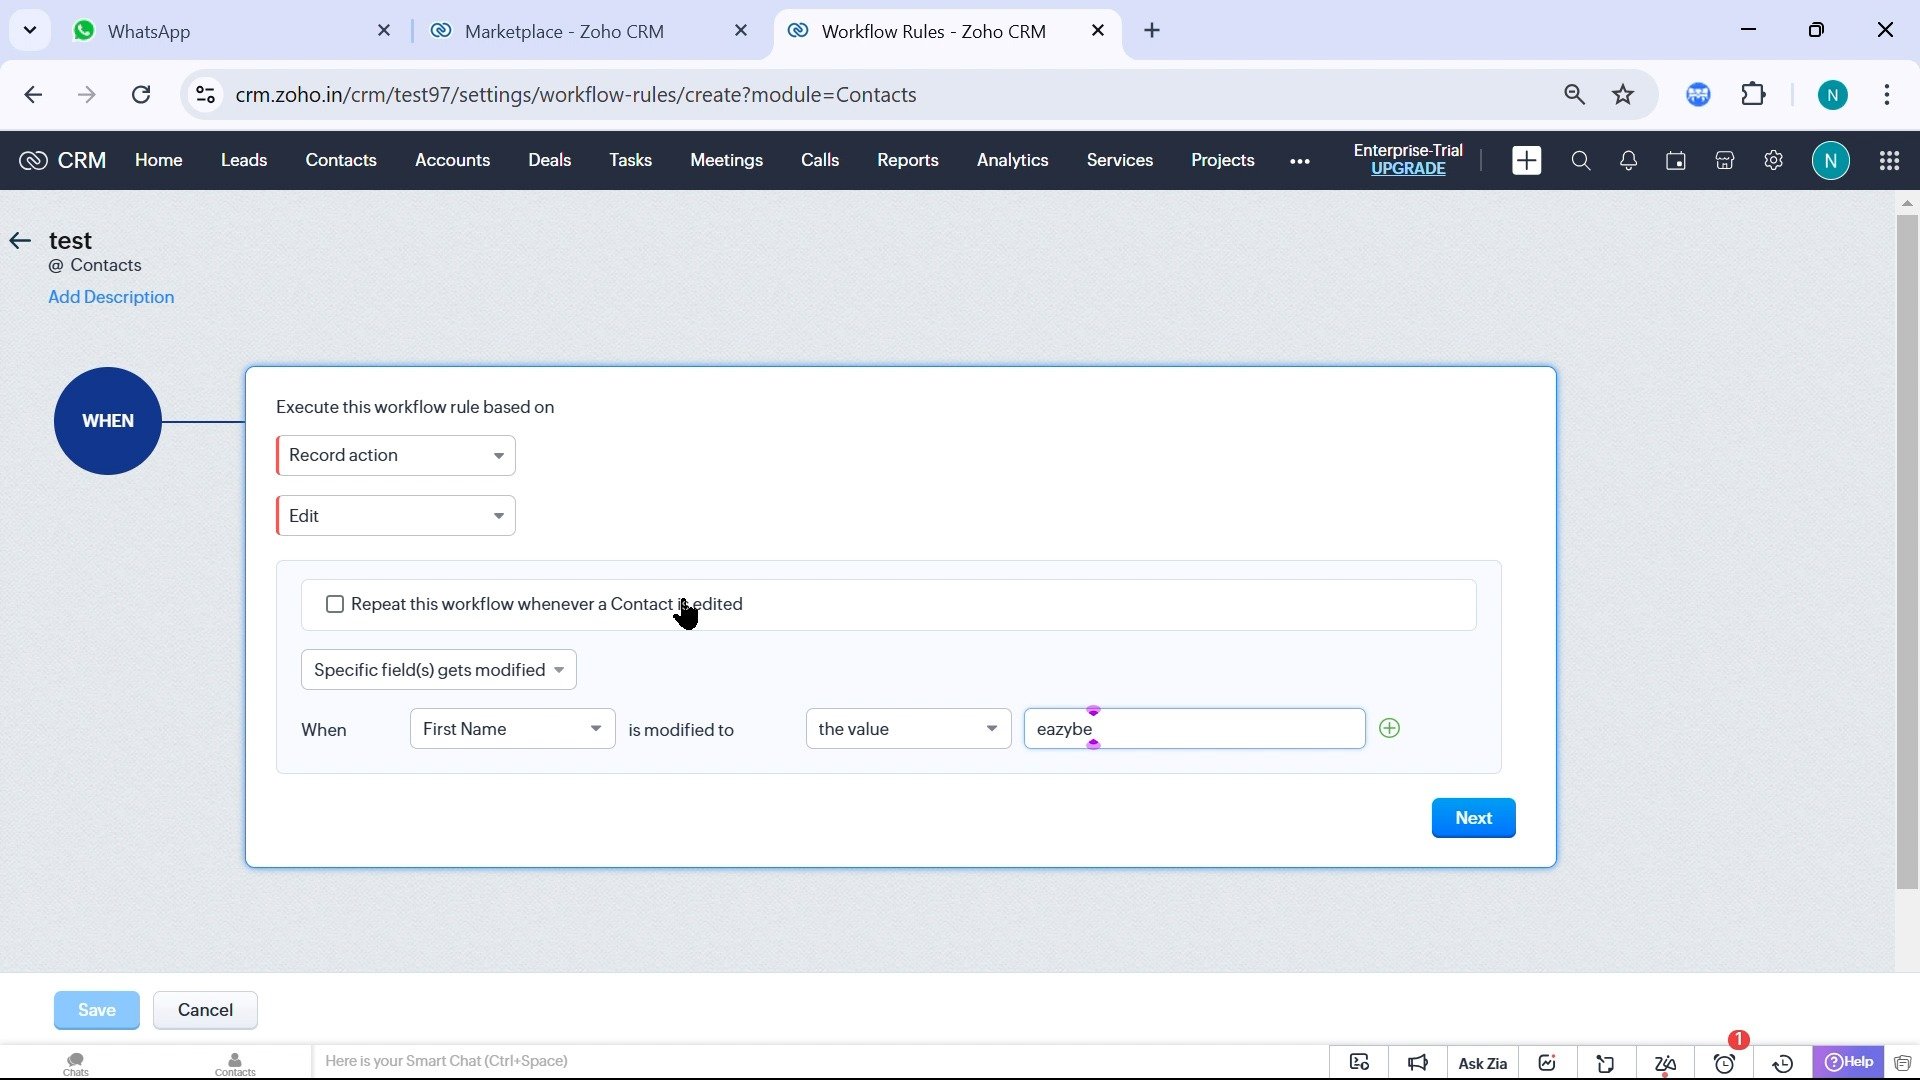 Enable repeat execution only when contacts should receive another message after matching the condition again. Otherwise, the same recipient may receive duplicate messages.
In the workflow builder, open **Instant Actions → Custom Actions**, then select the Eazybe **MessageOnWhatsapp** action.
Enable repeat execution only when contacts should receive another message after matching the condition again. Otherwise, the same recipient may receive duplicate messages.
In the workflow builder, open **Instant Actions → Custom Actions**, then select the Eazybe **MessageOnWhatsapp** action.
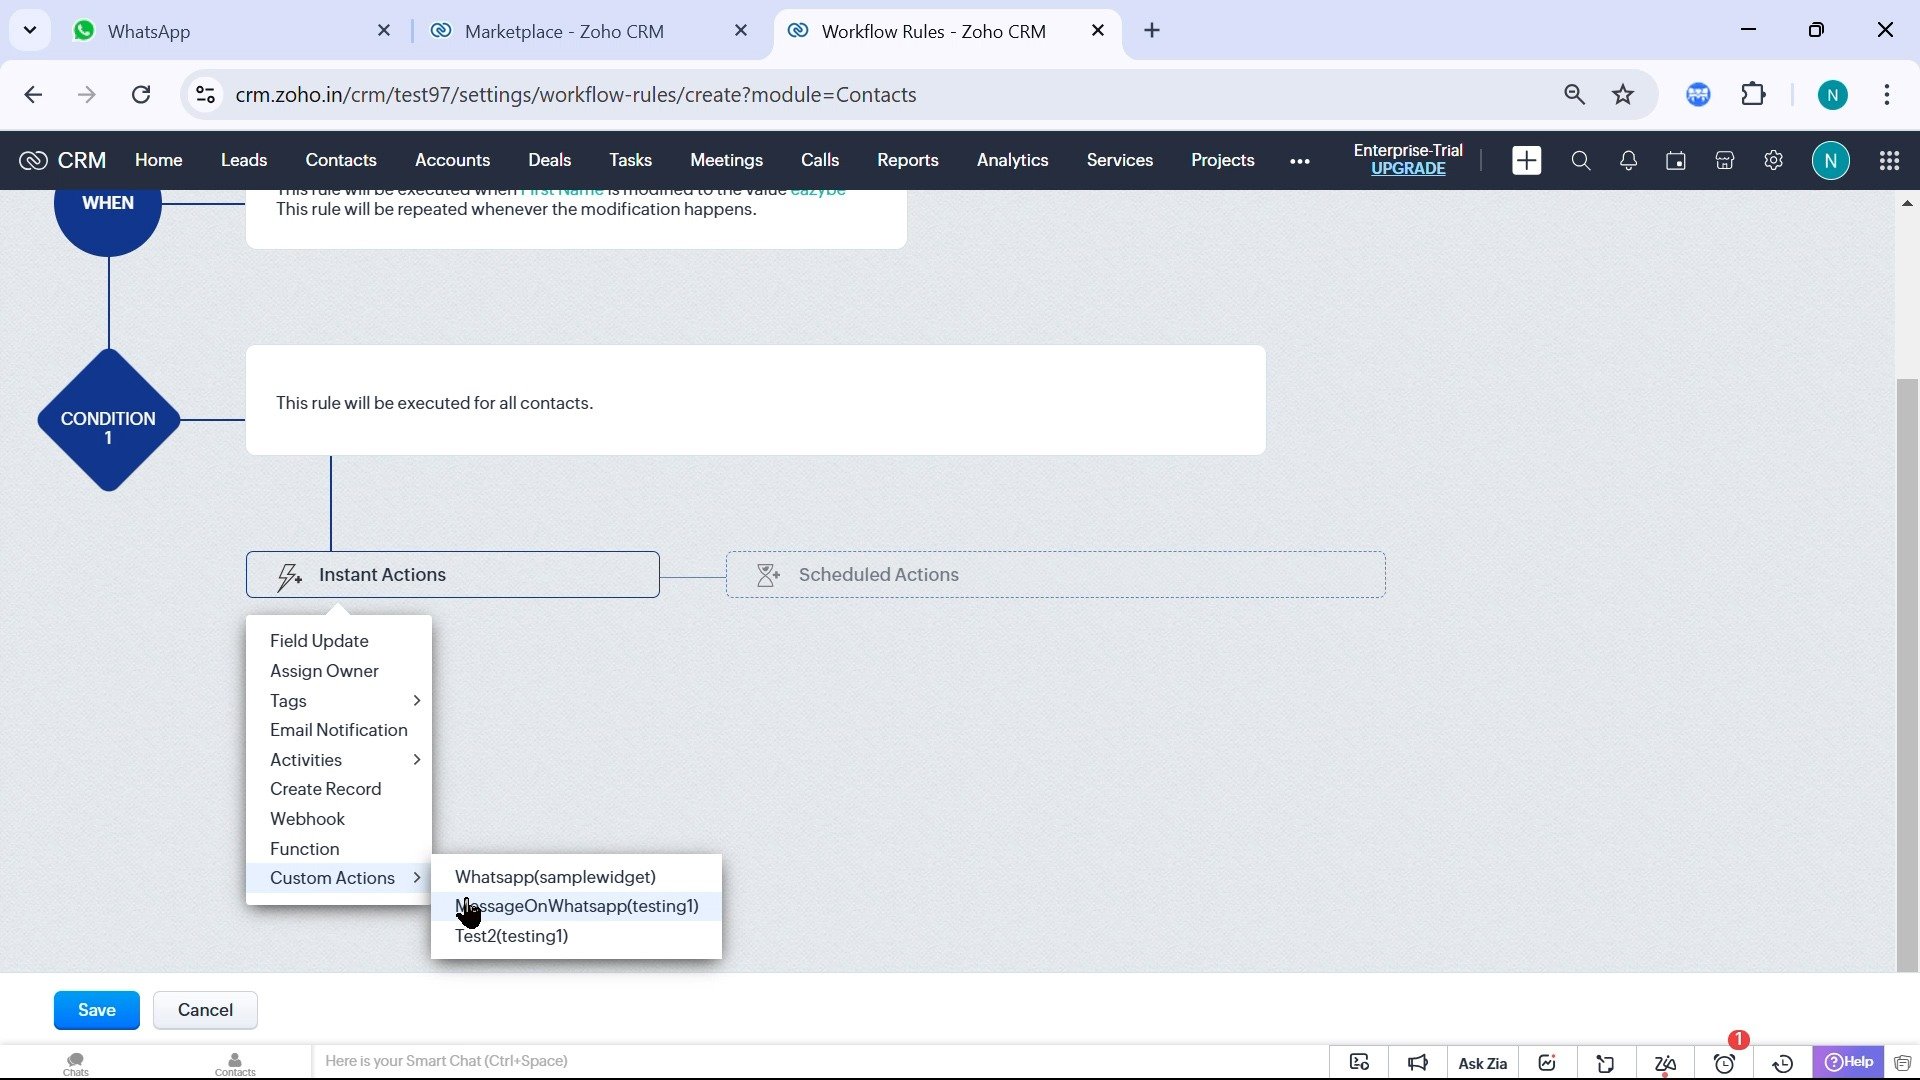 Zoho may show the extension namespace in parentheses after **MessageOnWhatsapp**. Select the action that belongs to the Eazybe integration.
In **Send message to WhatsApp**, open **Select number field** and choose the Zoho field that contains the recipient's WhatsApp number, such as **Phone** or **Mobile**. Enter the message in the text field, then click **Save**.
Zoho may show the extension namespace in parentheses after **MessageOnWhatsapp**. Select the action that belongs to the Eazybe integration.
In **Send message to WhatsApp**, open **Select number field** and choose the Zoho field that contains the recipient's WhatsApp number, such as **Phone** or **Mobile**. Enter the message in the text field, then click **Save**.
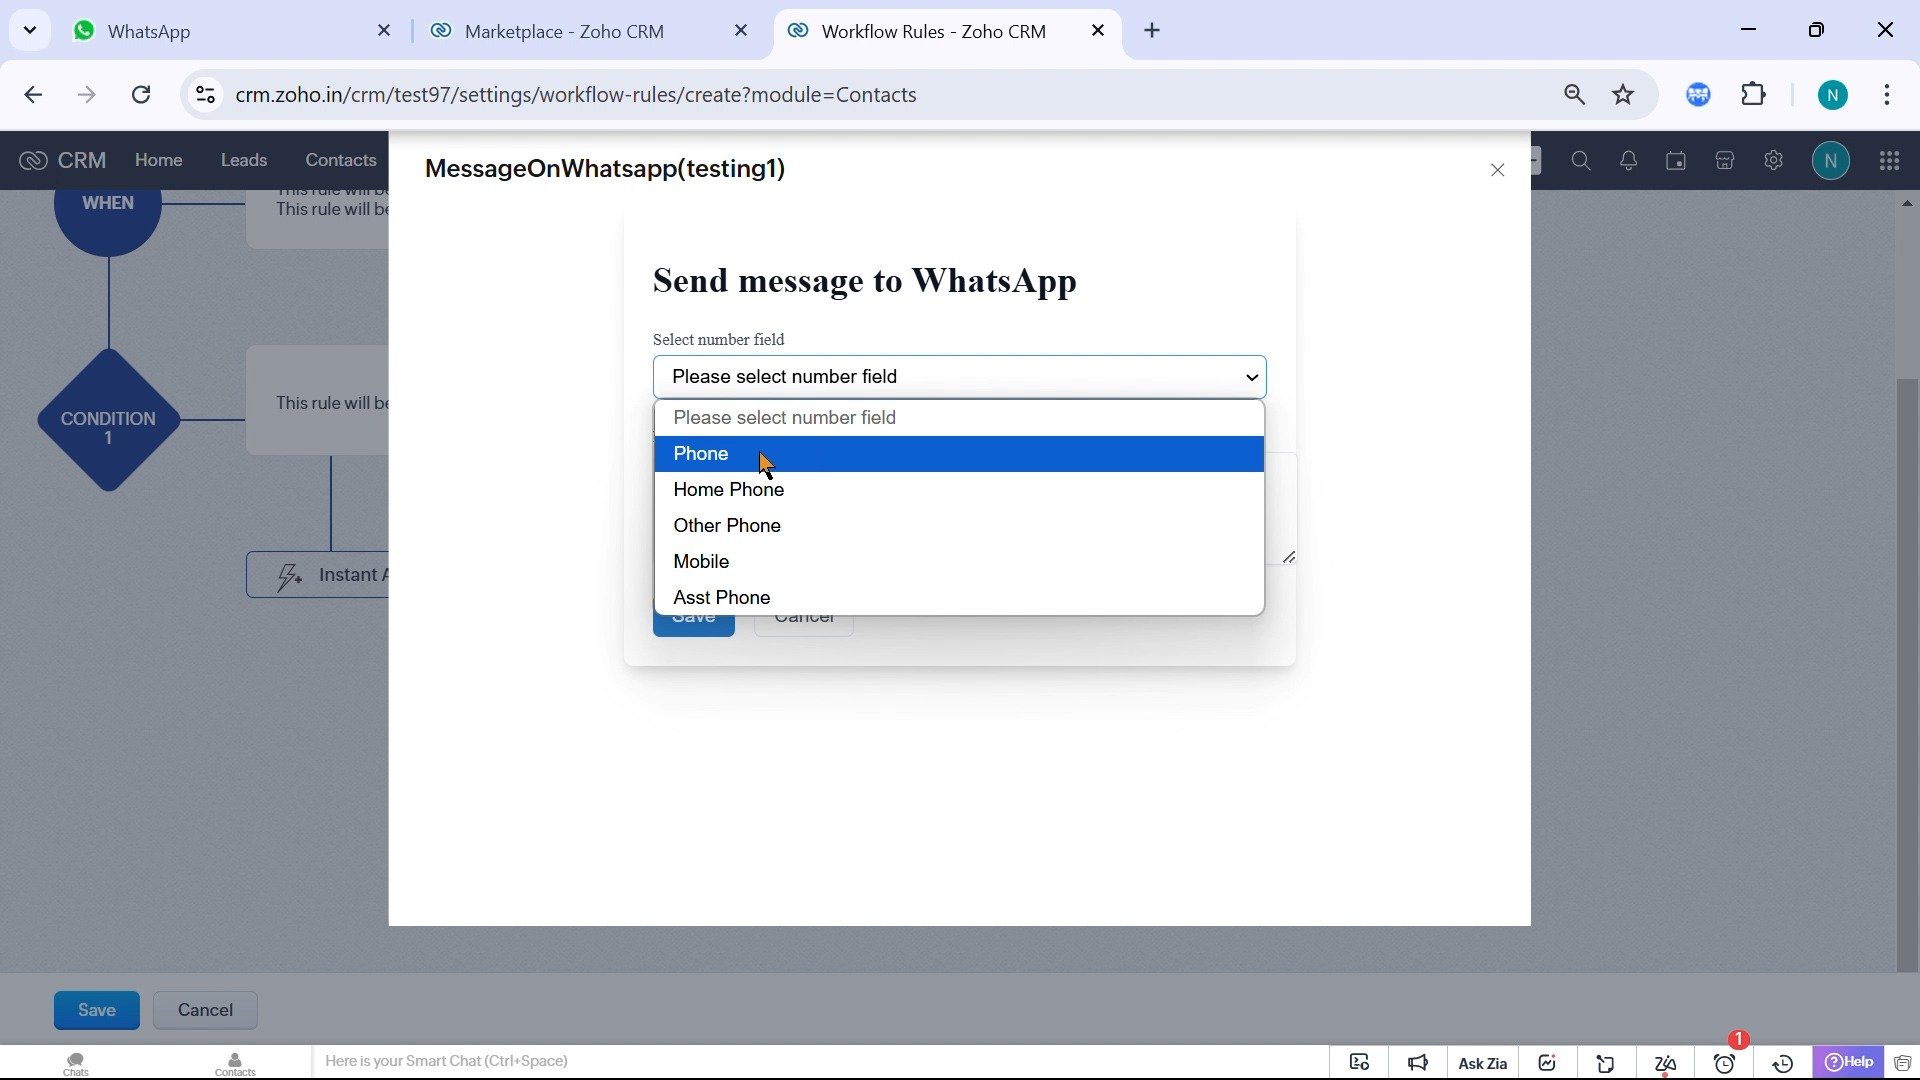 Save numbers in international format with the country code. An incorrect or missing country code can send the message to the wrong recipient or prevent delivery.
## Activate and verify the workflow
Review the trigger, conditions, and **MessageOnWhatsapp** instant action. Click **Save** to activate the workflow, then update a test record so it meets the trigger conditions.
Verify that:
* The intended WhatsApp number receives the message.
* The message is sent from the record owner's connected WhatsApp number.
* The workflow runs only when the configured conditions are met.
Media attached to a workflow message must be no larger than **15 MB**. Compress or resize larger files before testing the workflow.
## Troubleshooting
* If the action is missing, confirm that **Zoho trigger** is active and the Zoho account is connected to Eazybe.
* If the message is not delivered, confirm that the record owner has the Eazybe extension or app installed and has an active WhatsApp connection.
* If the wrong recipient receives the message, correct the selected number field and store the number with the appropriate country code.
* If the workflow sends duplicates, review the repeat execution option and the rule conditions.
For more fixes, see [Troubleshoot Workflow](/en/integrations/zoho/troubleshoot-workflow).
Save numbers in international format with the country code. An incorrect or missing country code can send the message to the wrong recipient or prevent delivery.
## Activate and verify the workflow
Review the trigger, conditions, and **MessageOnWhatsapp** instant action. Click **Save** to activate the workflow, then update a test record so it meets the trigger conditions.
Verify that:
* The intended WhatsApp number receives the message.
* The message is sent from the record owner's connected WhatsApp number.
* The workflow runs only when the configured conditions are met.
Media attached to a workflow message must be no larger than **15 MB**. Compress or resize larger files before testing the workflow.
## Troubleshooting
* If the action is missing, confirm that **Zoho trigger** is active and the Zoho account is connected to Eazybe.
* If the message is not delivered, confirm that the record owner has the Eazybe extension or app installed and has an active WhatsApp connection.
* If the wrong recipient receives the message, correct the selected number field and store the number with the appropriate country code.
* If the workflow sends duplicates, review the repeat execution option and the rule conditions.
For more fixes, see [Troubleshoot Workflow](/en/integrations/zoho/troubleshoot-workflow).